Showing posts with label die cuts. Show all posts

Wednesday, March 3, 2021

Take a Hike, Inspired by a Shape


Another fun collection Scrap Shotz sent me to play with is the ‘Take A Hike’ collection from Reminisce. I have never had the pleasure of playing with one of the Reminisce collections and I have been missing out - such fun! 

One of the bits of a collection or kit I generally check out first are the die cuts - my favourite! While the Reminisce collections don’t seem to come with die cuts they sure come with some fantastic stickers on a 12x12 sheet (which I popped onto some white cardstock and fussy cut to make die cuts) and cut apart pocket cards (which I fussy cut the images from). A couple of episodes of Departures and some fussy cutting scissors and I now have Take a Hike die cuts. Perfect! 

Circles ... 

For my first layout I was inspired by all the fantastic circles in the collection - mostly from the sticker sheet but some are fussy cut too. Using the Take a Hike circles and some circle stamps in my stash, I created a messy circle infused pattern -working to cover the full background. I stamped some word phrases in and around the clusters of circles and added done green paint to give it even more mess. 

When I went to add my photos to the layout it made sense to continue the circle theme for at least some of them. So those that were far away pics of our crew hiking, looking down at my boots, or a landscape shot I made them circles and added them into the background pattern. 


I topped off the layout with a 4x6 feature picture of myself - this is my happy place. Fresh air, hiking boots on, tech gear, good weather and a trail and friends around me. 

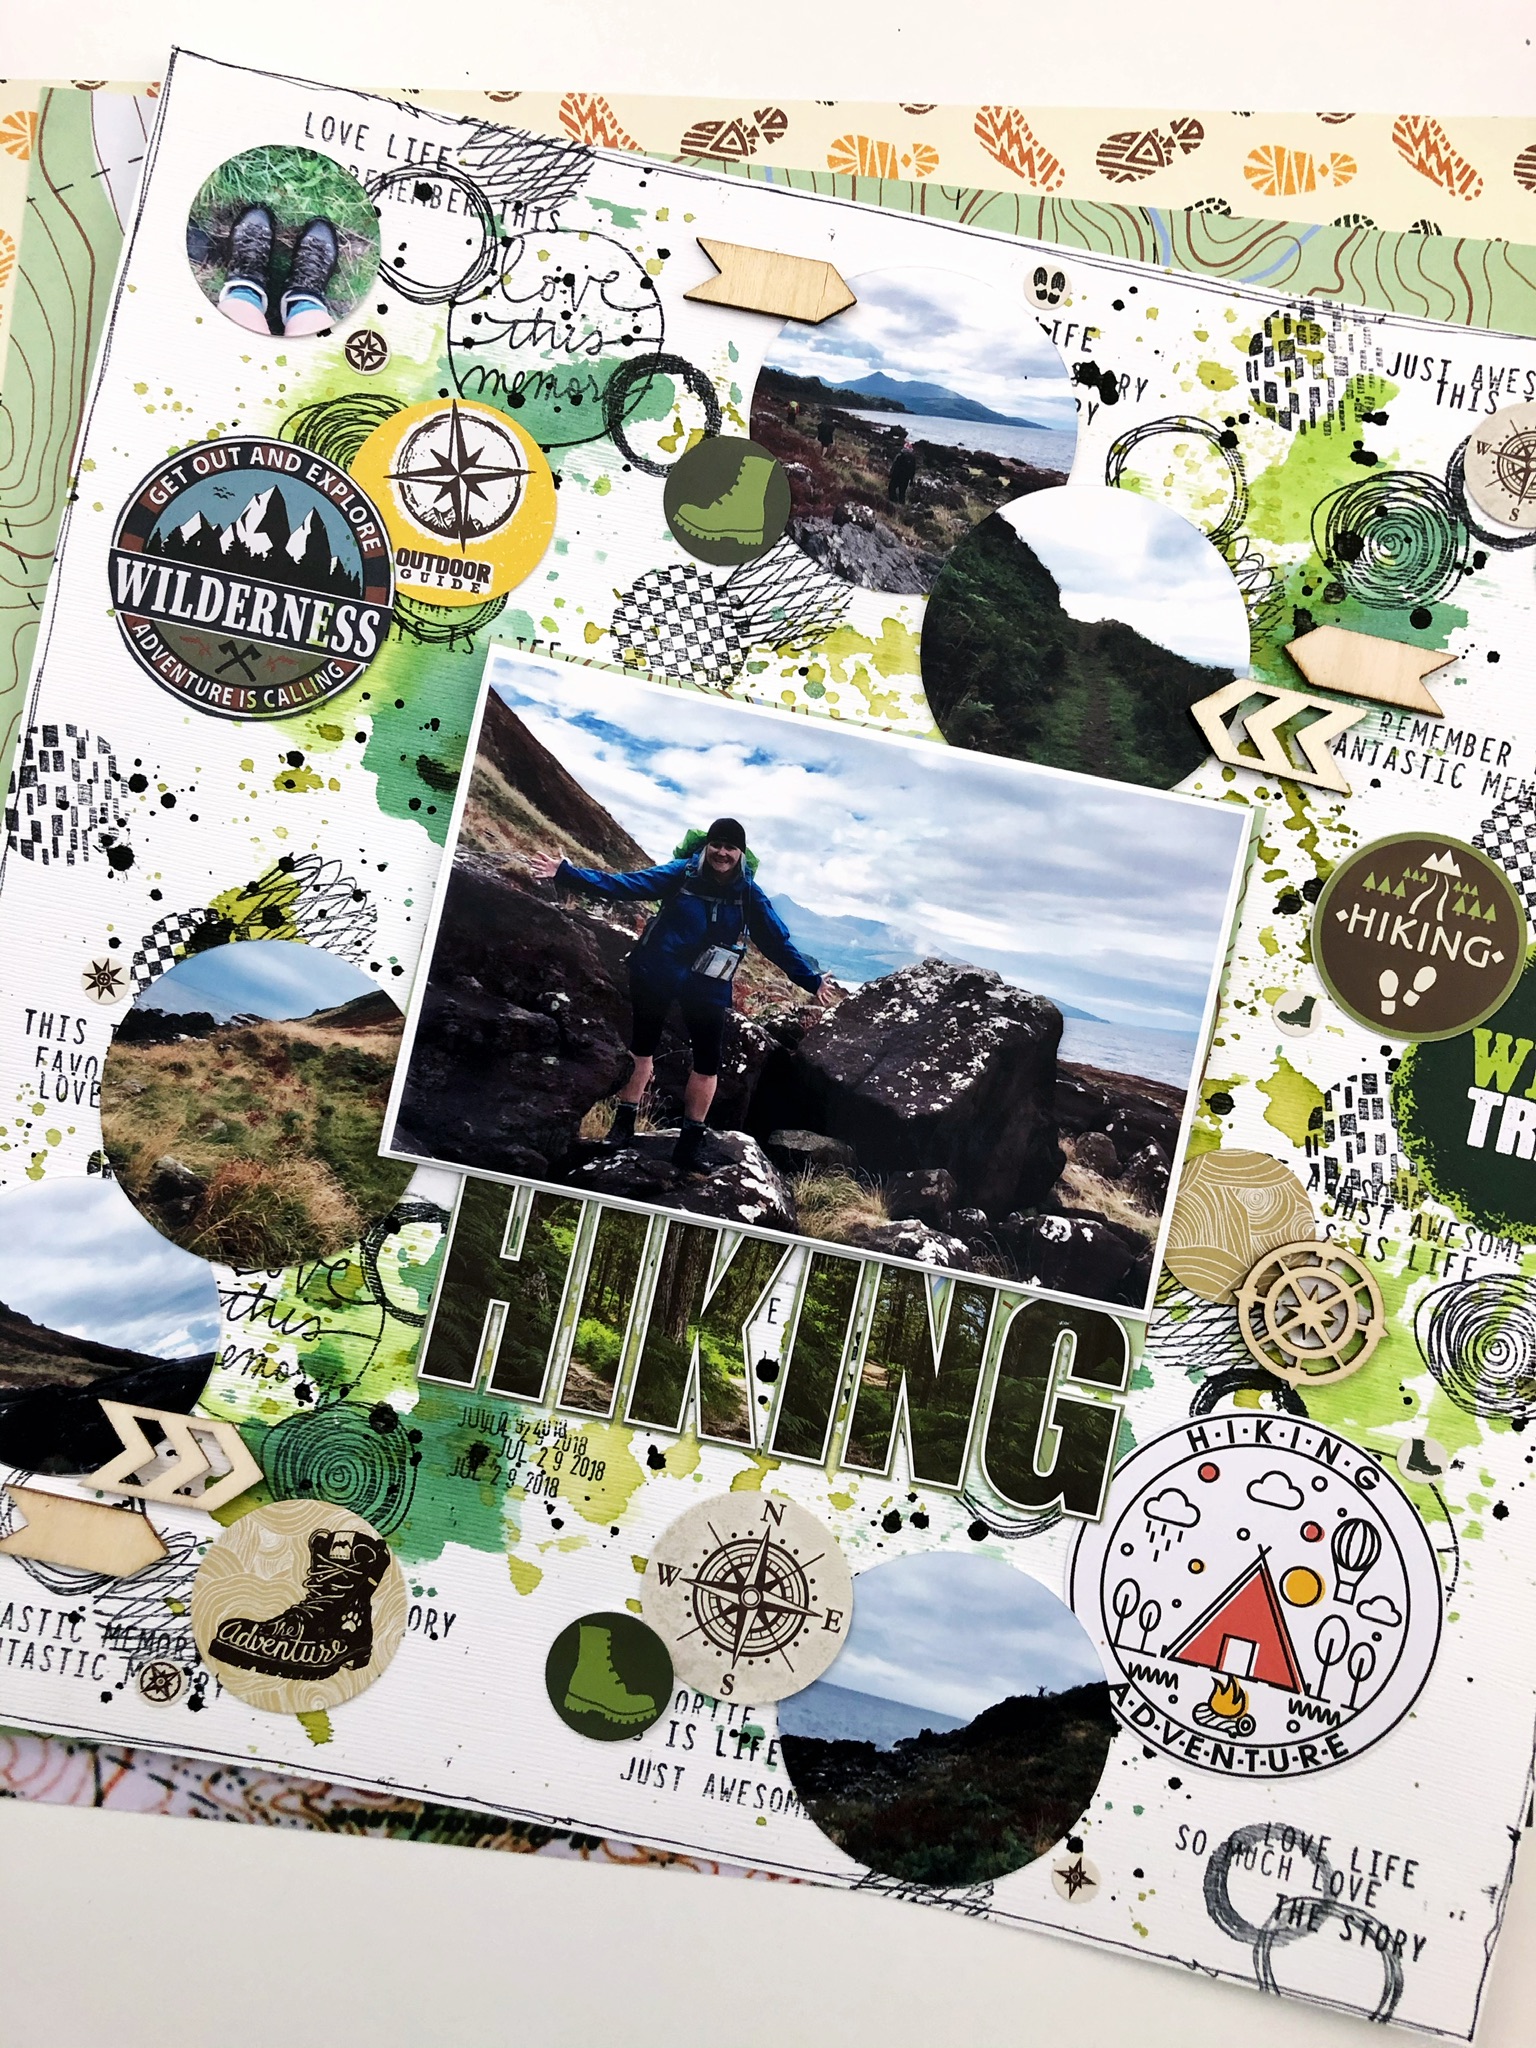
For the title  I used ‘Hiking’ (nothing like stating the obvious eh!) which I fussy cut from on of the large stickers in the kit. I love how bold the title is, even with so much going on in the background. 

To finish it off, I added some black splatters and a few wood veneer bits from my stash. 

Chevrons... 

For my next page, I started by with chevrons. A couple of the stickers had some great patterns - a brown/tan compass pattern, and a French topographic map. You had me at map and compass! I popped these onto cardstock and then using a chevron stamp from my stash I punched as many as I could for my background. More die cuts! 

Keeping most of my design to the right of the page, I set up the chevrons to look like short stripes out both sides of this 4x6 portrait oriented photo. I liked this stripe idea so I kept building on that with the stickers and fussy cut pieces I made into die cuts from the collection. 

From there it was just a lot of fun tucking some patterns here and there, adding a few tree stamps where I had a gap in the chevrons and of course some splatters. This is a hiking photo after all - a little mess is expected. 

For my title I couldn’t resist grabbing the Kaisercraft Chipboard Alphas in the shop that I have been loving playing with. So fun! I covered each with a green/blue Bazzil Cardstock scrap from my stash (most than likely from a past Scrap Shotz kit!) and stamped them each a few times with that tree stamp for a slight pattern. I did the same for a few arrows from the chipboards too and placed those at the top and bottom of my layer of strips around the photo. 


For the finishing touch I messy cut a little bit of each side of the white cardstock away, roughed up the edges with my distress tool and placed the whole thing down on a Mysterious Teal, Bazzil Cardstock. I love how this gives the whole thing a bit of a frame - really drawing the eye to the center. 

I still have loads to play with in the Take a Hike collection and see a grid layout in its future ... 

Thanks for stopping by! 


Tuesday, October 13, 2020

Use ALL the Die Cut Words

Hello, me again playing with the Cocoa Vanilla, Daydream collection (the September Scrapbook Kit). 

I know I have said it in past posts but I will say it again ... I love this collection, it really is so dreamy! I have not spared a single embellishment or touch here or there, no hoarding is possible with this beauty. All of it must find a forever home on a layout. 

In my pursuit to use it all (kill the kit as you may see on social media, a great hashtag to follow btw), I decided to take all of the remaining Die Cut Words and see if I could make a sentence to inspire my next layout. Well, my grammar is a bit off but the sentiment is perfect! 

Here is my layout titled "Lovely, little, big, beautiful, dream together. Our home."


Honestly, I did not do too much more to this layout besides the "fancy" title which I jazzed up a little by tucking the 3 little homes and some florals from the Die Cut pack in and about, added a few floral and heart stickers (which I first backed on white cardstock then fussy cut),and then tucked in a few of the phrase stickers too. The rainbow background pattern did all of the work for this design! 


The photo is an awful one - well I love the photo but it is not of great quality - so I printed it quite small 2x3. Printing small also left loads of room on the page for my long sentence title. (The photo was a just-for-fun selfie I took while we were out house hunting. We didn't know at the time this would be our home. We just moved in a couple of weeks ago!) 

I used one of the tags in the Die Cuts and the Pinkfresh Studio alphas in my kit to document the actual house address, and then tucked that behind the photo so it just peeps out. 


I love how this page turned out - sometimes I am inspired by a photo or a story, and sometimes I let the product do the work. Between the little Die Cut houses in this kit and the fact that such a fitting sentence came together for a big bold title is well .. a Daydream. See what I did there? wink, wink


Monday, July 6, 2020

Kate & Ash Collection - Double Page Layout!

Hello friends! It's Karla back today with a double page layout using the adorable Simple Stories Kate & Ash Collection! As soon as I saw the beautiful images and designs in this line I knew it would be perfect - not only to document fun times with my girls, but also to use it for myself!! I love the retro feel of the colours, and I can't wait to share with you the two page layout I created using the July SCT365- 2020 Sketch. These photos are from a few years ago, but this collection will easily be able to help me document current pics as well - especially since one of my girls is now a teen!


I used some coordinating green cardstock from my stash to create a frame and then layered on the pretty papers from the 12x12 Collection Pack. I love how there are cut apart sheets included as well as an awesome full size sticker sheet! I used fun pieces from the 6x12 Chipboard Sticker Sheet, Ephemera from the Bits & Pieces Pack, coordinating Decorate Brads & the fun matching Washi Tape to decorate my pages! You can find even more coordinating accessories in the Shop!


I chose some of the fun stickers and embellishments to coordinate with my Breakfast In Bed theme and layered my matted photos to match the sketch. I even used some of the awesome Paper Rose Shaker Mixes and some sequins from my stash to add more pops of colour! I love how the Decorative Brads include several cardstock ephemera pieces with brads attached!


I added some of the Dina Wakley Gloss Sprays onto both sides of the layout, matching the colours to the papers and using a piece of packaging to smoosh the paint onto the page. I even lifted the nozzle out of the spray bottle to add some fun splatters! I used some gold Thickers from my stash to add a title and cut one of the 3x4 journaling cards from the cut apart sheet in the Collection Pack.


The 12x12 Sticker Sheet from the Pack has lots of fun elements, including various sentiments that work great to layer on. I used the absolutely adorable Mama Elephant Boba Tea Shaker Die Set to create a cute little dimensional cup, adding a fun brad to the top! You can see all kinds of more fun cards using this Shaker Set in last week's Facebook Live!! 


Thanks so much for stopping by today! Be sure to check out the full Simple Stories Kate & Ash Collection in the Scrap Shotz Store, and be sure to join us for Live Videos on our Facebook Page!! We also have a Facebook Group - and we'd love to see what you're working on! Wishing you a crafty and very happy week ahead!


Wednesday, December 18, 2019

Create Anchors for Embellishments

Are you addicted to embellishments as much as I am? There are so many amazing embellishments in the November Scrapbook Kit and I simply want to use them all - die cuts, stickers, chipboard, enamel dots, paper bow clips and more.

My desire to use way too many embellishments on my layouts has made it necessary to create some go-to page designs in my scrapbook repertoire that allow me to do just that - use way too many embellishments. These page designs focus on creating "anchors". A place where an embellishment can naturally be nestled or layered - not just floating in background paper space. 


One of the page designs I use often is this layered circle look. So simple! I cut a variety of sized circles (just the outline in this case but the full circle works too) of matching patterned papers (usually from scraps) and layer the circles down or across or diagonally on the page. For this layout, I layered the circles down the right-hand side and used one large circle on the left to sort-of frame my main 4x6 photo and give the layout some balance. You could also create a pattern of circles on the entire background - this is especially fun for bathtime photos, sort of like bubbles!

Once your circles are down, add you photos - I like to use a little foam to pop the photos up a little so they do not get lost in what will be embellishment organized chaos - and then start embellishing! Just make sure some edge of the embellishment is touching or "anchored" on one of the circles. Don't stop embellishing until you think you have way too many ... add a few more, then stop. 


You will notice I kept the background paper pretty plain on this layout - I knew I would have lots going on with the way too many embellishments and the circles so chose one of the Simple Stories, Winter Farmhouse coordinating dot papers from the kit as the background. I love how the simple and faint dots of the background paper also add another circle element.  

Don't have a circle cutter? Do not fret. This "anchor" concept can be created with squares of pattern paper, strips of paper (try washi or the banding strip), or stamp some words or phrases. I also love hand-drawn circles for this concept! Simply grab a few different sized cups, put them mouth down and trace with a black journaling pen - trace each a few times and make one of the lines a little less perfect than the others to give it a little something-something. 

Thanks for stopping by - I hope you are having a great December! 


Monday, August 19, 2019

Faux Layered Background Die Card

Hi All,

Rosie here sharing a card using the Mama Elephant Circular Grid die


This Mama Elephant die cuts 12 circles, it works great with all the cute Little Agenda stamps Mama Elephant makes. After watching this Jennifer McGuire video I was inspired to create a layered background.

I decided to create a rainbow coloured background:


I cut panels from white, red, orange, yellow, green, blue, indigo and violet card stock from my stash.


I started by layering the red panel behind the white panel, slightly offsetting it to one side so you can see a slice of red from the front.


I used liquid adhesive for the layers since it takes a little bit of time to dry so I could adjust the layer until it was right where I wanted it.

I continued adding the layers, in rainbow colour order, alternating from left side to right side. I used the white die cut as the guide for trimming the offset layers.


Once I finished adding all the layers I adhered the entire panel to a 5 1/2" x 4 1/4" white note card. I die cut "happy" with a die from my stash in black card stock and white heat embossed "birthday" from the Mama Elephant Happy Everything stamp set.


I finished it off with a coating of Nuvo Crystal Glaze over the happy die cut.

I love how this turned out, so much fun to make!


Saturday, June 22, 2019

Less is More, Sparkle City Sure Does Sparkle

Hello crafty friends!

This month the amazing Scrap Shotz team sent me some of Shimelle's Sparkle City collection to play with and, wow, talk about colour and vibrant and silly and fun. My favourite!

As with all of Shimelle's amazing collections, this one is full of purples, pinks, reds, greens and all the amazing patterns. The puffy stickers are gorgeous and the die cuts are so cute (think smiling cartoon pigeons and little french fry containers) - some of them are even holographic!

Take a peek ...


To be honest with so much colour and so many options (the paper pad alone has 48 sheets), I was a little overwhelmed. I wanted to play with all the things. So I started small. Small photos and a small amount of product. A 'less is more' approach to get the Sparkle City spark going.

My approach ...

In my photo stash, I had two tiny (2x2 inch) colour photos of my crazy nephew following me around a tourist shop in Victoria, B.C. wearing a plastic horse mask. I was laughing so hard at his antics I could barely take the photos  - so they are horrible. But good photo or not, this memory had to be scrapbooked. Besides how good does a photo of an 11year old in a plastic horse mask need to be?!

Now usually with a bright collection, I use neutral or even black and white photos and very large photos to help bring some calm to the layout. However, this is Shimelle's collection and I feel she is all about colour and would appreciate a more vibrant approach, so I went for it - a big colour, but a small product and photo, approach.


You can probably see that I used very little product - less is more with the super bright and cute collections for me. I used 4 die cuts (the camera and the little city building), two small scraps of paper behind my photo and roughed up the edges to bring some mess and dimension to the layout, 3 tiny stars, 3 phrase stickers and a title. A lot goes a long way with this much sparkle!


I really wanted to draw the eye to the tiny photos so decided to place the photos cluster on a two-tone watercolour 'mess'. I chose purple and red as those are two of the colours of the little die cut buildings but also because I just love these two colours together. I simply found some red and purple watercolour paints in my stash and used the packaging technique to smoosh a puddle of wet paint onto the page. Yes, smoosh is a technical term - all the mixed media gals are using it (wink, wink). 


Once assembled, I finished off the layout with some journal pen stitching around the border of the page - this is where you literally freehand lines down each side of the page with a couple of random squiggles as if the "sewing machine" got all caught up. Then added a few matching purple and red splatters. I like white space but only so much. 

I love how this layout turned out! Off camera and before it went in the page protector, I added some freehand horizontal lines below the photo to the bottom of the page and added my journaling. I was chuckling to myself as I wrote- what a ham my nephew is. Oh he makes me laugh! 

Now that I have cracked open the Sparkle City vault - I am dying to make more, off I go!  Hope you all have a few mins to get crafty this weekend too. 


Wednesday, June 5, 2019

New Product Review - Lawn Fawn Center Picture Window Cards

Hello friends! Karla back today with three super cute cards using the brand new Lawn Fawn Center Picture Window Card Die and Add On. As soon as I saw these die sets I knew I would love using them... and I do!! There are just so many possibilities, and you can use this card design with any of the stamp sets you have already, or with the cute new ones I’m featuring here 😉


The first card uses fun stamps from the new Say What Pets Set. I coloured the images with Copics and created a sweet scene on both the front and inside. The Add On set has lovely stitched rectangles sized to perfectly fit the front, back and inside panels. I used some border dies from my stash to add grassy areas to the front oval and inside base. The T-shaped scoring die, included in the main die set, works perfectly to configure any border to fit the Center Window area.


The fun little stackable dies add so much dimension and are so easy to assemble!


I added an area on the back of the card to write a little message and stamped a greeting with another Lawn Fawn Set, Butterfly Kisses.


For the next two cards I’m using the new Lawn Fawn Smooth Sailing stamp set. I grew up in Nova Scotia, so lighthouses and sailboats have a special place in my heart. For this card I wanted to create a nighttime scene, so I used the star and moon die from the Center Picture Window Card die set. I love the little accessories that come with this set and the Add On! The Lawn Fawn Sparkle Spring Cardstock gives a little glimmer to the card and I used the oval diecut from the Center Picture Window Card Die Set to cut a focal area for the front of the card.


I used the Lawn Fawn Wavy Sayings Stamp Set to add a thank you sentiment to the inside of the card, stamped on the banner included in the Center Picture Window die. Seriously, there are a lot of dies included in this set!! The sweet little bunny in the Smooth Sailing set is so sweet! I stamped the stars from this stamp set on the sailboat for a cute little pattern before I coloured in the images. The tiny star diecuts from the Center Window Picture die add just another layer of detail to the inside folded window.


Lastly, I wanted to make a more masculine card that I could give to my hubby for Father's Day coming up. I love the Lawn Fawn Really Rainbow Scallops Paper and used the Add On die to cut a stitched rectangle before stamping a sentiment from the Smooth Sailing stamp set and adding the anchor from the same set.


Inside, I used the Wavy Sayings stamp set on the banner again and created a cute little ocean scene with the smaller boat, lighthouse and clouds from Smooth Sailing, while adding a tiny diecut sunshine from the Center Picture Window die set. I used a stitched hill die from a set in my stash to create a wave effect at the bottom of the card. 


Supplies:

This card base goes together so easily, and I love how the recipient will be so surprised when they open it up!! I know you’re going think of many more ways to use the Lawn Fawn Center Picture Window Card Die and Add On, so happy crafting! Thanks so much for stopping by today and have a fantastic week 💕

Hugs, 
Karla

Wednesday, October 31, 2018

Getting Your Planner Ready For Christmas!

Hello friends! It's Karla back with one more post using some of the fabulous new products available in the Scrap Shotz Store - Kaisercraft First Noel Collection and the Sizzix Tim Holtz Thinlets Die Swirling Stars. Everytime I looked at the Kaisercraft Sticker Booklet all I could think about was how awesome it would be to decorate my planner for December - there are over 800 stickers in it! I used lots of stickers along with the beautiful First Noel papers and some diecut ephemera pieces as well.


I cut one of the 12x12 papers and punched holes in it to fit right in my A5 Personal Planner, making a little tabbled divider. The diecut ephemera pieces were great to use with some large paperclips to tuck into the planner pages.  


I used the gold numbers from the sticker booklet to number each day and cut out some of the images from the paper, using coloured pencils to add some colour.


The black stickers and sentiments from the booklet were great to add directly onto each day.


I even added stars using the Sizzix Swirling Star diecuts as a stencil with some Distress Oxide Ink.


I added some doodles and the Christmas Eve sticker from the 12x12 sticker sheet. A little red star cut from the Sizzix die set adds another pop of colour.


Now my planner is ready for adding in all the fun December details as they arise! 


Thanks so much for stopping by! If you haven't checked out the last two posts featuring these fun supplies, you can find them HERE and HERE. Be sure to head over to the Scrap Shotz store to check out the Kaisercraft First Noel Collection and the Sizzix Tim Holtz Thinlets Die Swirling Stars, and don't forget you can always browse what's new HERE! Have an awesome, crafty week!