Thursday, February 25, 2021

Kaisercraft Chipboard Alphas


Have you got your hands on the Kaisercraft Chipboard Alphas yet? Oh my wow, I am having so much fun customizing these to match my layouts! 

Sharing the four layouts I have had the pleasure of creating so far using these chipboards and the Kaisercraft Explorer collection. Hope to inspire you to give them a try! 

Pattern Paper and Stamps: 

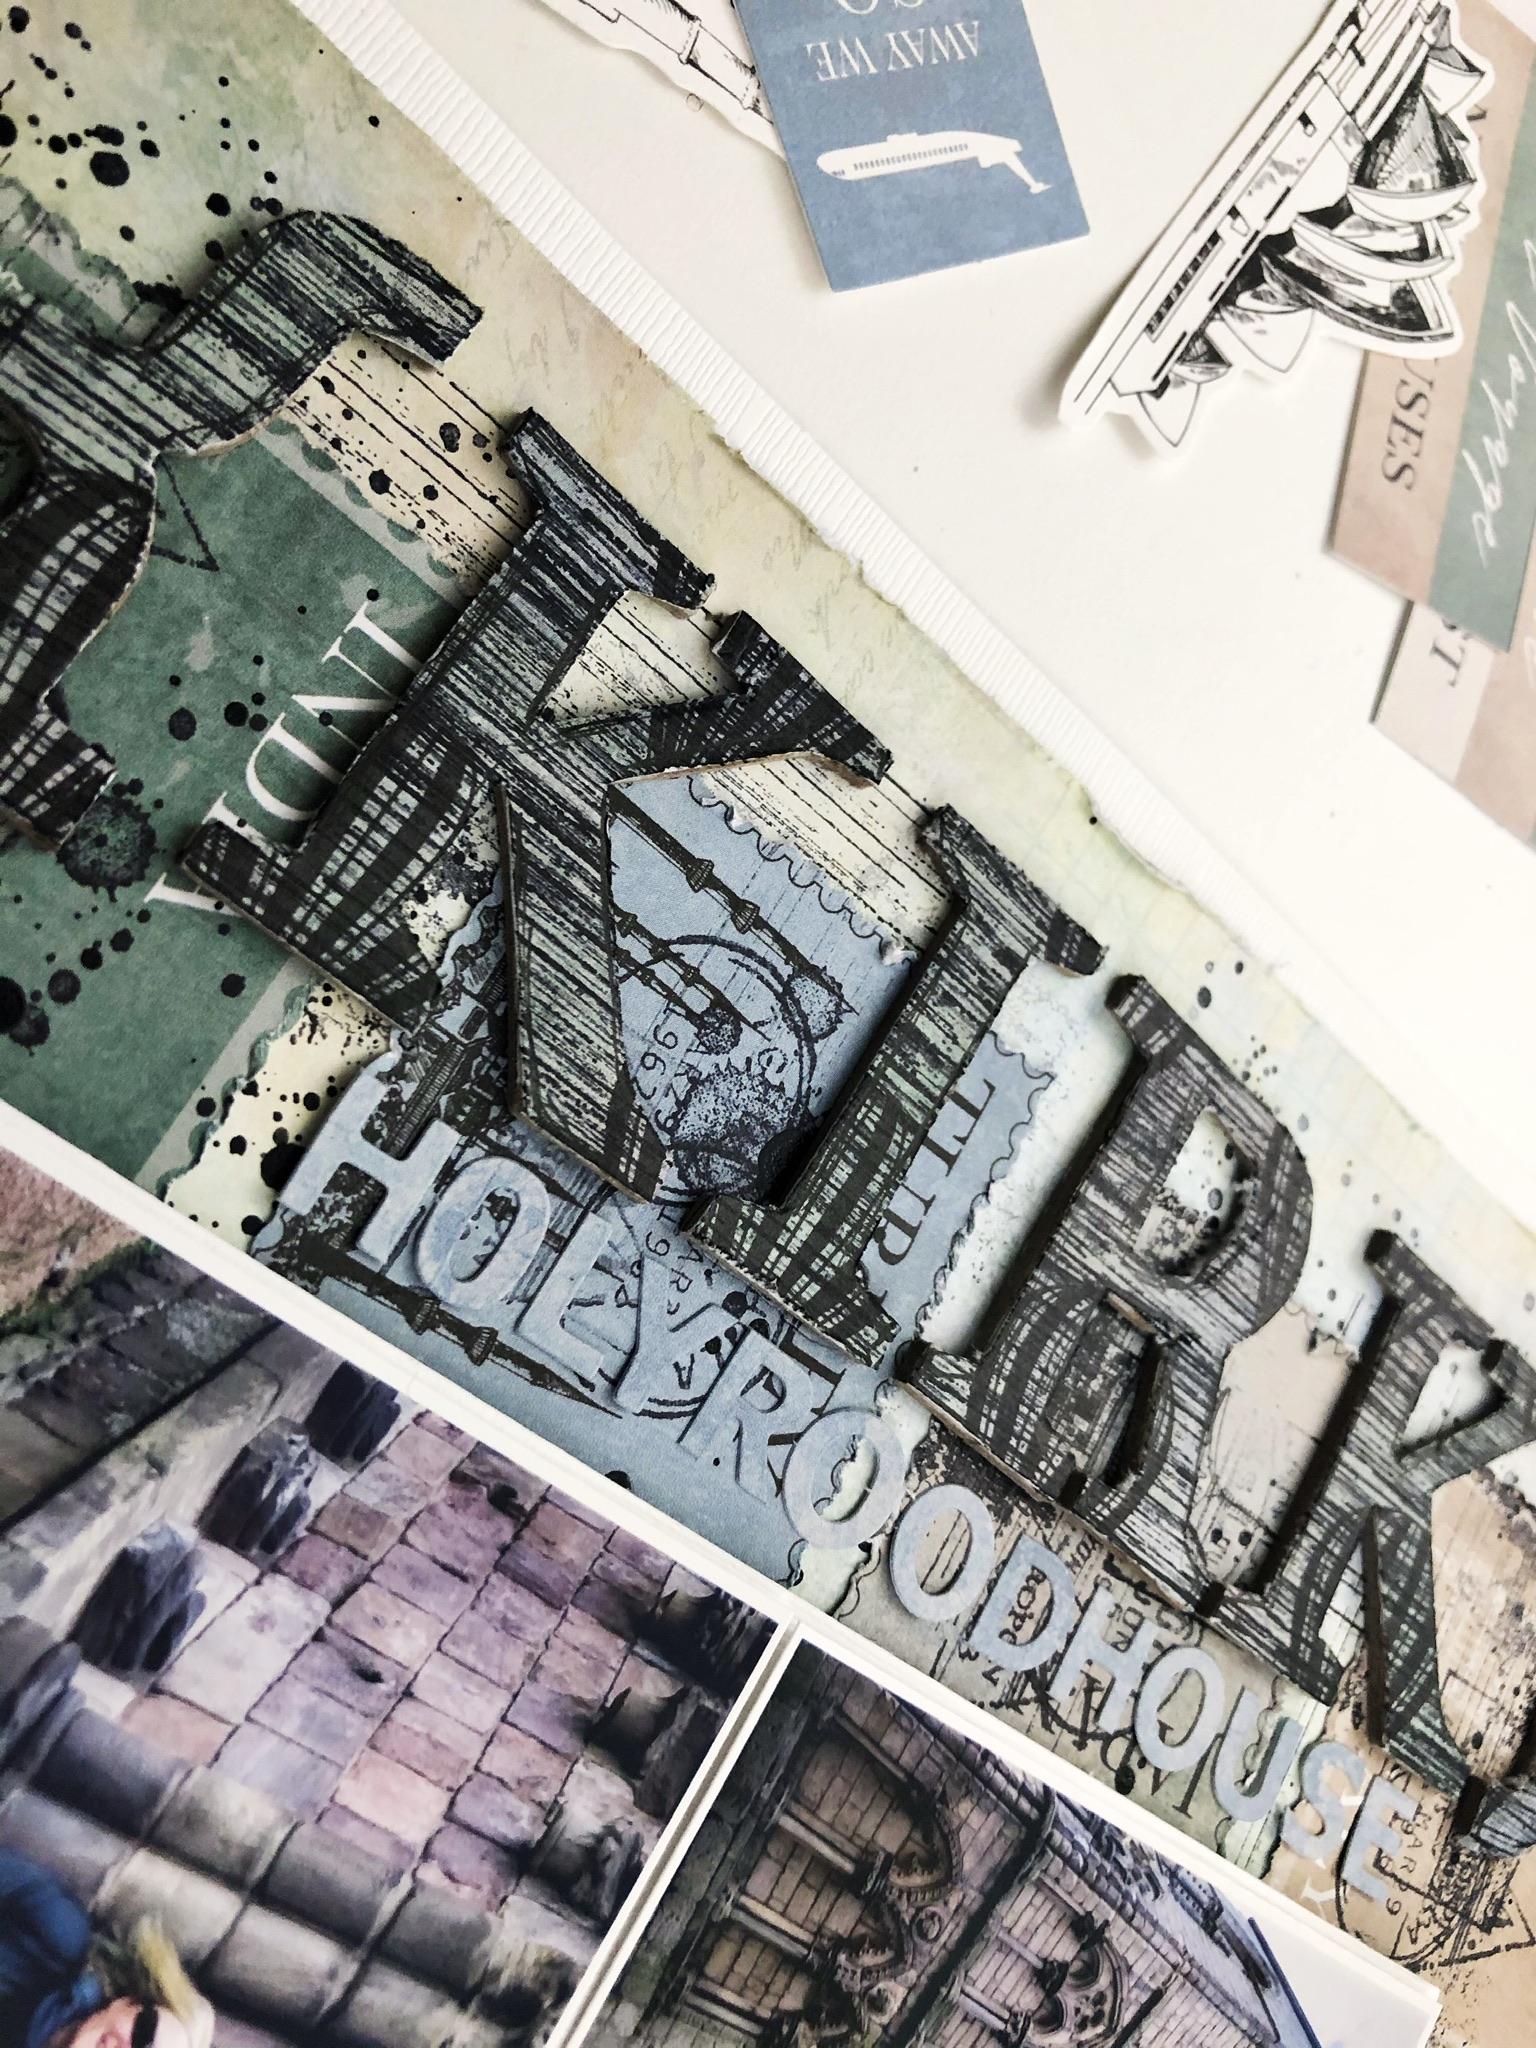
For this layout I customized the chipboard alphas in the word ‘Kirk’ to match using both pattern paper and stamps: 

1) covered each letter with the blue air balloon pattern paper of the collection (Flight) using liquid glue

2) flipped them on their face once the glue had dried and cut around each letter with a craft knife. The chipboard gives the pen a place to push up against making this quick work

3) stamped the front of each letter over and over again with this grungy stripe stamp from my stash in Staz On Jet Black

4) using a black journalling pen I messily traced the outline of each letter on the edge of the pattern paper 

Stamps and Watercolour Paint: 

For my title ‘ROAM’ I used a stamp and some watercolour paints:

1) using the suitcase stamp from the Wild Whisper Designs, Where to Next? set and some Staz On Jet Black to just stamp over and over on the front of each alpha

2) scribbled some Vicki Boutin Art Crayon in blue/grey onto plastic, added some water and after mixing it up with a paint brush used it to paint each letter 

Strips of Pattern Paper and Border Stickers:

For this title ‘Wallace’ I focused on the pattern paper and stickers of the Explorer collection:  

1) cut thin 1/4 inch strips from my favourite patterns from the papers, branding strips and some of the border stickers from the collection 

2) covered each letter with adhesive glue 

3) messily laid down the strips of paper and border stickers in no particular order on each letter 

4) once the glue dried, I flipped the letters over and used a craft knife to cut around each letter to get rid of the excess bits of paper and sticker bits 

Some of my letters got a few random black splatters when I added those to the page - a fun touch! 

Stamps and Splatters: 


For this layout I used the chevron bits and pieces of the chipboard set:

1) stamped a bunch of travel inspired stamps from my stash in a messy way all over the front of each chevron using Staz On Jet Black 

2) scribbled some Vicki Boutin Art Crayon in blue/grey onto plastic, added some water and after mixing it up with a paint brush used the paint brush to splatter the letters 

3) squeezed some Nuvo Crystal Dots Black onto plastic, added a spritz or two of water, then used a paint brush to splatter the letters 

So many possibilities for making these chipboards perfect for your next layout. I should mention I didn’t prepare the letters in anyway with Gesso or anything. Also the chipboard set includes punctuation, arrows and as shown above chevrons too. 

Thanks for stopping by! 


Saturday, February 20, 2021

Enjoy the Ride Layouts and a Card - Part 2

 Hello! Carolyn back again with a few more layouts and a card using the January Kit. This kit features the Altenew 'Enjoy the Ride' Collection. It is so pretty I can't wait to show you!

Ride Baby Ride


Have you been playing along this weekend with our online crop? If not, head over to the Facebook group and join in on the fun. This is the layout I featured last night for the Cut File Challenge. Make any project using a cut file of your choice. If you would like to use the Pie Chart one I used, you can download it free here. Make sure you upload your project to the challenge album to be entered to win a prize!

This layout was inspired by the bicycles in the collection and the fact that the picture matches the colours in the kit. I chose a cut file that looks like a wheel. The cut file is made by Juliana Michaels and has given me permission to share the file with you. If you're a card maker, you will want to check out her work! I resized the circles to three different sizes and backed each section with a different patterned paper. 

To create the background, I covered the white cardstock with gesso. I smooshed watered down pink paint with a piece of plastic around the page. I then splattered a darker pink and a green around the circles. I propped up the picture and one bicycle with foam. The purple letters in the title come with the kit and the green letters are by Simple Stories and are from a previous kit. The remainder of the pieces come from the two ephemera packs and chipboard stickers.

Cotton Candy


This was actually the first layout I made with the kit. I just love the blue pattern paper. I didn't want to cover too much of it up so I put my pictures more in the middle. The middle paper is just the reverse side of the pattern paper. I tore the paper, layered some chipboard and flower ephemera, added a title and done! So easy yet one of my favourites.


Wonderful Happy Day


This layout began by trying to build a wreath around a circle. I started painting the circle and it went a little wonky so I changed it into a butterfly. I used some embroidery floss to stitch the outline and layered lots of flowers from the ephemera pack. I even made eyes using two O's from the chipboard letters.


Miss You Card


I used some of the leftover pieces to make this cute little card. The Parakeet cardstock worked really well to pop out the title and ephemera. 

Thanks for checking out the projects! I hope you'll join us for the crop today!

Thursday, February 18, 2021

"Enjoy the Ride" Altenew Scrapshotz Kit

 Here is another layout using the awesome Enjoy the Ride line from Altenew. I  did a bit of modification with the chipboard title, cutting off the bottom words (Happy Day) to use it here. The leafy die cuts were in the ephemera pack and I like the way they break up the hard line of the photo mat. A border drawn with a black pen to frame the layout and it's complete.

I made some cards with the Altenew Mini Thanks Stamp set. I was able to use the new Tim Holtz color, Kitsch Flamingo to ink the edges of this one. I stamped the laurel leaves multiple time and popped them up below the white embossed sentiment. Topped it off with flowers from my stash and used Nuvo Crystal Drops in Carnation Pink for the flower center and accents.

This next card also used the Mini Thanks Stamp, along with a pink ribbon to highlight the pink flower centers in the patterned paper. I used green enamel dots to accent the sentiment.

I love the versatility of the sentiments in the Altenew Fancy Greetings Stamp Set. I stamped the "sending hugs" with Rustic Wilderness Distress Oxide, then used the Distress Embossing Powder in the same color to give it shine. This time the Nuvo Crystal Drops were Apple Green.

For this simple card, I gold embossed another sentiment from the Altenew Fancy Greetings set and die cut a flower from a Tim Holtz Foliage die from the photo mat before mounting my panel. I do this a lot, as no one sees under the panel anyway, and you can't let great gold foil cardstock go to waste!

That's it for me today! I hope you're all ready to get crafty with us tomorrow, February 19 at "The Great Scrapshotz Staycation Crop!" See you there!


Wednesday, February 17, 2021

Enjoy the Ride Layouts and a Card

 Hi scrappy peeps! Carolyn here today with some scrapbooking layouts using the January kit. This kit features the beautiful Altenew 'Enjoy the Ride' Collection. There are so many big flowers on these papers just asking to be fussy cut! 

Theo's Baby Shower


I made this layout using the February sketch from Creative Scrapbooker Magazine
I used a Vicki Boutin stencil from a previous kit to make white gesso circles in the background. The pictures are backed with the Sunbeam cardstock in the kit. I roughed up their edges. The flowers and leaves are all fussy cut and some chipboard letters and stickers finish off the layout. Here is a link to the papers in this kit.


Blossom and Grow

Zoom in on those socks! How cool is it that they match one of the papers in the kit? I didn't want to let the page get too busy so I built it on white cardstock and put just two thin strips of paper behind the pictures. This layout is so easy to make. Rip some paper for the corners, fussy cut the leaves and flowers, splatter some paint and voila!

 I also used the add-on stamp to add some black ink branches. I tucked a piece of ephemera behind the flowers on the bottom right and used a chipboard title. 


Inspiration is Everywhere

This layout began with the picture. My daughter actually took this selfie crawling into her fort. I wanted to make it look like she was peeking out from under the paper. I tore the paper so it fit around her head and added some more to the lower half of the page to balance it out. I layered some of the add-on flower ephemera and chipboard pieces. 

The final touch was to drip some paint down the layout to go with the paintbrush sticker and journal about her creativity. 

Thank-you Card

I stamped the sentiment using the add-on stamp. The flowers are made from washi tape. I used a Stampin' Up punch to make the petals. It is actually a punch with a dove and the petal is the dove's wing. I added many petals together to make the flower. I used a separate punch to create the centers of the flowers. I drew the stems with a marker and placed a piece of chipboard on top. 

That's all for now - but there will be more this weekend! I hope you'll be able to join us at the 'Staycation' crop in the Scrap Shotz Facebook Group. Friday 6pm - 10pm and Saturday 10am - 6pm. Lot of inspiration, games and prizes! Have a great day.


Monday, February 15, 2021

2021 Flipbook using Simple Stories Hello Today Collection!

 Hello friends! Karla back today with a look at the flipbook I'm creating for 2021 using the Hello Today collection from Simple Stories! I really am loving working with this collection and my plan is to use each monthly cut apart page included in the 12x12 Collection Pack for a spread in the flipbook and then the rest as a couple of 12x12 scrapbook layouts. So far this has been an easy process and, since there are tons of embellishments to choose from, I am loving mixing and matching it all! If you missed my post from last week where I created two layouts from the January cut apart page you can find that HERE. Here's a look at the front of the album. I love these Flipbooks because you can add as many pages as you like! I pulled a 6x8 piece of paper from the  Paper Pad to decorate the cover and added some stickers and ephemera along with a ribbon from my stash.


The Flipbook comes with a selection of page protectors and I used the full size 6x8 one to add another piece of paper from the Paper Pad. I used some more chipboard and stickers to decorate the page. There are so many sticker options including the Puffy StickersSticker Book, Chipboard Stickers and Combo Sticker Sheet (which also comes in the 12x12 Collection Pack).


Here is the January layout and you can see you can easily design these as you would a mini page (as in the 6x8 page on the left) or pocket pages. I cut apart the journaling cards and then embellished with more stickers, Bits & Pieces Ephemera and Foam Stickers. 


Here is a look at the February spread. I decided to make these page more about Valentines and focus on the hearts, but it definitely is not Valentine themed and you could add any elements and stickers from all the fun embellishments. 


The left page is a 3x4/4x6 pocket page layout and I first cut apart the journaling cards from the 12x12 sheet in the Collection Pack. I layered my photo on some of the paper from the Paper Pad and added a sticker from the Sticker Book along with a puffy Love sticker. I grabbed a little valentine paper and fussy cut it to add with the Bits & Pieces Ephemera flowers on the heart journaling card.


I added a Happy Valentines Day strip from my stash and journaled on this fun card. I printed some of my photos at a 2x3" size so I could use more of them on these pages. The Rise & Shine sticker was just right to add to the delicious breakfast pic! You can also find the Chipboard Frames and Simple Pages Elements in the shop now too!


Here's a look at the Live Video I shared on Facebook where you can see all these goodies and how to make the January Page closeup! 


If you didn't already know, we are having a fabulous FREE Online Crop in our Scrap Shotz Paper Crafting Facebook Group on February 19th & 20th!! Be sure to join the group so you don't miss out! 

Thanks so much for stopping by!! Be sure to check out the Hello Today collection in the Scrap Shotz Store! Remember - if anything is out of stock you can sign up to be notified by email as soon as it is back in! Have a wonderful week and weekend ahead friends, and happy scrapping!


Friday, February 12, 2021

Enjoy the Ride - Altenew - Scrapshotz Kit

 Hi there! I was so excited to get the Altenew Enjoy the Ride Scrapshotz kit to play with!The vibrant colors of this kit reminded me of tropical vistas and I looked to a photo of a sunset in Puerto Vallarta. I used blooms and leaves from the ephemera pack and word strips from the chipboard elements. The edges were inked with Distress ink and the chipboard thickers were included in the the kit, too!


Then I got into using the ephemera for cards. I used some scraps of patterned paper, but also some pages from the Altenew Enjoy the Ride 6x6 paper pad that was a great add-on this month. You can still pick it up here.


 I popped up the die cuts and used Nuvo Crystal Drops on most of these. I love the drops and they find their way on to most of my cards. They were also treated to a bit of shine with the Zig Wink of Stella Clear Glitter Marker.

This card also got a little love splatter from the Dina Wakely Gloss Spray in Eggplant. The sentiment here was cut out with the Taylored Expressions Well Rounded Die.

These next cards used the Altenew Fancy Hello Die. What a bit of elegance! Their dies cut so cleanly and are a joy to put down.


What a fun line to work with! I will keep dreaming of tropical views and temperatures as we make our way through this crazy polar vortex that the prairies are stuck in. That is the best reason to stay in and get crafty! Hope you can do the same. Thanks for stopping by.


Thursday, February 11, 2021

Using Sketches with the Simple Stories Hello Today Collection!

 Hello friends! Karla back today with two layouts using the amazing Hello Today collection from Simple Stories! I just love how they've created this collection!! You can use the 12x12 Collection Pack, which comes with a paper for each month of the year and a full size sticker sheet, to do a whole year's worth of scrapbooking. You can cut apart the wonderful journaling cards and use them in a Flipbook or Project Life type pocket album - or you can use them on 12x12 layouts as I'm doing here!! Or if you decided you wanted to use the B sides you'll find beautiful patterns to mix and match. You can find a VIDEO below so you'll see exactly how this page came together! (Plus be sure to read to the bottom where you can find more exciting NEWS!)


I decided to use both the sketches from January and February for my layouts! First up - and I love this design - is the January Sketch from the Creative Scrapbooker Magazine Sketchy Challenge Facebook Group!

I love the foam letters and I love how well they stick to the page!! There are so many great elements in this collection - images you'll definitely be able to use all year! You can even pick up the 12x12 Combo Sticker Sheet separately - or if you want an extra with your collection pack ;) 


I love this sketch for placing my photos in a grid! I printed my photos with my Canon Selphy, using the Project Life app to collage them to 3x4's. My daughter got a new Instax Printer for Christmas and she sweetly gave me her little Polaroid pic!


I combined Bits & Pieces Ephemera with Puffy Stickers and the amazing (it's huge!!) Sticker Book for lots of fun details around the page! 


I added some splashes of Distress Oxide Sprays in Lucky Clover and Speckled Egg as well as some of the awesome Avery Elle White Ink Spray for a splash of colour! 


Be sure to check out the Process VIDEO HERE!


I was having so much fun with this collection that I had to do a second 12x12 layout with the January Paper from the 12x12 Collection Pack and all the fun coordinating accessories! This page is actually one using photos in December - but you can see it's easy to mix and match cards from the sheets of patterned paper. 


Here's a look at the February Sketch! I would never have thought to do a title wrapping around my photos - but I love how it turned out!


I used a 6x8 sheet of the Paper Pad to mat my photos on and grabbed stickers to create my title. The 'Birthday' word is actually from a Thickers set from my stash - but I felt like the colours matched so I went for it! 


I added some stickers from the amazing Sticker Book and 12x12 Sticker Sheet (either from the Collection Pack or purchased separately) and layered pretty flowers and a border sticker.


I decided to add in a bit of mixed media with the Lucky Clover and Speckled Egg Distress Oxide Sprays again and then continued my title elements around.


I wrote in my journaling on one of the cut apart cards that actually said 'Goals' at the top - and since I didn't want that on this page I used the numbers from the Bits & Pieces Ephemera to layer on. I really love that I actually did a page about me, hehe!

Thanks so much for stopping by!! I'll be back next week to share how I'm using this collection in a 2021 Flipbook as well. Be sure to check out the Hello Today collection in the Scrap Shotz Store! Remember - if anything is out of stock you can sign up to be notified by email as soon as it is back in!!

And don't forget today is our Facebook Live at 3 pm MST!! That means I'll be showing you lots of new goodies we have in the store AND we will make a fun card today using Deco Foil and Toner Sheets - along with some adorable Mama Elephant Toasty Friends stamps!! 

And PS 😉 We are having a fabulous FREE Online Crop in our Scrap Shotz Paper Crafting Facebook Group on February 19th & 20th!! Be sure to join the group so you don't miss out! Have a wonderful week and weekend ahead friends!