Friday, March 26, 2021

Simple Stories Simple Pages Dreamer Page Kit!

Hello friends! Karla here today with a look at the gorgeous New Simple Stories Simple Pages Dreamer Page Kit!! This kit contains almost everything you need to create 4 beautiful pages - that's 2 double page layouts that you'll be able to get into your album! This kit coordinates perfectly with the Simple Vintage Cottage Fields Collection.... just sayin' 😉


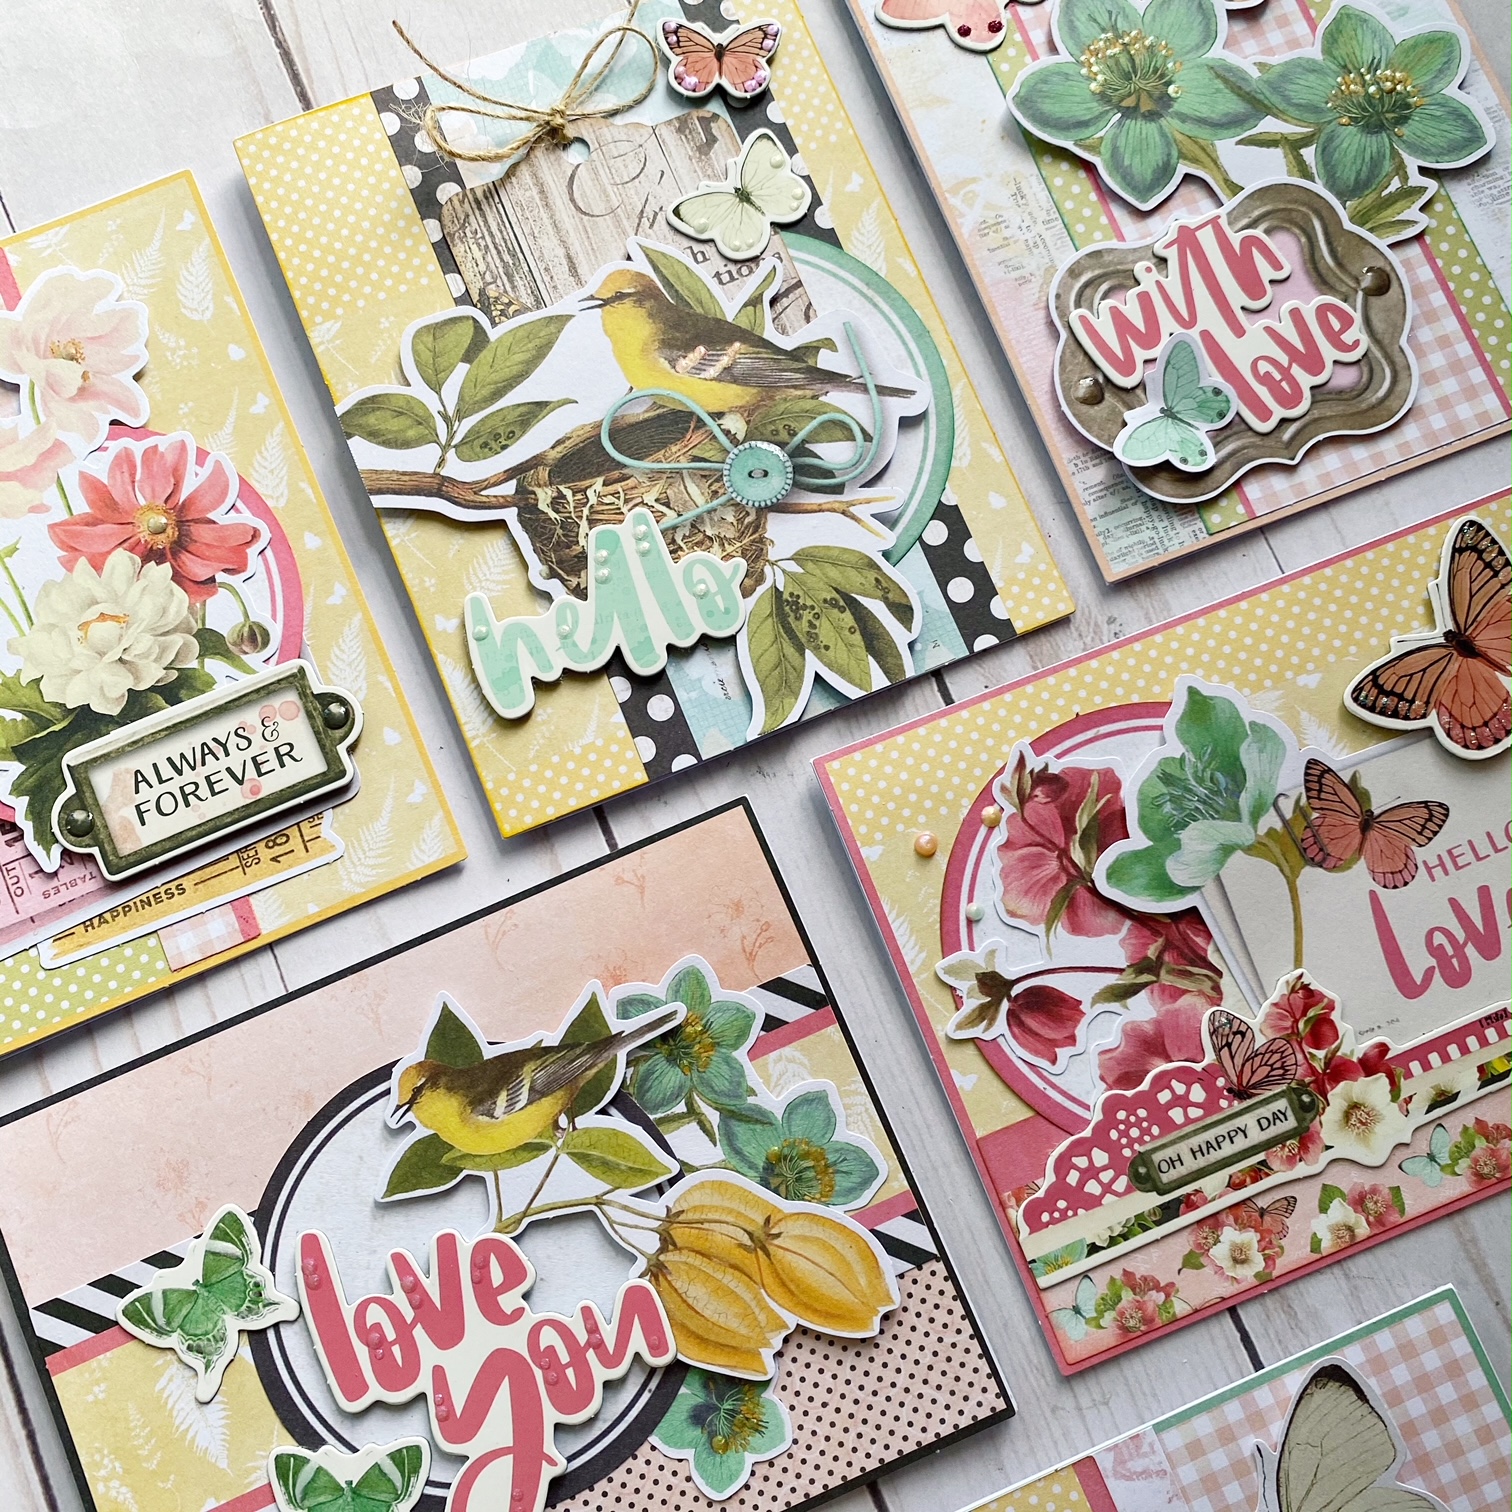
I put these layouts together for you to see how lovely they are! I used some foam tape for dimension and pulled out my Tonic Dream Drops, Glitter Drops and Crystal Glaze to add some shimmer and shine! Here are the first two pages. 


And the next two are just as beautiful!!


Here's a Video where you can check out some closeups and how I put one of these pages together!


I love the pre-printed backgrounds! They definitely give you ideas about how to layer and place elements on other pages you'll create!


All of the elements come in a punch out format and there are clear instructions about where to place each element as well as reference photos. 


I love that they've left lots of room for lots of photos! 


This would be a lovely kit to give to a friend, to do together on a crafty on-line 'zoom' or even to give premade as a gift!


The ephemera and designs would be lovely for birthday photos, Mother's Day, spring and summer!


I love the shine that the Tonic Nuvo Drops gave to the flowers, butterflies and the frame hardware.


I used Distress Oxide Inks in coordinating colours on a few embellishment punch outs to add edging detail.


You'll even end up with a few extra embellishments to use on another page or card!


Thanks so much for stopping by! Don't forget to check out the Simple Stories Simple Pages Dreamer Page Kit in the shop!!  I hope you have an amazing day and a very crafty weekend ahead!!


Friday, March 19, 2021

Well Hello Today


Are you one of the lucky ones who has the Simple Stories, Hello Today in your stash? This super fun collection is near all sold out from the Scrap Shotz shop, so a bunch of us do. I blame my need to have this collection on Design Team member Karla! Her layouts were so inspiring, I had to have it too and ohh I am loving playing with this one! 

All the Numbers  


For my first layout I started with a Bazzill Cardstock, Raven and some Picket Fence, Paper Glaze in Black Pansy and a Tim Holtz number stencil - inspired by the numbers in the Hello Today collection. I wasn’t sure if the black glaze would shop up on the black background but it sure does and wow I love it - a nice subtle touch of texture and shine.


From there I found this fantastic photo oh my littlest brother,  printed in black and white, and just had fun tucking and adding any of the die cuts or stickers that were numbers. I wanted to create this sort of  ‘all the ways I love ya bro and think you are one of the coolest humans I know’ sort of idea.

I was a little torn on if I could pull off the black and white flowers but I think it totally works for the memory and story. Some white splatters to finish it off (seems I need something messy on every layout) and I love it! 


All About the Title 


For some reason anytime I see a pattern paper or embellishment with a lot of orange, especially when paired with yellow or red, I think retro and I think bowling. Perfect! I had some cool Instax bowling photos to document! 

Inspired by the ‘Hello today’ die cut in the Hello Today Page Pieces I decided to anchor the entire design on this title. I ripped a couple of my favourite pattern papers for the bottom of the page and then started added the photos and little layers here and there all around the title. I used some Tonic, Nuvo Crystal Dots in Moroccan Red as paint to add a little colour behind all this goodness. 


There was a little too much white space above all this good stuff so I added a little bit of a confetti look up top with some die cuts, chipboard pieces including some cute hearts, and of course splatters. 


All the Circles 

For this layout I was inspired by the die cut circles for each month in the collection! So cute! So I grabbed a circle stencil from my stash and used some Tim Holtz Distress Inks in matching colours to the collection and a Ranger Blending Tool to create a multi coloured background. 

From there it was a matter of playing with the circle die cuts and my photos to bring it all together. I used these bold black foam alphas from my stash and some cheeky Tim Holtz phrase stickers in black to bring a little drama to the page - I love the pops of black. 


Such a fun collection to play with. If you had the chance to grab some of these goodies from the shop, we would love to see your projects. Drop your project onto the Scrap Shotz Paper Crafting FaceBookGroup or tag is @scrapshotz on Instagram! 


Thursday, March 18, 2021

Simple Stories Vintage Cottage Fields Layouts

 Hello everyone! Carolyn back today with some more layouts using the February Kit. These layouts use the Simple Stories "Vintage Cottage Fields" Collection.

Layout #1


For this layout, I had wanted to use the coloured tag stickers. I felt the background was too similar so I added some stamped leaves using the Altenew stamp from last month's kit. I used a marker to make a dot circle and stuck the foam hearts along the line. 


The papers behind the picture are torn and have a piece of ephemera underneath. I finished off the layout with some chipboard and brad stickers.


Layout #2


For my second layout, I pulled a few items out of the kit that had to do with birds and nests. I thought it would go well with the subject of my picture. I always shy away from using the really bold patterned paper so I decided I was going to go for it this time. I actually used my scalloped scissors to make the border! Those things hardly ever get used. The rest of the layout is a combo of cardstock, chipboard and foam stickers. Here is a closer look.


Thanks for having a look at the blog today. Keep scrappy!

Wednesday, March 17, 2021

Tone it Down, Then Jazz it Up


If you all are playing with the February Scrapbook Kit you know how beautiful and dynamic the Simple Stories, Vintage Cottage Fields collection is. (The Kit is sold out but a few goodies are still in the store!)

The collection has so many amazing little touches that make it classically Simple Stories but also a tad busy ... which I LOVE. My approach when things get busy .. is to tone it down just so I can make it my own kind of busy! Jazz it up, Brande style! 

I started with this bold polka dot pattern paper from the Kit - it felt whimsical and fun. Perfect for some old-school soda shoppe photos! I didn’t want the polka dots to overwhelm my design though so I toned them down with some white acrylic paint. I simply added some water to white paint and messily painted a big square in the middle of the page with a wide paintbrush. Messy! Any white paint or even white gesso will do. 


Next, I let the Kit inspire my photo size. I loved the 2x2 cut apart squares in Kit the pattern papers - so cut up my favourites and printed my photos in the same size to arrange them all in a grid pattern. I love the idea of square shapes in a grid pattern in stark contrast to the circle of the polka dot background. 


From there I took my ‘toned down’ busy page and kicked it up a notch with all kinds of busy! Using the stickers, bits and pieces, chipboard, brads, and foam alphas from the Kit to add all kinds of texture and touches to the page. I used the square pieces and edges of the pages to anchor all the fun.


I am loving how this turned out - any chance I have to use ALL the fun and pretty things in a layout is a design that makes me happy. All of the pops of whimsy from the embellishments gave this layout the exact feeling I was hoping for - a fantastic reflection of the feelings of this memory!

Are you playing with this Kit? We would love to see! Pop it up on the Scrap Shotz Paper Crating Group on Facebook or tag SCrap Shotz on Instagram so we can ohh and ahh! 


Tuesday, March 16, 2021

Scrap Shotz Spotlight – P13 Free Spirit

Hello! Today I have a couple of layouts and some cards created with the P13 Free Spirit line. This line has darker colors and an industrial feel to it, so it’s pretty well suited to masculine pages and cards. I used it to create a layout with a photo of my teenage grandson. I love the strip of patterned paper with the marquee letters!

I added die cut gears from Tim Holtz dies for embellishments and used foam Thickers to create the title. A simple layout for this quiet photo.

The next layout is based on the Creative Scrapbooker March sketch from their Sketchy Group on Facebook. Here is the sketch and my layout.

I followed the sketch pretty literally, only adding interest by slanting the photos and using pop dots under some of them. Some were popped up with a double layer of foam and some only one layer, so there is a variety of texture and depth. I used CosmicShimmer Glitter Kiss on the wooden alphas in the title. It’s awesome -  goes on smoothly and covers well, then doesn’t rub off when dry! Win, win and WIN!


Here are a few cards with the 6x6 patterned papers. Here I used glossy accents on the Poppy Stamps - Happy Birthday Poe Script Die after cutting out a couple of layers. Love the polished look! A trio of sequins finished the card.

This round tag is from the P13 - Free Spirit Tag Set 01 and the sentiment is Altenew - Fancy Greetings Stamp Set , stamped in black and embossed with clear embossing powder. I cut the corners on the top of the card with my WRMK corner chomper. And added some Tonic - Nuvo Crystal Drops Ebony Black to finish it off.


The last card for today is simple too, using stickers from the line in the bottom third, some twine and an black embossed sentiment pane, once again using the Tonic - Nuvo Crystal Drops Ebony Black to accent.

This line is perfect for your masculine projects! Thank you for stopping in to have a look. 


Monday, March 15, 2021

February Kit Layouts with Simple Stories Vintage Cottage Fields

 Hello everyone! Carolyn here today with 2 layouts using the February kit. The kit is full of Simple Stories "Vintage Cottage Fields". This collection has lots of flowers and butterflies and a mixed media feel to many of the papers. 


My first layout was inspired by the butterflies on the paper. I tried to keep the titles, pictures and embellishments in the same colour as the butterflies. I'm always so excited when I can get 5 photos on a layout! This was also super easy to make. All I had to do was back the photos with cardstock and arrange my chipboard and brad stickers around the journaling. Those title stickers are my favourite part of the kit.


My second layout is inspired by the March sketch in the Creative Scrapbooker Magazine Sketchy Facebook Group. Here is the sketch:
What I like about this sketch is that I could use 2 of the cut apart cards in the paper pack. I also got to use all the cardstock in the kit. The black matting of the pictures helped them to not get lost on the page. The bottom photo looked a little weird without some extra matting. I got to use a little bit of everything on this layout. In addition to the kit elements used in the first layout, I also used the layered stickers (kit add-on), washi tape and die cuts. A few are elevated with foam stickers.

Thanks for looking! I'll be back on Thursday with some more kit creations.

Friday, March 12, 2021

Simple Stories Hello Lovely Card Kit!

 Hello friends! Karla back today with a look at the beautiful Hello Lovely Card Kit from Simple Stories! This is a new kit Simple Stories has come out with called Simple Cards and the package comes with everything you need (except adhesive) to put 8 awesome cards together. I stepped it up a notch and added some Crystal Glaze and Dream Drops (and some items listed below), but you can keep it as simple as you'd like - or use your stash to add some bling! 

Here's a look at the video where you can see how to put together two of these lovely cards and get a look at exactly what's included in the kit!


These cards would make anyone's day happier! I'm thinking birthdays, friend cards, Mother's Day! You could even wrap up several with envelopes and give them as teacher gifts! 


I added some foam tape to give the layers dimension. You simply punch out the papers and embellishments following the detailed instructions! 


I will definitely use the included instructions to create more of these cards with my own supplies! It give you many different layering ideas. 


It would even be fun to get together with some friends for an online crafting session to complete a kit! Extra supplies I used were Foam Adhesive, Art Glitter Glue, Distress Oxide Inks in coordinating colours (I used Lucky Clover, Abandoned Coral and Mustard Seed) to sponge edges, Crystal GlazeDream Drops and Sparkle Shakers Glitter.


Thanks so much for stopping by! You can find this lovely kit in the Scrap Shotz Store HERE! Have a wonderful weekend friends, and enjoy creating!!