Friday, December 26, 2014

Merry Christmas!


From all of us at Scrap Shotz,we wish you all a very Merry Christmas.

Here is an easy Christmas tag for a hostess gift!

To make the tag, cut 4 window die cuts with the Taylored Expressions window die. This tag can be made with any window die and there is a fine selection in the store.  Adhere the window die cuts to one another to strength the cardstock but also to add depth to the window.

At this point, I applied Tim Holtz distress inks and a quick spray of Tsukineko irRESISTible spray to the window die cut but if you are in a hurry, you can bypass this step. Then back the window with a piece of pattern paper; add a ribbon and accent accordingly.

What is fantastic about this tag is that it can easily be adapted to any occasion by changing the pattern paper beneath the window. For a birthday, add a fun sweet print.


The sentiment is handwritten with the Tsukineko Pico Embellisher.


The sentiment on this tag is written with the Tsukineko Pico Embellisher through the Tim Holtz Layering Stencil of phrases.

Merry Christmas!

Monday, December 22, 2014

Fabulous Find: Tim Holtz Layering Stencil Festive and Wendy Vecchi Crackle Paste

Want to create a beautiful and unique card to adorn your Christmas present? Consider the card below.

For the background, I used the Tim Holtz Layering Stencil - Festive along with the Wendy Vecchi crackle paste. Apply the crackle paste through the stencil - allow to dry thoroughly. Yes, you can speed up the drying process with your heat gun! As the paste begins to dry, you will see the gorgeous cracks form.

Once the paste is dry, you can apply Tim Holtz distress inks with an applicator directly onto the crackle paste or you can reposition the stencil and apply the distress inks through the stencil. I like both looks. For those tighter, smaller areas, apply the distress inks using the Tsukineko Fantastix colouring tool.

I found with a heavier application of ink, the crackles became more pronounced. Personally I find the crackle look gorgeous and unique. Once I was happy colouring the paste, I added colour to the edges of the stencilled card front.


For the sentiment, I used the Tim Holtz Shadow Press embossing folders. After I embossed the paper, I applied various distress inks to the front and around the embossing. Then I adhered it to the card front.

To create a colour coordinated ribbon, stamp the colours of the distress inks you used. Spray with Rangers Perfect Pearls onto the distress inks. Dip your ribbon into the pearlized ink water and let the ribbon absorb the colours. Let ribbon dry and tie onto the card.


Hope to see your cards too!


Wednesday, November 26, 2014

Fabulous Find: Taylored Expressions Jingle all the Way

Taylored Expressions makes beautiful dies. With each release, I am amazed at their continued creativity and of course their great quality.

The Jingle all the Way cutting plate is smaller than their other cutting plates. The die cut image is beautifully bordered by the card base. Additionally the elegance of the script made me initially worried about how easy it would be to cut from paper, stiffened fabric or light foil. Let me share that I was pleasantly surprised as the image was easily cut from a variety of materials.

This card background was created with Tim Holtz Distress Inks. Once the inks dried, I sprayed some Tsukineko irRESISTIBLE spray on the background. The heat gun helped speed up the drying process. Then I added more distress inks to the background. As you can see, the irRESISTIBLE spray easily resisted the additional distress inks. Once the background was dried I adhered the Jingle all the Way die cut. This was a fast and easy card to create - plus its unique and gorgeous too!

Supplies:  Bazzill (cardstock); Taylored Expressions (Jingle all the Way cutting plate); Tim Holtz distress inks, Tsukineko irRESISTIBLE spray

A close up of the irRESISTIBLE spray ...


I'd love to hear your thoughts on the die and spray!

Thursday, November 13, 2014

Fabulous Find: Sizzix Tim Holtz Layered Butterfly

Scrap Shotz has had a very busy fall with the Scrapbook Carnival at Spruce Meadows and the fall Scrap Shotz crop. The best news is that I will be back posting regularly on the blog - thank you for being a loyal reader.

Over the next few posts, I would like to share some projects created for the Carnival and the crop using many of the wonderful mixed media products on the market. The card below showcases the very versatile and beautiful Sizzix Tim Holtz Layered Butterfly Die and Embossing Folder. From experience, I can tell you that the Sizzix die and embossing folder work like a dream. It easily cuts cardstock, chipboard and even starched fabric. Each of the die cut butterflies, were embossed without difficulty and with defined definition. The starched fabric required a few extra passes on my Big Shot but it still looked beautiful.

This card was heavily inspired by the uber creative scrapper, Tammy Tutterow. From reading her blog and stalking her pinterest boards, I have learned so much about the various mixed media products and how to effectively use the diverse Tim Holtz products. I will be honest with you and tell that up until the beginning of October, I owned maybe 3 Tim Holtz products and had convinced myself I was unable to create these mixed media projects. Well, today I own almost every set of distress inks, lots of paints, a gaggle of stamps and several dies!

Now a bit about this card...the background was created using distress inks through the layered honeycomb stencil.  Then I applied another layer of distress inks through a stencil I made using the Taylored Expressions Ray of Sunshine cutting plate. Using the Joggles Shooting Stars stencil (it is sold out in the store), I added a contrasting layer of distress inks.


Supplies: Bazzill (cardstock); Tim Holtz (Layered honeycomb stencil, Layered Christmas words stencil, distress inks, Sizzix Layered Butterfly die); Dina Wakely (gel medium, gold embossing paste); Prima Art Ingredients (glass beads, glass glitter); Close to my Heart (organza ribbon)

For the butterfly,  I sponged distress inks to the raised embossed areas and then heat set clear embossing powder to make the butterfly shine. The clear embossing powder really showcased the distress inks on the butterfly. Using a sturdy medium bristle paint brush, I applied gel medium around the outer edges of the butterfly. The glass beads were applied first. Then gel medium was applied just inside the beads so that the glass glitter could be adhered. A close-up of the butterfly wings can be seen below in the close-up photo.


The die cut butterfly was adhered to the card front with pop dots under the wings so the wings appeared to be "fluttering". Lastly, I applied gold embossing paste through the Tim Holtz Christmas words stencil to make the card sentiment.

I hope I have inspired you to try the various mixed media products available in the store. If you have any questions, please let me know. I will try to answer them the best I can - I have spent many hours educating myself on the various products as well as experimenting with them...and I love them all!!!

Thursday, July 24, 2014

Fabulous Find: Teresa Collins Moulding Paste

In continuation of my sharing post on the Faber-Castell Mixed Media Mini Journal, I wanted to pause and share my love of Teresa Collins Moulding Paste. I just love love love this product. Firstly, its smooth texture and consistency makes its application easy peasy...especially with a palette knife. (Contact Sandy for one wonderful palette knife - it makes using gelatos and moulding paste wonderfully easy!)

Secondly, I love that the moulding paste yields slightly different results if you allow it to air dry or if you dry it using your heat gun. (Now you may already know this but I was rather thrilled with my ingenuity drying the moulding paste with my heat gun!!!) When I let the moulding paste air dry, it had a texture similar to clothes drying on a clothes line - a bit stiff. When I dried the moulding paste with my heat gun, the moulding paste puffed up a bit and then flattened when cooled; the cooled moulding paste had a slightly smoother texture. You might inquire why I would mention this?? Well, both textures are fabulous but alter my application of an after product like Art Anthology glazes or   more gelatos or Viva Decor Ferror Metal Textures.

For this card, I smooshed on some gelatos and smudged it with my fingers to create the background. With an older stencil from The Crafters Workshop, I applied the Teresa Collins moulding paste and let it air dry.


Supplies:  Bazzill (cardstock); October Afternoon (pattern paper); Hemptique (hemp twine); Maya Road (chipboard heart); Elizabeth Craft (sentiment sticker); Faber-Castell (gelatos); Teresa Collins (moulding paste); The Crafters Workshop (stencil)

For this card, I was dried the moulding paste with my heat gun. Not sure if you can see the surface of the moulding paste but it dried slightly smoother than the air dried version.


Supplies:  Bazzill (cardstock); Dina Wakely (white gesso); Tim Holtz Layering Stencil Latticework; Faber-Castell (gelatos); Elizabeth Craft (butterfly die and overlay)

For this page in my mini journal, I used the Studio Calico chevron stencil with Teresa Collins' moulding paste. After letting it airdry, I "water coloured" a gelato and water mixture onto the moulding paste. The moulding paste absorbed the gelato and water mixture beautifully. 

\
Supplies:  Faber-Castell (mixed media mini journal, gelatos); Dina Wakely (white gesso); Studio Calico (chevron stencil, Mr. Huey); Making Memories (mini alphas); Tim Holtz Ideology stickers; Glitz Design (mini alphas); Elizabeth Craft (butterfly and overlay dies); Prima (gems)

I hope I have inspired you to try gelatos with moulding paste! Let me know your thoughts!


Wednesday, July 16, 2014

Fabulous Find: Faber-Castell Mixed Media Mini Journal

I have really been having fun with the Faber-Castell Gelatos Set as well as the Faber-Castell Mixed Media Mini Journal. Below are the first 3 pages of my journal. The primary goals of my journal was to capture quotes that inspired me, to try various techniques with the gelatos and experiment with the various products which complemented the gelatos in my journal.

When I created the title page of my journal, I was very very green with gelatos. I watched countless YouTube videos by the Faber-Castell design team and Donna Downey. What stood out the most to me was how creatively liberating working with gelatos could be. You can pair as many or any combination of colours together. You can blend the colours in any manner you choose or you can let each colour stand on their own. Honestly the possibilities are endless!

For this title page, I gingerly attempted Donna Downey's drip technique by adding swatches of colour throughout my page, misting liberally and tipping it upright, letting the watered colours dribble down the page. I let the drips dry...well, I helped it with my heat gun too. Then I had some fun!

With my Kaisercraft grid stamp, I coloured the stamp with a gelato, lightly misted the coloured stamp and then stamped the edges of my title page. Then I spritzed a quarter sized amount of Mr. Huey onto my Tim Holtz Non-Stick Craft Sheet. Using the cap of the mist, I stamped circles on the front and tapped off the excess mist from the cap to create splotches. After the colours dried, I adhered the chipboard fern leaf, alphas, wood veneer and butterfly.


Supplies:  Faber-Castell Mixed Media Mini Journal, Faber-Castell gelatos, Prima (alphas, fabric butterfly); Claudine Helmutt (acrylic paint); Studio Calico (wood veneer, Mr. Huey mist); Pink Paislee (chipboard fern leaf)

For this page, I became a bit bolder witht he gelatos and was very inspired by the many Mixed Media pinners on Pinterest. To create the background, I coloured the gelatos directly onto the page and heavily misted the coloured areas. I left the water saturated page to dry fully. The circles were created by stamping Mr. Huey mists with the cap of the mist. Using scraps of October Afternoon typography paper, I loosely arranged them into houses, coloured with gelatos and drew directly on them with the American Crafts Project Life markers. The clouds were die cut with Taylored Expressions cloud duo dies, were sponged with dye inks and outlined with American Crafts Project Life markers. The quote was pieced together with mini alphas and sticker words and then lightly sponged with dye ink.


Supplies:  Faber-Castell Mixed Media Mini Journal, Faber-Castell gelatos, October Afternoon (pattern paper); Glitz Design (alphas); Making Memories (mini alphas); Tim Holtz Ideology word phrases sticker book; Close to my Heart (dye ink); Mr. Huey mists


For the third page, I tried a technique from the Faber-Castell blog. Using a palette knife I roughly applied Dina Wakely black gesso to the journal page. Using my heat gun, I dried the gesso and then coloured on top of the gesso (in places) and the rest of the journal page with a gelato. Then applied Teresa Collins Moulding Paste to a Tim Holtz Stripe stencil to create the white irregular dimensional lines. Then I added my quote using alphas from Chatterbox, Tim Holtz Ideology word phrase booklet and Making Memories. To age the quote, I dry brushed dye ink onto the alphas.


Supplies:  Faber-Castell Mixed Media Mini Journal, Faber-Castell gelatos, Chatterbox (alphas); Tim Holtz Ideology word phrase sticker booklet; Making Memories (mini alphas); Teresa Collins (moulding paste); Tim Holtz stencil; Dina Wakely black gesso

I hope I have inspired you with my journal book. There will be a few more posts on the other pages of my journal. 

Friday, July 4, 2014

Happy July 4th!!!


From all of us at Scrap Shotz, we wish all our American friends and family a wonderful 4th of July!


Tuesday, July 1, 2014

Happy Canada Day!


From all of us at Scrap Shotz, we wish you all a wonderful Happy Canada Day.

Saturday, June 28, 2014

Fabulous Fundamental: Stamping with Gelatos

Since receiving my gelatos (which I might add comes in a starter pack but this value pack is utterly AMAZING) I have been watching videos on the various gelatos techniques. I am completely sold on the product!!!

One of the techniques that I have been enjoying is stamping with gelatos. The water colour look on a dry brushed typography piece of pattern paper is stunning. Stamping with gelatos was much easier than I expected to be honest. All you need to do is colour directly on your stamp with the gelato. Just before stamping, lightly mist the gelato covered stamp and then stamp. If you desire a more watery effect, mist with a heavier hand.

An example of stamping with gelatos is below.


Supplies:  Cardstock (Bazzill); pattern paper (Scrap Shotz monthly kit); twine (Hemptique); leather label (Making Memories); sentiment (Elizabeth Craft Designs); stamp (Bo Bunny); gelatos (Faber-Castell); chalk (Versa-magic)

What have you created with your gelatos?

Tuesday, June 3, 2014

Fabulous Find: Faber Castell Gelatos

When I first heard the word, "Gelatos" I immediately thought of ice cream! That super smooth delicious cool taste with the gorgeous array of colours. Then I learned about gelatos by Faber Castell...well, I don't think my crafting area has been the same since.

Truthfully I don't know why I have never dabbled in the mixed media world of this wonderful hobby but I suspect it was fear. Fear that I wasn't an "Artiste." However I can honestly say that working with gelatos is so freeing. There is no right or wrong; it's all about creative expression and that in itself is freeing.

On YouTube and Faber Castell blog, there are oodles of tutorials, samples and videos. Check them out - it's a great way to spend a couple (um...a few!) hours of time. Over the next few blog posts, let me show you what you can do with the gelatos.

When I first began with the gelatos, I was wanted to become familiar with how the colour worked, not the blending or the other fancy techniques, just the application of colour. On the 2 coasters below, all I did was add colour in blocks, spritz with water, let it dry and then add a bit more colour for depth.

For this coaster, I coloured each leaf with green and some orange and then smooshed the colours together with a water brush. On the moulding paste created stars, I coloured directly on the paste with the gelatos.


Supplies:  Faber-Castell (gelatos), Maya Road (tree stamp, chipboard bird), Chatterbox (chipboard phrase, mini alphas)

On this coaster, I coloured the whole coaster purple, making some areas of the coaster heavier with colour. Again, it was spritzed with water and allowed to dry. After it dried, I added a smidgeon of blue to various places on the coaster. Then I coloured my "chicken wire pattern" stamp, spritzed with water and stamped. After it dried I added some flowers and various left over chipboard and stickers to the coaster.


Supplies:  Faber-Castell (gelatos), Making Memories (sticker); BasicGrey (rub on); Maya Road (chipboard dress form, butterflies); Hemptique (twine); Kiki Art (glitter chipboard heart); Prima (flowers); Kaisercraft (chicken wire stamp)

I hope you are inspired to get some gelatos and play too! (Check in a few days time to see some stamping with gelatos too!)


Thursday, May 22, 2014

Fabulous Find: My Minds Eye Chalk Studio

Chalkboard paraphernalia is one of the coolest trends now (in my opinion.)  Who doesn't love the look of striking white or gold or silver (and even other colours) on black? American Crafts has created the DIY Shop Permanent Chalk Markers for outlining, journaling and accenting. The pens fit comfortably in my hand; the ink flows smoothly and steadily and the look is gorgeous.

Another chalkboard themed line is by My Minds Eye. Their Chalk Studio line is completed with these awesome accents. There are enamel dots, decorative tapes, chipboard elements, decorative brads, decorative frames, papers and accessory pack, stickers, labels and tags - the complete set is available in the store.

The gorgeous layout below was created by Rosie showcasing the Chalk Studio line.


Supplies: patterned paper, enamel dots, stickers & washi tape MME "Chalk Studio II", Teresa Collins Modeling Paste, Tim Holtz stencil

What have you made with a chalkboard theme?

Wednesday, May 21, 2014

Fabulous Fundamental: Mixing and Matching Elements

Sometimes I find myself stuck in my ways, thinking I should only use the items in a collection but then I ask myself "Why?" Why indeed? Half the fun of this wonderful hobby is the creative freedom it affords.

Take the layout below for example...here I have used predominantly Studio Calico's Print Shop line and its accessories but I love how easy it is to add elements from other manufacturers. For example, just a few wood icons from Prima here and there add so much to the layout. The cloud dies from Taylored Expressions are so versatile and are just the perfect accent to tie all your elements together.


Supplies:  Paper from Scrap Shotz monthly kit featuring Studio Calico's Print Shop, American Crafts (thickers). Studio Calico (cork punctuation, happiness wood phrase); Prima (wood icons); Spellbinders (circle dies);  Taylored Expressions (cloud die); Making Memories (mini alphas)

Tell me...do you mix and match from within a collection or do you use multiple manufacturers?

Tuesday, May 13, 2014

Want to Play Tag?

Have you considered joining our forum? We have monthly Design Team challenges, swaps and tags, for both layouts and cards. Participating in tags is so inspirational and loaded with laughs and camaraderie.

Below is a layout I created as part of the Layout Tag using Bella Boulevard's Molly Collection kit.


Supplies:  Bazzill (cardstock); Bella Boulevard (pattern paper), Heidi Swapp (flowers); BasicGrey (alphas); Claudine Helmutt (acrylic paint); Prima (gems); Studio Calico (acrylic phrases)

I look forward to seeing you in the next tag!

Tuesday, April 15, 2014

Fabulous Find: Elizabeth Craft and Karen Burniston Lots of Pops Die

Have you seen the uber cool Lots of Pops die from Elizabeth Craft and Karen Burniston? It's ingenious if you ask me. I love cards that "look" complicated but are simple and elegant in construction. This die is it and is oh so versatile. You can make birthday and sympathy cards all in one. (In a future post I will show you how to combine the various Elizabeth Craft and Karen Burniston dies - so easy, so quick and so amazing.)

Look at the samples Rosie created below.


Supplies: Karen Burniston for EC Lucy Label Pop It Up die; wood stars Stucio Calico, EC Peel Off Words, paper Fancy Pants "Be Different"


Supplies: Karen Burniston for Elizabeth Craft Pop It Up die; Featuring the My Minds Eye line, Izzy from the February Scrap Shotz monthly kit


Supplies: Karen Burniston for Elizabeth Craft Pop It Up die; Featuring the My Minds Eye line, Izzy from the February Scrap Shotz monthly kit; Elizabeth Craft bird stickers; Elizabeth Craft tree die

Aren't Rosie's cards amazing? What have you done with your dies???

Thursday, April 10, 2014

Fabulous Find: Cheery Lynn Chrysanthemum Strip

One of the newest manufacturers Sandy has brought into the story is Cheery Lynn. Firstly, isn't their name just oh so cute? Their dies offer so much versatility. They cut easily and precisely in my Big Shot. Perhaps what I liked the most was how I had the option of how I wanted to layer the pieces of the chrysanthemum. If I wanted a fuller flower, it was easy to add another layer. If I wanted a more fragile flower, I simply layered less.

Below are 2 different moods of cards. Below is a fun vibrant birthday party. The royal blue chrysanthemum added a punch of colour and spunk.


Supplies:  Bazzill cardstock; Hemptique (hemp); Cheery Lynn Strip die (chrysanthemum die); Tinkering Ink (pattern paper); Die Versions (border die)

This next card is a sympathy card, for a dear friend in memory of her mother. I wanted the card to represent the happier memories she had of her mother and adorned the card with chrysanthemums. Misting the flowers, after assembly, with 3 different colours allowed me to create dimension in the flower. It looks like the sun is bouncing off of the petals.


Supplies:  Bazzill cardstock, Cheery Lynn dies (chrysanthemum flower, chicken wire), bronze leaves (source unknown); Queen and Company (brads); Memento Ink, Tattered Angels (mist)

I hope you will give a try to the Cheery Lynn dies - they are utterly fantastic!

Monday, April 7, 2014

Fabulous Find: Elizabeth Craft and Karen Burniston Butterfly Pivot Die


Have you seen this fabulous new Butterfly Pivot die by Elizabeth Craft? Isn't it absolutely divine? As you know I have a soft spot for anything butterfly - Elizabeth Craft really knows how to design a gorgeous butterfly too.

This pivot card is easily made with the die.  Take a look at the card Rosie made with the die. 


Supplies: card stock Bazzil, patterned paper Heidi Swapp, Shimmer Sheetz, glitter DotsButterfly Pivot Cutting Die Karen Burniston for Elizabeth Craft Designs, Stamp unknown, Memento Ink black, clear glitter brush marker Wink of Stella, embossing folder Provo Craft, border punch EK Success

Hear what Rosie says about the die: "The new Karen Burniston pop it ups dies are lots of fun to use, I love how this butterfly card turned out. The most challenging aspect of it was choosing the papers I wanted to use in combination with the Shimmer Sheetz in my stash ;). This die is so easy to use and the small butterflies, flowers & butterfly bodies are part of the die as well so you're getting 6 dies in one purchase, lots of bang for your buck!"

Another fabulous product from the Elizabeth Craft and Karen Burniston pairing!

Thursday, April 3, 2014

Fabulous Find: Taylored Expressions - Banner Stacklets


Since the banner craze started, I have been in enamoured with it. I use them as "flags" on my layouts and cards; as backdrops for a sentiment or journalling; as a border; as a tag unto itself and have even fashioned the banner shape into a card. Below I have tried to inspire you with samples of "banners." All of the banners on these projects have been cut using the Taylored Expressions Banner Stacklets which can be ordered through the Scrap Shotz store.

Below is a layout I created using the Scrap Shotz monthly kit which showcased the Print Shop line by Studio Calico.


Supplies:  Bazzill (cardstock); Studio Calico (pattern paper, cork punctuation,  chipboard conversation bubbles, acrylic script words); American Crafts (glitter alphas, slick writer); Pebbles (corrugated alphas and punctuation); stitching

In this layout, I used the banner stacklets to create matted blocks of colour and pattern to balance the bold and vibrant Studio Calico Print Shop pattern paper. The banners were stitched onto the layout and adorned with the the Studio Calico stars.


Supplies:  Bazzill (cardstock); Taylored Expressions (banner stacklets dies); Studio Calico (pattern paper, chipboard conversation bubbles, cork punctuation, acrylic stars); Little Yellow Bicycle (burlap accents); American Crafts (alphas, Slick Writer); stitching

For these "tag cards" below, I placed the die just about the folded edge so I could maintain the integrity of the card but have the shape of a tag.


Supplies:  Bazzill (cardstock); SEI (pattern paper); Making Memories (glitter ampersand chipboard, chipboard label); Kiki Art (glitter heart); Heidi Swapp (acrylic flower, large white cloth flower); Basic Grey (chipboard "2U"); K&Company (rubber button acting as a flower centre); Sizzix (rolled flower die); Tattered Angels (mist)


I hope I have inspired you to take a second look at the Taylored Expressions Banner Stacklets die - I would love to hear how you have used your banner shaped die too!


Monday, March 31, 2014

Fabulous Find: Taylored Expressions - Proud Peacock Cutting Plate

Taylored Expressions is one of my favorite companies - not only are their designs fresh and innovative but the quality of their product is superb.

Below is a sample using the Proud Peacock Cutting Plate that Rosie created. When I first saw the die in the store, I fell in love with it but I wasn't quite sure how to use it...but since I've seen Rosie's projects, well I am just brimming with ideas.

See how Rosie used the die as an accent on her layout?


Supplies:  March 2014 Scrap Shotz Monthly Kit

And look at this beauty of a card? It is so stunning and that colour combo is timeless.


Supplies:  March 2014 Scrap Shotz Monthly Kit

What creative ways have you used your Taylored Expressions Proud Peacock Cutting Plate? Please share them with me. 


Wednesday, March 26, 2014

Fabulous Find: Elizabeth Craft and Karen Burniston Accordian Dies


Recently Elizabeth Craft and Karen Burniston joined forces to create the uber amazing accordian dies. It really was a match made in Heaven. The dies come in shapes such as the circle, fancy label and oval shape. They are thin, yes thin and are easily stored in a box. These dies are very versatile - you can make cards, mini albums and even banners with the dies. I will show you a few samples over the next few days on the different ways you can use these wonderful dies.

Check out this card by Lorraine from her March reveal which showcases the March 2014 Scrap Shotz monthly kit as well as the Elizabeth Craft and Karen Burniston Accordian Circle die.


Supplies:  Bazzill cardstock; Teresa Collins (pattern paper); Elizabeth Craft/Karen Burniston Accordian Circle Die

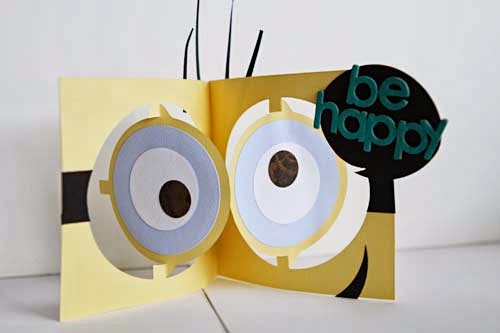
Isn't Lorraine's card gorgeous? I have the same die and I could not resist making this Minion card that I saw on Pinterest. It is perfect for an upcoming birthday party that my daughter is attending with a Minion theme!!!!


Supplies:  Bazzill cardstock; Elizabeth Craft/Karen Burniston Accordian Circle Die; Spellbinders (circle die); Prima (alphas); Claudine Helmutt (acrylic paint)


Now let me show you Rosie's jaw dropping card using the Elizabeth Craft/Karen Burniston Accordian Oval Die.


Supplies:  Bazzill cardstock; Elizabeth Craft (word and image stickers); Copics

See that "filigree" on the card front? That too is from Elizabeth Craft and is called the Oval Flourish Frame Edge Die Set. And guess what? The die can be adapted to die cut the filigree for the Accordian Circle die too! I know I just had to have it...and so I have it on order right now. It takes your card from beautiful to Wowzers. Just let Sandy know if you would like your own die. 

What cool projects have you tackled with the Elizabeth Craft/Karen Burniston accordian dies?


Tuesday, March 18, 2014

Fabulous Fundamental: Speaking Sequin-tially!!!

As mentioned in this post, I have more to talk about sequins, one of my new favorite accents! The different sizes, colours and sheem make these little gems so versatile.

Rosie created a unique photo frame and border on the layout below. She used Glossy Accents to glue the sequins to the layout. I love the look - it very much draws the viewers eye to the focal photo.


Supplies:  Teresa Collins Memorabilia (pattern paper, chipboard, enamel dots, sticky note, sequins) showcased in the Scrap Shotz Summer 2013 monthly kit

On Rosie's card below, she die cut the "Celebrate" word using this Die-versions Edge die which I will show more samples of in the future too! In the negative space, Rosie adhered sequins to the backing cardstock with Glossy Accents to create a stunning and sparkling card sentiment.


Supplies:  Teresa Collins Memorabilia (pattern paper, sequins) as showcased in the Scrap Shotz Summer 2013 monthly kit; Die-Version Edge Die (Celebrate); Elizabeth Craft Designs (Starform border stickers); Bling on a Roll

Have I inspired you to use your sequins???


Thursday, March 13, 2014

Fabulous Find: Cheery Lynn Chicken Wire Dies

One of the hottest trends now is the look of chicken wire. Being a farm girl, I have always loved the versatility of the chicken wire design. It is angular and circular all at once and works on almost every project and event.

Here is my take on the Cheery Lynn Chicken Wire die. The first is a sympathy card for a dear friend.


Supplies:  Bazzill cardstock, Cheery Lynn dies (chrysanthemum flower, chicken wire), bronze leaves (source unknown); Queen and Company (brads); Memento Ink, Tattered Angels (mist)


Supplies:  Bazzill cardstock; Prima (pattern paper, flowers); Dieversions (oh thank you die); bronze leaves (source unknown); Queen and Company (brads); Cheery Lynn (chicken wire die)

Do you like the chicken wire trend? How have you used chicken wire on your projects? I would love to hear :-)


Tuesday, March 11, 2014

Fabulous Fundamental: Using Sequins

If you have peeked into the March Scrap Shotz Monthly kit, you would have found the Teresa Collins package of sequins. When I first saw the sequins, I was intrigued by the awesome colours and the different sizes and sheen of them. I love the sequins - there just seems to be no end on what you can use them for.

I'd like to share one use: use them in a Shaker Card. Here is mine below...


Supplies:  Bazzill (cardstock); BoBunny (pattern paper); Teresa Collins (sequins); glitter (source unknown); Taylored Expressions (layered banners); stamped sentiment (source unknown)

Inside my star-shaped shaker "box" are sequins and some random star shaped glitter from my daughter's craft box.  You could have also highlighted the polka-dotted motif of the pattern paper by adhering some the sequins but I am going to save that for another post on sequins soon!

The layered sentiment was created using the Taylored Expressions banner die. They are available by order from Sandy. (Like the sequins I have another post scheduled on how to use the layered banner dies from Taylored expressions.)

Thanks for dropping by - I would love to hear how you are using your sequins too!

Friday, February 14, 2014

Happy Valentines Day!


Happy Valentines Day! From everyone here at Scrap Shotz, we are thrilled to make your friendship and hope your day is filled with love, friendship and smiles!

If you are a last minute type of person, here are a couple of easy Valentines that can be completed in under 30 minutes! (Trust me, I did both of these in 30 minutes!)

For the first one, I placed a layered heart on top of a loop of ribbon on a matted piece of pattern paper.  My stamped sentiment was placed on the card and voila I was done!


Here I folded an origami heart, glued in on my cardstock base and stamped my sentiment! Easy peasy!


Can you share your Valentine cards with me?

Thursday, February 13, 2014

Fabulous Find: Sizzix Frame-lits


Have you seen these amazing Frame-lit dies by Sizzix???

You may have seen some Christmas cards I made using the die. The centrepiece varies in shapes like squares, a full circle or even an oval. What makes the Frame-lits SO awesome is with one set of dies you create the cardstock background that is pre-scored AND then you use the remaining dies to cut the coordinating pattern paper pieces with a consistent 0.25" border. It even comes with dies to die cut the accent pieces on the swivel pieces. What used to take me hours and hours to cut, assemble and accent now literally takes me minutes to make.


What I have done here is turned the Frame-lit die on its side, using the mountain and valley folds. On the swivel pieces, I put my sentiment "I *heart* U" - below is a front view.


Here is a top view of the card - there is lots of room to write your thoughts to your special someone too.


I hope you will agree with me that the Frame-lit dies are wonderful versatile and easy to use.


Wednesday, February 12, 2014

Fast and Fabulous: Valentines for Everyone

Valentines Day is just 2 days away - have you made your Valentines? I completely forgot about my daughter's party so she and I whipped up 30 of the Valentines cards below.


In 30 minutes, my daughter and I grabbed my pink and red offcuts and used my wonderful Big Shot to die cut some hearts with my Spellbinders die. Then we used all the left over strips of paper to stamp "Happy Valentines." Probably her favorite part was stapling the sentiment to the heart with my Tim Holtz stapler and gluing it to the card front. Then I corner rounded the edges on one side. We are now taping a heart shaped lollipop to the card. It has been a fun project!

What do you think?

Thursday, January 23, 2014

Oh, How LOVE-ly!!!

It's mid-January...blah! Are you experiencing the Winter Blues??? We have been lucky, here in Calgary, to be enjoying unseasonably warm temperatures. With the sun shining, it inspired me to make something colourful...and think of Valentine's Day.

For the readers on your list, consider these book marks which lets them leave small notes for themselves.


This project was inspired by this pinner. I hope to see your version of this very quick Valentines project.