Saturday, April 29, 2017

Thanks and More March Kit Projects

**Please Note: Photobucket very recently changed their terms of service and no longer supports direct linking for 3rd party hosting of images. To view the images not displayed, hover and right click over image, then choose either "open image in new window"  **

A great big thank you to Nicole Wright for being our March Kit Guest Designer and sharing her amazing projects on the blog😁.

I am back to share a few more projects and I'm not lying when I say I STILL have LOTS of product left, in fact I'll show you at the end of this post😃.

I wanted to brighten up the muted colours of the patterned paper so I hand cut triangles, applied Distress Crazing Collage Medium and let dry.  I then scribbled each triangle with various Distress Crayon colours, smudging with my finger.


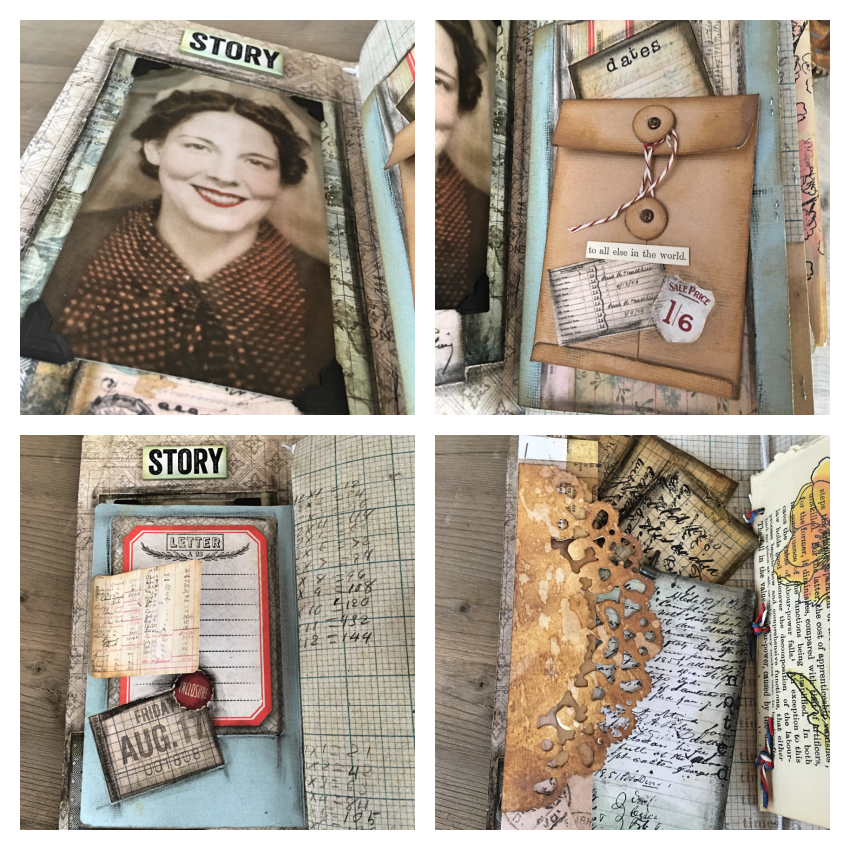
The card stock was misted with Distress Mica Spray in Pewter. I arranged the triangles around my photo placement, popping up some of the triangles. A piece of tag ephemera was misted with TH Distress Stain and placed under the chipboard piece along with some Nuvo Crystal drops.

Metallic stickers form the title and a little hand stitching finishes off this layout.

These stamped images are from the Tim Holtz Crazy Dogs set. They were coloured with Prismacolour pencil crayons.

It was my turn to create a 2 page layout this month and I thought the beige-y tones of the papers were perfect for these vacation photos. Patterned paper strips and chipboard words are placed next to each other across both pages to reinforce the idea of a 2 page layout.
I also inked the edges of kit ephemera with Mermaid Lagoon distress ink and placed just under the edges of the card stock.

A close up of one of the embellishment clusters:


This final project incorporates the kit, a few kit add ons and some items from my stash.
I began by applying texture paste through a Tim Holtz stencil and then pressing in small pieces of gilding flakes.  

Die cut made with the Tim Holtz mixed media die is adhered with Distress Collage Medium to the burlap panel. Card from the Ideaology Collector Layers is adhered with collage medium as well. Once dry, texture paste is applied through a Tim Holtz Stencil.
The entire panel is then misted with Distress Spray Stain in Mermaid Lagoon and Twisted Citrus along with a spritz of Mr.Huey's Spray in Boss Lady.
Large flower is die cut from the Ideology Collector Layers and TH Tattered Flowers die, spritzed with Mr. Huey's Boss Lady and applied with Mono glue to the canvas.
A postcard and image from the Snippets ephemera pack, clip, chipboard words and sticker phrases-all from the kit-along with a few blooms from the  Add-On Ideaology bouquet complete this decorative burlap panel.
That's it for me with this kit...and just to prove to you how much product is in this kit, here is a photo of what I have left over after creating 10 projects:
Still have 5 full size pieces of patterned paper😀along with lots of chipboard words, sticker phrases and alphas.

Thanks for taking a look, please visit the Scrap Shotz blog to see my earlier projects and Guest Designer Nicole Wright's projects...wishing you a wonderful day😊

SaveSave
SaveSave

Tuesday, April 25, 2017

Journaling with March Kit

Hey Scrappers, Nicole here and I am back as a guest to share another project I made with the Scrap Shotz March Kit.  
There is so much you get in this kit that I barely made a dent creating this Junk Journal.  I am so excited to share Sizzix Designer Eileen Hull's new Journal die.  This junk journal is stuffed full of tuck spots, pockets and collaging.  


A sample of what I used my March Kit for.


Can you believe all this from that kit!


Want to see more?  Please stop by my blog for more inspiration of what you can do with this kit.  Thanks for stopping by and seeing my latest Eileen Hull Journal.  
 photo NWD Sig.png

Thursday, April 20, 2017

Etcetera Tag using the March Kit


Hi crafters, Nicole here and I am Nicole Wright Designs.  I am thrilled to be able to create with the Scrap Shotz March 2017 Tim Holtz Kit.   I love all the contents of this kit and that fact I get to make anything I want.  Woohoo!  The Etcetera Thickboard Tag is not included in the kit. 

A little about me then we will get to the good stuff.  I am a Canadian blogger, crafter and general mess maker.  I have been crafting for a while and blogging for around 10 years.  I currently design for Eileen Hull, Sizzix, Xyron and I design and write for Creative Scrapbooker Magazine.  I am lucky enough to teach classes where we make a mess and learn a thing or 2 along the way.  Sandy and I are working together and I am thrilled to offer the Boy and his Dog class at her next crop in May!  Start of something new…?


There is so much you can create with a half pack of Tim Holtz paper pack Memoranda.  I covered the whole tag with this awesome pattern paper.


I cut some of the Memoranda paper up.  The smaller images found throughout the paper is great for collaging.


The Mini Cabinet Card stuffed with a Found Relatives vintage photo is perfect to layer with.  Those Silver Metallic Alpha Stickers are a great embellishment that come in the kit.


Ohhh these Chipboard Quote Chips are awesome inked up with Vintage Photo Distress Oxide Inks.


OMG I finally have the Floral Stencil!  Guess what I finally found… my Crackle Texture Paste.  Had to be done, that’s right more Distress Oxide Inks really shows off that crackle.  Loving it…


OK, I was just out in Victoria and found a little awesome antique store where I found some vintage stamps.  I stamped, inked and layered!  So fun!!!!


Do you have some new ideas for this Tim Holtz?  I know I do.  I am working on another project using all these yummy papers and embellishments. 

Thanks for stopping by and thanks to the Scrap Shotz Team for letting me invade their blog!  Be sure to check out my blog where you can check out all the stuff I’m up too.  Want more.. you can stalk me on Social Media too where I share a lot of behind the scenes stuff.  All the links are on my blog, HERE.

Happy Crafting, Nicole


Friday, April 14, 2017

Scrap Shotz March 2017 Kit Reveal

**Please Note: Photobucket very recently changed their terms of service and no longer supports direct linking for 3rd party hosting of images. To view the images not displayed, hover and right click over image, then choose either "open image in new window" or "open link in new window" **

Hello!
Thank you so much for your patience with a few delays that have kept you waiting for the Design Team's project reveal.
I, Rosie, am happy to be sharing some of my projects with you today.
Truthfully, I am still finishing up a couple of projects so rather than keep you waiting to see them all I  am kicking off our team reveal😊

We love to share our interpretation of a sketch and this month we've chosen to use this Scrapbook and Cards Today sketch:

Let's take a look at a few close ups:
I fussy cut this flower from the kit patterned paper and inked the edges; the leaf die cuts were cut a few of the Altenew Hello Sunshine dies.
I applied Nuvo Glitter Glimmer Paste to the edges of the 3x4 papers and kraft card stock photo mat.
These die cut edges are inked and layered behind the Clippings stickers. The layout is finished off with the kit Perfect Pearls.
A hand cut banner houses the layout title and is surrounded by journaling.

As this kit is full of Tim Holtz I had to channel my inner Tim and combine modelling paste, a TH stencil, Distress Glitter dust, Distress Collage Crazing Medium and Vintage Photo Distress Ink.
  I sprinkled the glitter over the texture paste while the paste was still wet, let it dry and then applied the crazing medium to seal the glitter so it doesn't flake off.

I pulled out my Silhouette Cameo and Tim Holtz Oxide inks for the following layout, I just love how smooth and opaque the inks apply:
A few of the negative spaces are backed with kit patterned paper and I lifted up the cut file with dimensional adhesive over the oxide inked background. 

The kit twine is wrapped around the frame and also accented with the Clippings die cuts.
Here's a close up of one of the clippings, chipboard and sticker clusters.

I'll finish off this first part of my kit reveal with this card:
The floral image is from the Altenew Amazing You stamp set. 
I stamped the images on patterned paper, fussy cut, coloured the inside of the floral leaves with a Versamark embossing pen, applied Emerald Creek Fractured Ice embossing powder and heat set.
The background is translucent embossing paste mixed with Mermaid Lagoon Distress Spray and spread through a Tim Holtz stencil.
Nuvo crystal drops and a clip from this month's kit complete the accents on the card.

There will be more March kit projects for your viewing pleasure so keep checking in!
Thanks for stopping by! 

SaveSave
SaveSaveSaveSave
SaveSaveSaveSaveSaveSaveSaveSaveSaveSaveSaveSaveSaveSaveSaveSaveSaveSave
SaveSaveSaveSaveSaveSaveSaveSaveSaveSave
SaveSaveSaveSaveSaveSaveSaveSave
SaveSave
SaveSaveSaveSaveSaveSave
SaveSaveSaveSave
SaveSaveSaveSaveSaveSaveSaveSaveSaveSaveSaveSaveSaveSaveSaveSaveSaveSaveSaveSaveSaveSaveSaveSaveSaveSaveSaveSaveSaveSave