Monday, May 30, 2022

Scrapbooking with the Splendid Collection- May Kit Club!

Hello friends! Karla here today with a look at the beautiful May Kit Club featuring the Paige Evan's Splendid Collection! Be sure to scroll down to see the process video where I put this together Live on the Scrap Shotz Facebook Page. 


I used a sketch to start from the PageMaps Sketches website. I love starting with a sketch! 


I used some of the pretty floral paper as a background, and as you can see from the video below, created a frame to save the inside of that lovely paper for another project! I used the wave stencil from the Vicki Boutin Sweet Rush collection and some Distress Oxide Ink to create a subtle effect on the Bazzill cardstock included in the Kit and then added some splatters of Kitch Flamingo Distress Oxide Spray.

I added ephemera and puffy thicker stickers from the kit as well, popping some elements up with foam tape for dimension.


I cut a strip from the gorgeous acetate sheet also included in the kit to place under my photos. The beautiful gold accents are amazing! I combined stickers and ephemera from the kit, and some Thicker letters from my stash, to complete my title and finished it off with some of the pretty flower sequins and enamel hearts and dots.


Here's a look at the video where you can see exactly what's in the May Kit and how to put this layout together!


The May Kit  features 12 of 24 papers, This & That Phrase Thickers, Sequin and Epoxy Sticker pack, Icon Ephemera, 6 sheets of Bazzill Cardstock and the gorgeous Acetate Specialty Sheet! 


You can also purchase the Splendid collection piece by piece in the Shop!

Thanks so much for stopping by today! I hope you have an amazing week! Don't forget to take a break and join us on Facebook at 1 pm MST every Thursday for a Live demo featuring fun products!


Sunday, May 29, 2022

Splendid Mini Album - Part 1


The May Scrapbooking Kit features the newest Paige Taylor Evans collection called Splendid. In classic Paige style, the collection is colorful and floral and whimsical and full of all kinds of fun patterns! While I love my usual 12x12 format, this bright collection had me thinking mini album!  

For this post I will show you how I made the actual album itself from the pattern and cardstock papers in the Kit - and in a few days, I will pop up another post to show you the finished album. 

Step 1: Decide the size of your mini album. For this process, we are using 12x12 papers so you can go any size really - for a teeny weeny little 2x3 to a 6x12. I went with a 6x6 for a few reasons. I wanted it small but not too tiny, some of the embellishments and stickers are pretty big and I want to make sure I could use them all, this size only requires one cut, and you get 2 album pages (so technically 4 album layouts) from that one cut. 

Step 2: Select your papers. I went through the Kit and chose all the papers that made me most happy and one of each coordinating card stock. The few papers I left behind will mat my photos in the album. Note, the more papers you pick the bigger the album / more pages the album will have. These are the A and B side of the papers I picked.


Step 3: Cut and score your papers. With a 6x6 album you want to cut the paper into 12x6 strips aka in half. For the pattern papers, pay attention to the pattern direction when you cut - some patterns only make sense one way (words, birds, flowers) so you need to cut so that when you fold the paper longways the pattern will make sense. 

I used my trimmer to cut and score my papers. Cut: line up each paper to 6inches on your trimmer and slice - so you end up with a 6inches high and 12inches wide strip. Score: then turn the paper strip once and line it up to 6inches again on the board (so the very middle of the 12inches is dead centre on the cutting blade channel). Then use a ruler edge or scoring bone or if you trimmer has a score piece - score the paper. 

Do this for every pattern you picked. Each 6inches x 12inches scored paper will make 4 layouts in your album. 

Step 4: Assemble your album. Take all those papers you cut and scored and stack them and fold them in half like a book. Sometimes first folding each paper in half before you stack them and fold makes it a little easier - especially with card stock. The paper on the very bottom will become your front and back cover so pick that one with care, and the paper on the top will be a very pretty double layout at the centre of your book, so pick that one special too. 

Flip through the book a few times to see if you like the order of patterns and colours - switching papers around as your heart desires. Once the album is in the order you want, bind the album.

If you have a long arm stapler you can staple the spine (unfold and flatten the book making sure your cover is on the top when you staple - so the pokey part of the staples are on the inside of the album). I don’t have a stapler, so I use an elastic around the middle where the score is or a few wraps of twine. The twine on the edge is a neat touch and looks pretty on the shelf. 

Step 5 - OPTIONAL! Prep the pages with the theme you want for your album. Before adding photos or embellishments or anything, I like to bring a touch of a theme to my mini albums. For this mini, it’s a wee gift for my nephew about our pup. So I used a Peartree Cutfiles Stencil of little Doggy Paw Prints and various Tim Holtz, Distress Inks in a coordinating colour to bring a subtle tone on tone dog paw pattern to most of the album pages. 

Next step is to make a whole bunch of mini-layouts to fill your album - the really fun part! I will share my process and the final album next blog post. 


Saturday, May 7, 2022

Simple Stories, Simple Vintage Indigo Garden Kit

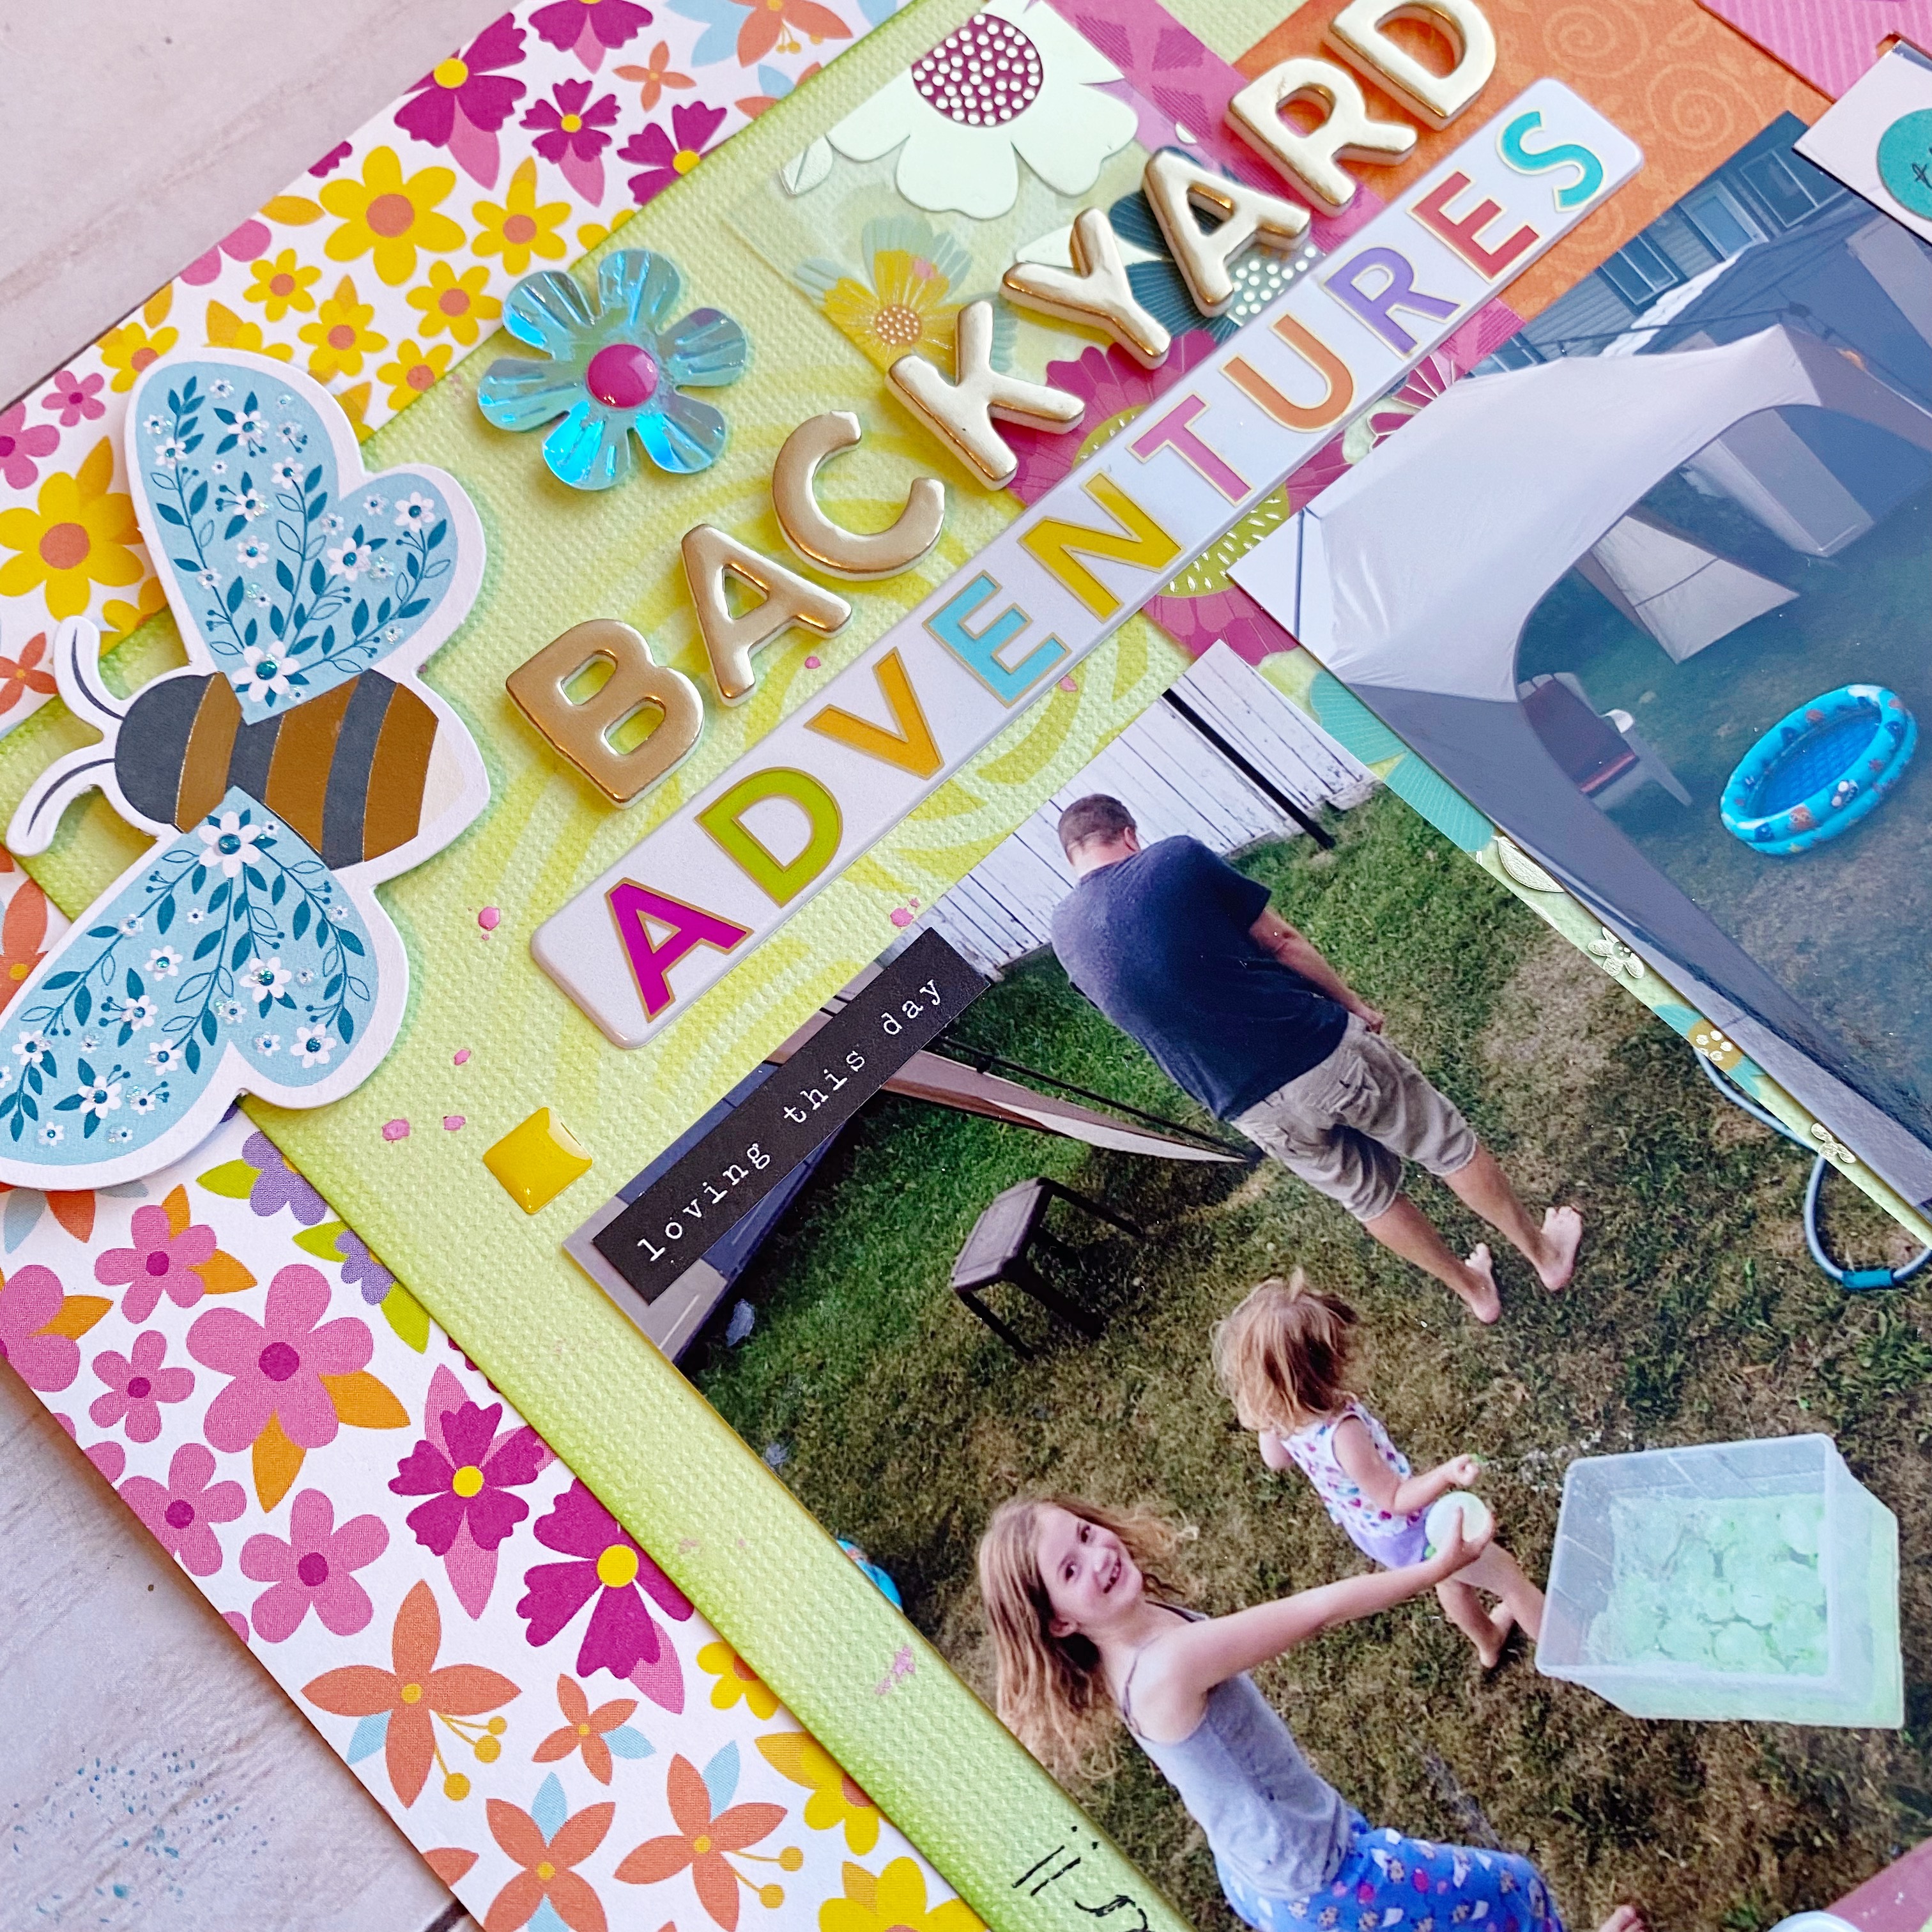
The Simple Stories, Simple Vintage Indigo Garden collection was the star of our March 2022 Scrap Shotz Scrapbooking Kit. An absolutely beautiful collection with lots of florals, great sentiments, hearts, and so many pretty butterflies. 

I am playing with the simple Stories, Simple Vintage Indigo Collection Kit, Chipboard Stickers, Bits & Pieces Die Cuts, Decorative Brads, Foam Stickers and coordinating Bazzill Basics Cardstock in pink, mint and yellow. Aka the Kit! 


All My Favourite Patterns 

For my first layout I set aside all my favorite patterns from the kit and got to work! I used a large circle (almost the size of a 12x12 paper) and used it to trace and cut out a few different sized wedges from each pattern then used those to roughly create a circle in the middle of the layout. Before adhering the pieces down, I traced the outside of each messily with a black journal pen and distressed the edges. I also used some Tonic Crystal Drops in Ebony Black to add black splatters to the paper wedges and the background pattern. 

(Splatters How To? Squish out some Nuvo of any colour, add a few spritz of water, mix it up with a paintbrush and flick it onto your layout - the bigger the brush and more dramatic the flicks, the more bold your splatters will be!)  


From there I backed my photo with a bunch of the collection patterns and had a lot of fun tucking and layering all kinds of embellishments. I focused on the Bloom & Grow title and florals behind the photo and from then just found other favourite things. So many amazing embellishments in this kit! 

I felt like the layout was missing something though. So used a Vicki Boutin botanical stamp on that dark grey pattern paper and fussy cut them out before tucking them in around the floral embellishments. I like the added contrast! 

Celebrate Indigo

For my next layout, I focused on the indigo bits! There are not too many collections that feature indigo and anything close to purple. So I was pretty excited that this one has pops of indigo - a deep purple with a touch of navy that after playing a little was a lot to found a combo of Tim Holtz, Distress Ink in Blueprint Sketch and Wild Plum to match. 

I started with white cardstock and using a Vicki Boutin stencil add some random stencil spots using the Tim Holtz colour combo. I used the same colours to add some splatters and, of course, a few black splatters too. 

Then I cut the black and white pattern in 4x6 so I could use a 2x3 photo and use the other half as an anchors for some of the floral embellishments. I added a few other patterns behind as well so they would peek out. And, you guessed it, from them I just tucked and layered goodies from  all the embellisments.


I added some black and white twine to the tags and really like the added texture. I was drawn to the green ‘Hello’ in the Foam Stickers so used that as my title and it inspired the added touches of green around the layout. I think it was a great finishing touch! 


Cascading Circles 

If you have seen any other posts form me .. you may know I love, love, love circles and a cascading design like this one is a go to. Such a great way to use way too many embellishments (is that a thing?) and show off lots of the pattern papers too. 

I picked a dark pattern paper for the background on this one, and prepped it with a Vicki Boutin stencil and splatters in Tim Holtz, Distress Ink in Spun Sugar. Then I found all the circle and large heart embellishments in the kit, cut a few more circles from the pattern papers (focusing on the black and white stripe) and made a circle mess down the page. 


No real method to my madness other than just evenly distributing the different patterns and textures throughout. I finished the layout off by dropping this 4x4 photo on the middle, adding the title from the foam stickers and finally the decorative brads.  

Inspired by An Embellishment

There are these cute little tags in the kit embellishments - a little sentiment with a clip - that sparked this page design. I had an idea of a clothesline look with my photos and all kinds of goodies hanging from it. Well, I may have embellished so much you cant see much of the twine - but I still love it. 

I prepped the cardstock with a bit of Tim Holtz, Distress Ink in Black Soot and a Vicki Boutin stencil, a few splatters in the same colour and some white acrylic paint splatters too. I had some yellow texture rub-ons in my stash that matched the kit’s yellow, so added a few bits here and there too.

Once the background was prepped, I adhered a loopy black and white twine across the middle of the page and added ALL those little tags I could find in the plain, chipboard and foam stickers. Then I just went crazy adding all the things - photos and florals and butterflies and more. 


I finished it off by creating a little mirrored cluster at the bottom of the page to balance how ‘heavy’ I made the middle of the layout. I also cut a little bit off 3 sides of the background so I could peek-a-boo one of the pattern papers around the sides.

If you are playing with this collection in the March Scrapbooking Kit, grabbed some from the shop or about to grab some cause now you love the collection as much as I do … we would love to see what you create. Tag us on social media or join the Scrap Shotz Paper Crafting and post your project! 

Thanks for reading and happy crafting! 


Friday, May 6, 2022

Simple Stories, Full Bloom

Happy Spring! I am celebrating spring here on the West Coast by playing with pretty flowers in my garden and in my scrapbook room! The Simple Stories, Full Bloom collection everything Spring you could hope for - flowers and bees and ladybugs and gardening and sunshine and rainbows! 

In classic Simple Stories style, there are a ton of different goodies with this collection and we have a whole host of them in the Scrap Shotz Shop! I am playing with the Collection Pack, Bits & Pieces Die Cuts Journal, Chipboard Stickers, Puffy Stickers and Decorative Brads


Tags, Tags, Tags 

For my first layout I just had to use the tag cut apart sheet - literally a page of tags on both sides of a whole 12x12 paper and not one of the tags are the same. Wow! 

I cut out the tags that made me most happy, and specially picked that ‘happy day’ tag (I added the heart) as my title. After adding some white acrylic paint splatters to the page, I layered the tags and my 2x3 photos across the middle. I focused all my embellishments in and around the title tag and, of course, those cute little snails just had to find a home on my layout. 


All The Patterns 

For my second layout, it was all about the fantastic pattern papers in this collection. I had too many favourites to pick one, so decided to create an angled and ripped paper design to   show off a bunch of them! Creating a bit of a mirror image on the top and bottom of the layout, with the top much smaller. 

When I secured the papers down I made sure to only adhere near the bottom edge of each giving me the little pockets to tuck and layer all kinds of goodies from the collection - and yes, the tags made another appearance! I was going for a fun, crazy, mess of happy things - which is a perfect depiction of me and my nephew’ adventures.

I did add a little bit of stenciling just peeking out from the ripped papers with Tim Holtz, Distress Ink in Mustard Seed and a few splatters to break up the white space a wee bit. 


Photos Dictate the Design 

For this layout, I wanted to capture a ‘all the things growing’ vibe. We bought a new house in fall and it was so amazing discovering all that the prior owners had planted and started to grow and bloom the first spring. So exciting - these are just the best of the pics!

I focused on creating a little garden with the embellishment clusters at the top and bottom of the photo grid. A couple of  the little sign die cuts were blank - so I added a couple of stamped words to each. I also added the botanical stamps around the photos using a Vicki Boutin stamp and Tim Holtz, Distress Ink in Evergreen Bough plus a few puffy sticker leaves from a Vicki Boutin collection too. I love the green on green look, subtle but cute. Some white splatters and outlining the page messily with a white pen finished it off. 


Use Black to Make it Pop 

There is a lot of soft orange and yellow and pink in this collection with only a few contrasting patterns and sometimes I like a really strong contrast … so I made my own contrast. 

The background is a bit of an intentional mess really - I used a stencil to add colour here and there with Tim Holtz, Distress Inks in Mustard Seed and Barn Door. Then added some circles with black ink using a variety of circle stamps from my stash and finally some black splatters. 

I backed the entire layout in black and my photos too. And a black title from Vicki Boutin combined with the collection embellishments gave me that contrast I was looking for! 

Are you playing with the Full Bloom collection? We would love to see, pop your creations up on the Scrap Shotz Paper Crafting Group or tag us on social media. Or looking to get your crafty hands on some Full Bloom goodies, pop over to the shop at Simple Stories, Full Bloom.


Cocoa Vanilla "No Limits" Scrapshotz Kit Take 2


Hello! I'm back with more layouts from the April Scrapshotz kit - Cocoa Vanilla "No Limits." What a fun patterned paper this one is! I used a No Limits Pocket Card for the journaling and embellished with chipboard and lightning bolts from the Die Cut Ephemera pack. Lots of foam used under various elements on this layout gives it depth and dimension!


Another hockey layout! This time I drew a border around the outside of the patterned paper with a black pen and used a phrase from the No Limits Die Cut Titles pack for the title. A couple of cards from the Pocket Card pack for a journaling spot and a ticket out of the Die Cut Ephemera to finish it off.

This simple card used a die cut from the Die Cut Ephemera and a word strip from the 6x12 Accessory Stickers. To add to the galaxy effect, I used some Tonic - Nuvo Dream Drops Enchanted Elixir for stars. So pretty! They add a shimmery glow to the background.

The main sentiment on this card was die cut twice with the Lawn Fawn Giant Thank You Die (available in the store!) from patterned paper out of the No Limits Paper Stack. The rest of the embellishments are from the 8x12 Chipboard sheet and the 6x12 Accessory Stickers. To give the card a little extra, I used Ranger Glossy Accents on all the bits as well as the die cut. I love the smooth shine that it gives the card.


This slimline card was created from bits and pieces from the chipboard, stickers and ephemera that makes up this fabulous line. I hope that I've inspired you to create with this awesome kit!


Monday, May 2, 2022

Cocoa Vanilla "No Limits" Scrapshotz Kit


I was thrilled to be able to work with the April Scrapshotz kit featuring the No Limits line from Cocoa Vanilla! This line is perfect for sport photos as well as almost any other event that life presents. I used it for this double page spread of my grandsons hockey season.

The title on the left side of the layout is from the chipboard embellishments. I wrote the journaling on a pocket card and the stars and banner are also from the 12x12 chipboard sheet.

The big titles on this side are from the Die Cut Titles. There are so many to choose from in this package! The stars and circle embellishments are from the Die Cut Ephemera package, and the word banners are from the 6x12 Accessory Stickers.

I had to use the paper from the paper stack to make cards! This big die cut was cut from the patterned paper with a Lawn Fawn die that is in the store here Big Hugs. I backed it with a second die cut in black and used small chipboard embellishments along with some Ebony Black Crystal Nuvo Drops that are in the store. This card would work for so many things.

For this card I used some starry patterned paper and a pocket card with some stickles on the letters. So colorful and easy! The stars are from the Die Cut Ephemera pack and got a Stickles treatment as well.

This card uses a sentiment from the Die Cut Ephemera package and word strips from the 6x12 Accessory Stickers. I used foam squares to pop up the sentiment and puffy stars to highlight the word strips.

Thanks for looking! I will be back later this week with more projects from this awesome line.