The Simple Stories, Simple Vintage Indigo Garden collection was the star of our March 2022 Scrap Shotz Scrapbooking Kit. An absolutely beautiful collection with lots of florals, great sentiments, hearts, and so many pretty butterflies.
I am playing with the simple Stories, Simple Vintage Indigo Collection Kit, Chipboard Stickers, Bits & Pieces Die Cuts, Decorative Brads, Foam Stickers and coordinating Bazzill Basics Cardstock in pink, mint and yellow. Aka the Kit!
All My Favourite Patterns
For my first layout I set aside all my favorite patterns from the kit and got to work! I used a large circle (almost the size of a 12x12 paper) and used it to trace and cut out a few different sized wedges from each pattern then used those to roughly create a circle in the middle of the layout. Before adhering the pieces down, I traced the outside of each messily with a black journal pen and distressed the edges. I also used some Tonic Crystal Drops in Ebony Black to add black splatters to the paper wedges and the background pattern.
(Splatters How To? Squish out some Nuvo of any colour, add a few spritz of water, mix it up with a paintbrush and flick it onto your layout - the bigger the brush and more dramatic the flicks, the more bold your splatters will be!)
From there I backed my photo with a bunch of the collection patterns and had a lot of fun tucking and layering all kinds of embellishments. I focused on the Bloom & Grow title and florals behind the photo and from then just found other favourite things. So many amazing embellishments in this kit!
I felt like the layout was missing something though. So used a Vicki Boutin botanical stamp on that dark grey pattern paper and fussy cut them out before tucking them in around the floral embellishments. I like the added contrast!
Celebrate Indigo
For my next layout, I focused on the indigo bits! There are not too many collections that feature indigo and anything close to purple. So I was pretty excited that this one has pops of indigo - a deep purple with a touch of navy that after playing a little was a lot to found a combo of Tim Holtz, Distress Ink in Blueprint Sketch and Wild Plum to match.
I started with white cardstock and using a Vicki Boutin stencil add some random stencil spots using the Tim Holtz colour combo. I used the same colours to add some splatters and, of course, a few black splatters too.
Then I cut the black and white pattern in 4x6 so I could use a 2x3 photo and use the other half as an anchors for some of the floral embellishments. I added a few other patterns behind as well so they would peek out. And, you guessed it, from them I just tucked and layered goodies from all the embellisments.
I added some black and white twine to the tags and really like the added texture. I was drawn to the green ‘Hello’ in the Foam Stickers so used that as my title and it inspired the added touches of green around the layout. I think it was a great finishing touch!
Cascading Circles
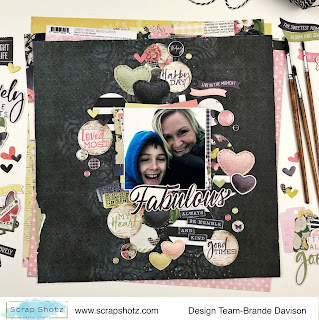
If you have seen any other posts form me .. you may know I love, love, love circles and a cascading design like this one is a go to. Such a great way to use way too many embellishments (is that a thing?) and show off lots of the pattern papers too.
I picked a dark pattern paper for the background on this one, and prepped it with a Vicki Boutin stencil and splatters in Tim Holtz, Distress Ink in Spun Sugar. Then I found all the circle and large heart embellishments in the kit, cut a few more circles from the pattern papers (focusing on the black and white stripe) and made a circle mess down the page.
No real method to my madness other than just evenly distributing the different patterns and textures throughout. I finished the layout off by dropping this 4x4 photo on the middle, adding the title from the foam stickers and finally the decorative brads.
Inspired by An Embellishment
There are these cute little tags in the kit embellishments - a little sentiment with a clip - that sparked this page design. I had an idea of a clothesline look with my photos and all kinds of goodies hanging from it. Well, I may have embellished so much you cant see much of the twine - but I still love it.
I prepped the cardstock with a bit of Tim Holtz, Distress Ink in Black Soot and a Vicki Boutin stencil, a few splatters in the same colour and some white acrylic paint splatters too. I had some yellow texture rub-ons in my stash that matched the kit’s yellow, so added a few bits here and there too.
Once the background was prepped, I adhered a loopy black and white twine across the middle of the page and added ALL those little tags I could find in the plain, chipboard and foam stickers. Then I just went crazy adding all the things - photos and florals and butterflies and more.
I finished it off by creating a little mirrored cluster at the bottom of the page to balance how ‘heavy’ I made the middle of the layout. I also cut a little bit off 3 sides of the background so I could peek-a-boo one of the pattern papers around the sides.
If you are playing with this collection in the March Scrapbooking Kit, grabbed some from the shop or about to grab some cause now you love the collection as much as I do … we would love to see what you create. Tag us on social media or join the Scrap Shotz Paper Crafting and post your project!
Thanks for reading and happy crafting!


No comments:
Post a Comment