Monday, February 28, 2011

ALERT!!!! Crop Sneaks!!!

OK I just crashed the Design Team's galleries to grab a few crop sneaks for you!!!! Check these out!


Intrigued?

Sunday, February 27, 2011

Psst! Crop Sneak Peeks #1

Ssssh! I can't make too much noise or the rest of the DT will hear me! I've got some information on the upcoming crop!

Wanna know???

Friday, February 25, 2011

Fabulous Friday - Blueprint Challenge

Whooo hooo! We have an awesome blueprint for this arctic Friday from the lovely Laura!

Isn't this sketch THE cutest??? And banners are seriously all the rage now!


Here is Laura's interpretation, equally delicious!


Let's see your interpretation!

Thursday, February 24, 2011

Fabulous Find - Canadian Scrapbooker Spring 2011

Don't you love holding a magazine in your hands, especially a scrapbook magazine? Yeah, I thought so! Me too! Nothing is more enjoyable than soaking in the tub surrounded by yummy candles, slowly reading a scrappy magazine.

One of the magazines I love is Canadian Scrapbooker. I love that it features a lot of Canadian talent, that it is created right here in Alberta, that the people behind the magazine are AWESOME and that there are A LOT of Scrap Shotz girls in each issue!!!! I love it, love it, love it!!!


Check out this issue in the store. If you are having trouble finding it, give Sandy a shout. She will hook you up! :-)

Wednesday, February 23, 2011

Fabulous Fundamental - The Sew Easy

Whoo hoo! Today we have a double-double (for all you Tim Horton fans!!!) - a Roving Reporter post from Lynnette Parent and a Fabulous Fundamental on the Sew Easy tool. This hot tool is a must-have in a scrapbooker and cardmaker's toolkit. Read onwards to read Lynnette's article.

I've always loved the look of stitching on layouts but have never had the urge to pull out my sewing machine and give it a whirl. I thought it would be way too much hassle to deal with my very heavy machine. And what if, after spending hours on a layout, I wreck it by sewing crookedly?!

Then I saw the Sew Easy. I immediately thought this simple little tool could finally be what I was looking for.

I went whole hog and purchased the handle, seven heads, extra needles, the pad and the red thread package. I gave it to myself for Christmas :-)

Here are a few things I've figured out:

- It is very easy to keep a straight line with the heads. I had thought it might be tricky but it really isn't.

- The heads are very easy to change and they lock in securely.

- You can use each head for at least 3 different looking stitches - very cool.

- You should use their custom mat as it keeps the points sharp. And the mat is over 12 inches long so you can go end to end on your layout without needing to move it.

- With some paper, if you push too hard, you make a crease and with others, if you don't push hard enough, you won't perforate the paper. It takes a little practice.

- Bazzill doesn't perforate well.

- I've been using up old embroidery floss (3 strands at a time). The Sew Easy thread looks nice too.

- You can use a pen instead of thread to do the "stitching".


On this layout I drew pencil lines with a ruler and used the simple single stitch head to punch the holes. I found it fairly easy to lift the head up and place it down again at the corners so I could match up the stitches.


I used the scalloped edge head for this one. As there are TWO layers of Bazzill here, there was no way the holes were going to perforate all the way through. I used the head more to MARK the placement of the holes and then used my piercing tool to actually make the holes. It only took a few extra moments for this step.

I finished the scallop off by putting a brad on each point.


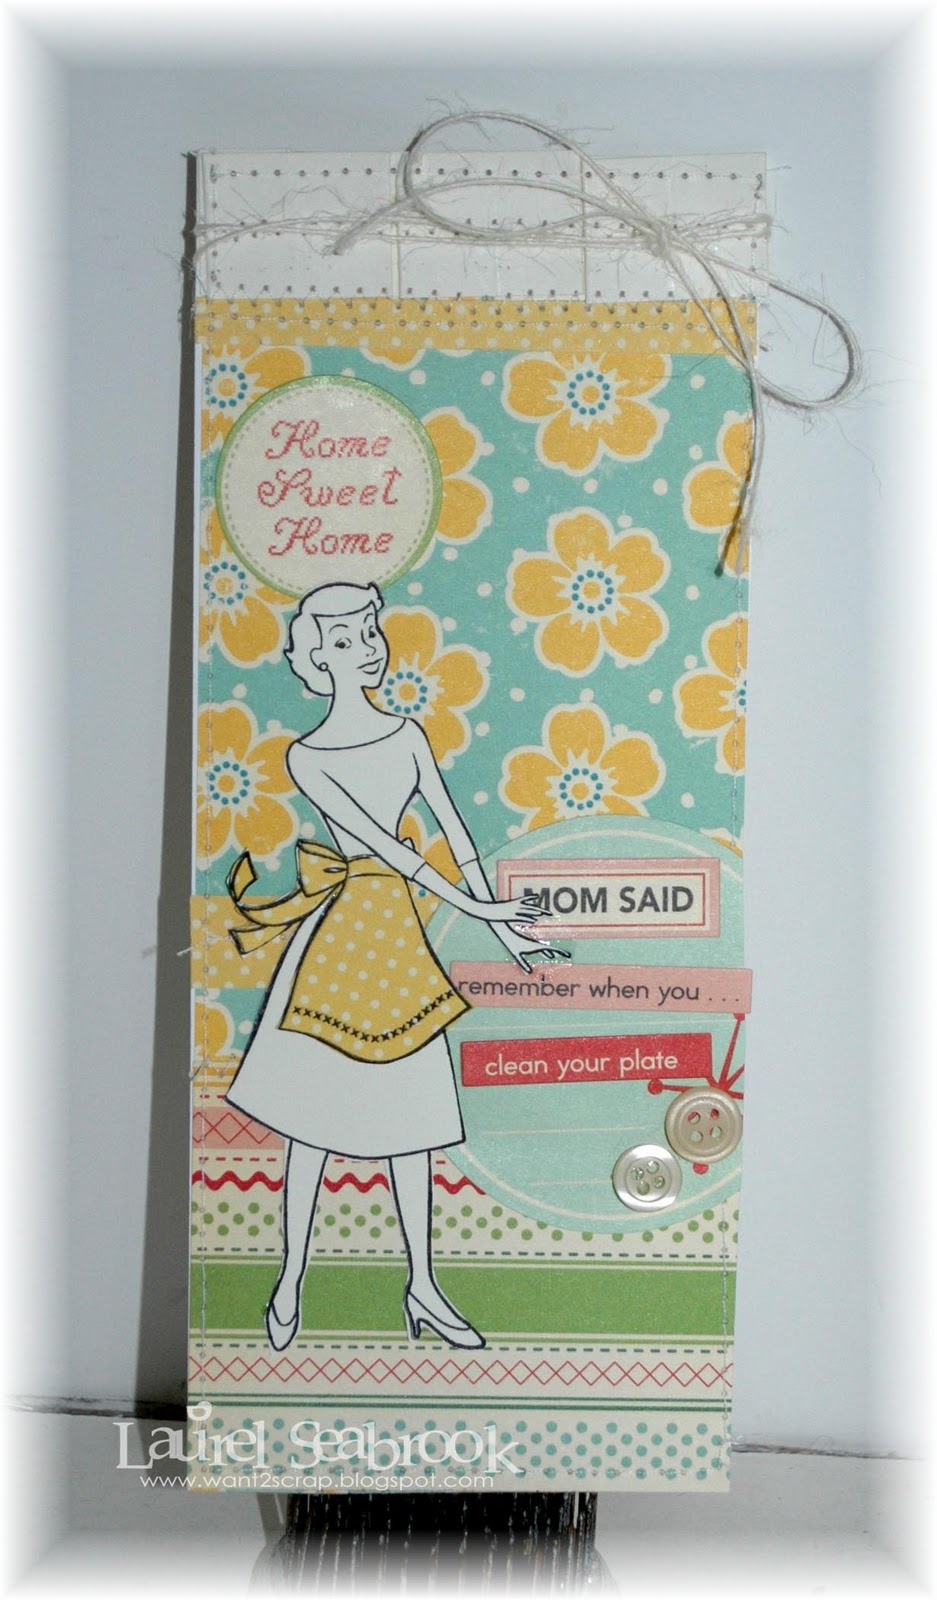
Here is a card I made using the starburst head. I didn't NEED to use the piercing tool but it is easier to sew if the holes are larger.


 Another very simple card.


With this layout I just wanted a touch of stitching that would blend with the colours of the photos. I found it a little difficult to get the holes to mark on the plaid paper AND the cardstock and had to go over it twice. I also had to use the piercing tool as there are two layers of cardstock.


This time I wanted to see if I could easily follow a curved edge. I traced the heart and then used the simple stitch head. It was a little harder to stay right on the pencil line but in the end I think it turned out great. I did each side of the heart differently so you can see how it looks with the stitches open and closed.


When I took the heads out of their packaging I kept each cardboard insert as they have samples of the different stitching you can do with each head. I put the heads in a little tin and keep everything together with an elastic band. I am considering purchasing the new case they came out with though.


Chloe Hill came up with this VERY innovative way to store her Sew Easy and Brad maker. I think it is so cool. If I can find a place in my scraproom I may do this!

All in all, I think the Sew Easy is a great investment and a tool that you can use over and over. They recently came out with 8 new heads and all kinds of new threads so I can see where my scrapbooking dollars will be going!

Tuesday, February 22, 2011

The Roving Reporter - CHA Winter 2011 Los Angeles

CHA - just hearing those initials makes my heart beat just a wee bit faster! It's a dream of mine to attend CHA. Wouldn't it be divine to be surrounded by all those new releases from all your old favorite manufacturers and the new up and comers???? Yeah, I thought so!

We are SO SO SO lucky to have Connie Nichol give us an insider report as our Roving Reporter during her recent trip to the 2011 Winter CHA. Here is the first of a 2-part series from Connie.


Usually the winter Craft and Hobby Trade show is held in Anaheim, so being in downtown Los Angeles was a bit of a change.  The show seemed smaller than last year, with fewer exhibitors and smaller booth sizes, but rumour had it that the Los Angeles convention center was more costly for the vendors.  Or perhaps it was the fact that the economic climate in the US is still largely not very good.

Anyway, despite this, in two full days, I still did not manage to see all the booths.   There were some lovely new products and I took several hundred pictures.  None of these photos  are particularly good because the lighting is a bit iffy in many booths, but you’ll get the idea.  Banners were everywhere, both decorating booths and incorporated into new products.  Circus themed paper was big.  Plenty of bird cages, bird themed stuff and botanical paper and lots of pleated paper rosettes and vintage looking resin flowers.  And there were also plenty of new ‘boy’ lines.  Here are photos of some of my favourites from the new releases:


Webster’s Pages had some great new lines.  I particularly loved Spring Market and Yacht Club.  As a fanatical gardener and a recent tourist to Nova Scotia, I need both of these in my collection.


There’s always a big crowd around the Graphic 45 booth.  It’s simply gorgeous!!!


Some very cute stamps by MyStamp Box, a Canadian company (as shown by the amazing Jackie Ludlage from Canadian Scrapbooker magazine).


KaiserCraft always has gorgeous products – these were two of my favourite releases, although I realize now that I don’t know what these lines are called.


Glitz Designs had some lovely new releases.  This was my favourite.


Nice stuff from Echo Park!!


And of course Tim Holtz had some new Sizzix dies, embossing folders and embellishments.  I am looking forward to getting these black plastic snap- off letters.  They look similar to the Heidi Swapp ones that were sold in pink and blue years ago, but much cooler.


...to be continued in Part 2...

Thank you Connie! I can hardly wait for Part 2!!!!

Friday, February 18, 2011

Fabulous Friday - Anything But Challenge

Hello, hello, hello Ladies! On this wonderful Friday, the lovely Ruby has created a fabulous Anything But challenge for us! Here it is...


I have coloured the canvas with 3 shades of dye inks. I found that daubers worked well to do this.  I applied water in a mister over the inked sections of the canvas. The inks started to move around on their own. I let the canvas dry and took a look at the way the ink moved.  Just played with the inks , canvas and water until I liked the result. After the canvas was fully dried, I used the  Unity stamps (Donna Downey)  to apply the designs.  In order to have a firm base  to stamp on , I used the cutting boards from my Cuttlebug for support. The ink  used was Rich Cocoa by Memento. After all my stamping was done, I let the canvas  dry for several days. To finish the canvas, I added embellishments, Ric Rack ribbon and the distressed frame.


Gosh Ruby, this is gorgeous! Thanks for your challenge!

Wednesday, February 16, 2011

February Scrap Shotz Reveal

Have you seen this???? Yes this IS the February Scrap Shotz Monthly kit titled "Spring is Coming."


This kit is a beaut. Check out the stunning projects the Design Team wow'ed us with this month.

From Laurel, we have this whimsical layout. The kit is chock-ful of fabulous corrugated die cut shapes.


Ruby created this stunning card. The corrugated die cut shapes are easily adorned with the gems also included in the kit.


Jennifer created this gorgeous layout using the stunning shaped pattern paper and a few of the other pattern papers included in the kit. How can you resist those October Afternoon mini alphas??? (I know I can't!)


How can you resist the jaw dropping layout from Laura? I love how she used so many of the pattern papers of the kit. And that banner is the perfect accessory to her photo!


Stephanie's layout is a timeless beauty. Those 3D butterflies (a kit add-on) are a delicious accent to her layout. Don't miss the adorable die cut person in the corner - just too cute!


Included in this month's kit is a fantastic envelope mini album. Here is an excerpt from Rebecca's mini album. Stunning was the first word that came to my mind!


As you can see, this kit is amazingly versatile, absolutely gorgeous and oh so easy to work with! If you are contemplating a Scrap Shotz monthly kit subscription, run, don't walk to Scrap Shotz. 

I'm sure you will agree that this month's kit is wonderful! What do you think?

Tuesday, February 15, 2011

Fabulous Find - American Crafts Ribbon Roses and SEI Juliette

Do you mix and match product lines between manufacturers? I do but I will admit that I like to stay within a manufacturer's line. Why mess with perfection? However, there are some products that just seem to work with almost anything. One such product is the American Crafts ribbon roses which debuted with the Dear Lizzy line.

I recently paired this luscious and oh so versatile American Crafts ribbon with SEI's Juliette line.


Supplies:  SEI (pattern papers, die cut stickers, alphas); American Crafts (ribbon); Prima (pearls); BasicGrey (chipboard alphas)

Although the ribbon "looks" bulky, it isn't! This layout fits nicely into a page protector in an album. The ribbon squishes down ever so softly yet still maintains its floral shape.


Simply adorning the ribbon roses with pearls adds a touch of elegance.


I can honestly say that the pictures do not do the papers and accessories justice. Several of the papers, die cut stickers and alphas are glittered. The colours are soft and muted but the glitter adds a subtle sparkle.


So what do you think? Don't you think these products are gorgeous and uber versatile?

Monday, February 14, 2011

Happy Valentine's Day!

Here's my pick for this week... love it Gail!!! Hope you all have a great day filled with love!


Friday, February 11, 2011

Fabulous Friday - Inspired By


Good morning Everyone! It's a fabulous Fabulous Friday, don't you think? Today we have an Inspired by challenge from the lovely Laurel.
  
Hi there, Laurel here.  I was browsing the Anthropologie website one day when I saw this pretty apron. 


It made me think of the October Afternoon Modern Homemaker paper so I decided to make a card for my mom.  I used both the Modern Homemaker and the Fly A Kite papers on this.  This could be a 'just because' card, a thank you card or even a birthday card. 
 

I would love to see how this apron inspires you.

Thank you Laurel!

Wednesday, February 9, 2011

Fabulous Fundamental - Distressing Part 3

This is the last of a 3 part series where the lovely Laura has dispelled all myths on distressing. I have learned so much from Laura over these past few weeks - thank you!

Without further adieu...

To create the pleated paper destressing you will need a piece of paper, your ink, a water spritzer, and some paper towels.
 
 
After inking and edge distressing,
 
 
get the corner of your paper wet using your spritzer. You may want to put your paper towels underneath.
 
Wet enough of the area to accomplish your desired look...or how ever mush you wish to pleat.


Using your fingers pinch the paper lightly together until you achieve your desired look. Do not pull too hard or you may rip the paper. I like the look of ripped paper but you may not. 

  
Continue pinching and pleating until you like what you see.
 

You can leave it to dry or use your heat gun to dry it.
 
On the following layout I used the pleating technique in the corner.


 On this one I pinched and pleated on both ends.

  
And on this last one I pinched and pleated a few layers
 
 
Thank you Laura - your work is SO inspiring!