Sunday, February 20, 2022

Day in the Life Traveler Notebook

 Hello! I've been playing with the January kit featuring the Echo Park "Day in the Life" Collection. This collection has all the usual fun papers and embellishments but it is also perfect for a planner or traveler notebook. I have so few pictures from 2021 due to the pandemic that I can probably do a traveler notebook for most of the year! 


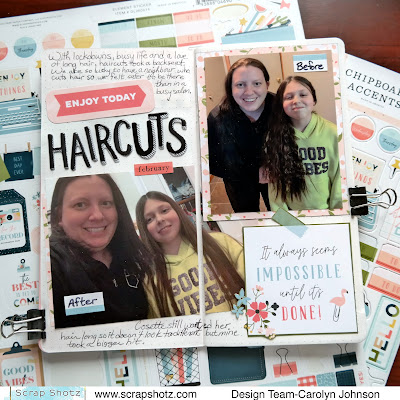
Is it bad that this was the only picture that I had from January?! We gave my husband a Star Wars waffle iron for his birthday so we enjoyed playing with our waffles. All the papers in the collection have cut apart cards on the back that correspond to each month. The tag that says "Keep it Real" is a cut apart card. The journaling is on a card from the ephemera pack. I also added some cardstock stickers and enamel dots. The date and stamping are from an older kit. The heart is from a 49th and Market sticker pack that comes with the kit.


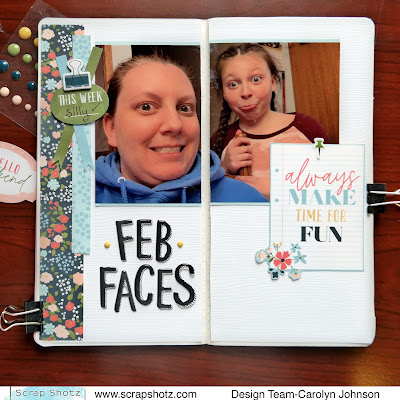
I'm in love with the "Sunny Days" Thickers! They are so playful. This page uses a fussy cut card, some cardstock stickers and ephemera.


I find that cutting pictures and leaving them spaced a little bit across the gutter helps to close the book. Which is also necessary when adding chipboard to the page. I used some of the Bazzill white textured cardstock as the background. 


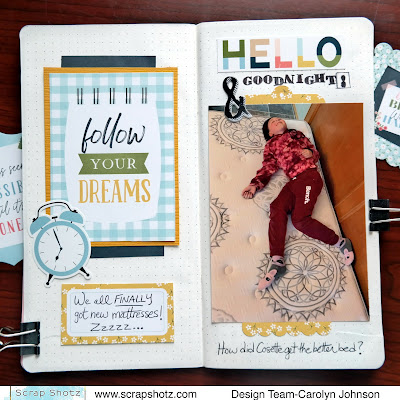
My daughter thought it was pretty fun to try out the new mattress in the living room. I used some amber colour Bazzill textured cardstock, cut apart card, cardstock stickers and ephemera. The stamps I dug out of my collection.


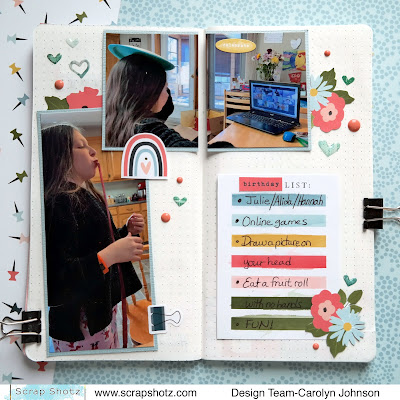
This page is showing how birthdays were celebrated all year - on Zoom! I fussy cut the flowers rainbow and used more of those pretty 49th and Market stickers. The photos are matted with Bazzill textured cardstock Coastal colour.


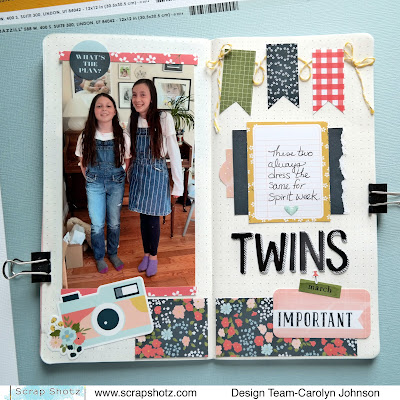
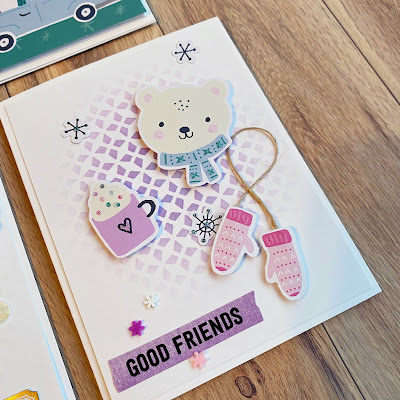
My last spread uses lots of ephemera and stickers and some twine from my stash. 

It was fun playing on a different sized surface than my usual 12x12. I hope you've been inspired! Thanks so much for stopping by!

Wednesday, February 9, 2022

More Feelin’ Frosty Inspiration!

Hello friends! It’s Karla back today with a couple more projects from using the Feelin’ Frosty Collection by Simple Stories! I think pretty papers and stickers make winter more fun, and this collection definitely has lots of fun and cuteness!! Here’s a look at the first layout I’m sharing today. 


I love the bright colours in this collection! I decided to use a Pagemaps sketch as a jumping off point to create this layout. I printed a 4x6 photo and two 3x4 photos with my Canon Selphy printer and layered on some polka dot and green snowflake papers from the Collection Pack to start. 


I added in titles with the Chipboard Stickers and some diecut letters and then created a fun cluster of embellishments with Chipboard and Puffy stickers as well as the 12x12 Sticker Sheet included in the Collection Pack (which can also be purchased separately HERE).


I diecut some of the 2x2 squares from the cut apart paper and layered on word stickers, Foam and Chipboard snowflakes and added in a few of the brads from the Decorative Brads Pack. I even added a few pink polka dots using a stencil from my stash and some Kitch Flamingo Ink on the white cardstock.


For the next layout, we made a scrapbook page online for last week's Thursday's Demo! You can watch it on Facebook HERE or click the video below to see exactly how it came together - then scroll down to see all the closeups! 


Products Used:


Thanks so much for stopping by! Don't forget to check out our Facebook Page every Thursday at 1 pm MST for a Live Demo with fun techniques and new products to inspire you! Have an amazing week friends 💓


Monday, February 7, 2022

Simple Stories, More Good Stuff


Hello, I am here today to wax poetic (again) about the Simple Stories, Good Life! Scrap Shotz sent me this collection to play with this month and I am loving it! You can check out my first 2 layouts here

Now, let’s show you a few more … 

Wood grain for the Win


For this layout I wanted to bring in a dark background to contrast the bright colours of the collection. So reached for a dark wood grain pattern paper from my stash. Wood grain is essentially a neutral and should go with anything in your stash. When you are struggling to match (which is my biggest struggle) - reach for wood grain. 

I prepped the wood grain by stamping some little hearts in Tim Holtz Distress Inks in Picked Rasberry and Mustard Seed then outlined each with a white pen, and added some white acrylic paint splatters. The hearts I made were my attempt at mimicking those in the collection. 

From there I focused on the cut apart 3x4 cards in the collection and bits & pieces embellishments. I cut a few big pattern paper rectangles to back my 3x4 card grid design, then focused on the grid. Matting each photo with a few layers and letting the 4th spot of the grid act as a title spot. 


I finished off the layout with these super cute photos of my niece (which I printed with a muted filter so they didn’t clash too much with the collection colours), and tucked and added embellishments and enamel dots all about.

Add Some Black to Make it All Match 


For my next layout I wanted to document a fun, fancy donut shop adventure with me and a couple siblings - all of us donut addicts. I was keen to include the Boca Grande logo I cut from the donut box but it looked too dark with the bright Good Stuff colours. So I added some more black to the collection goodies to make it all matchy-matchy! 


I started with this great circle pattern paper and using a washi tape roll and a glue bottle bottom as a stencil, used a black journaling pen to add black circles just off centre on many of the circles in the pattern. Drawing around each a few times and not perfectly. Then I used my favourite Picket Fence Studios, Paper Glaze in Black Peony and a Vicki Boutin stencil to add those cute starbursts in and around the circles and some splatters. I also messily drew lines around the outer edge of the pattern and backed it on black card stock. 

From there it was just a matter of finding all the foodie inspired bits & pieces from the collection and tucking them around the Boca Grande and my photos. I fussy cut the saying from one of the cut apart cards in the kit to use as my title. 

Let the Collection Inspire Your Design 

For my last layout, I let the Collection inspire me - from photo choice, to story and all the way to design. One of the pattern papers featured these 3x4 cut apart a cards that had the titles: Nope, Maybe, and Yes. The titles reminded me of attempting to take a selfie with our dog and the pictures went for bad to worse. Ha! 

I used each 3x4 card as an anchor and then matched a bunch of stickers, bits & pieces, and brads to the colour of the journal card. It was really fun to focus on the colour instead of how much sense the embellishments made - my fav is that thumbs up in the middle, yellow pile. So fun! 

I did add some white splatters to the background and punched out a bunch of these film strips in white to create a break between the busy polka dot pattern and my photos. Then added a few film strips to the top and some more embellishments to balance the page. 

I had such fun with this collection and love that it was so perfect for just the everyday fun stuff. There are still Simple Stories, Good Life in the Scrap Shotz shop!


Thursday, February 3, 2022

Simple Stories, Good Stuff

The Simple Stories, Good Stuff collection is just that - good stuff! Actually, great stuff! This collection features 12 fantastic pattern papers for the 12x12 scrappers and on the B side some amazing cut apart cards in 2 sizes for pocket scrappers. There is even a 4x6 calendar card for each month of the year for the project life folks too. 

When the Good Stuff goodies showed up at the door in my Scrap Shotz happy mail, I went straight for my fun and bright photos! The collection is all pinks and peach and mustard with pops of black and green. Fun photos it is. 

Numbers? Yes Please. 

Many of the Simple Stories collections have numbers in the Bits & Pieces (die cuts) set. They are so fun to play with. I have done a jumble of Simple Stories numbers before as an anchor for a photo and they are a great jumping off point to journal things like: # number of favourite moments from that memory or # reasons that you make me laugh, etc. For this layout I tucked in some journaling titled ‘12 weird things I love about our family’. I was laughing as I wrote them out. 

Pretty simple approach to this design. I added some white acrylic paint splatters to the pattern and used a film strip punch with vellum to anchor my photos. From them I literally tucked and played with the die cut numbers to make a jumbled mess around the photo, added some of the stickers form the 12x12 collection pack in and around the numbers and some of the enamel dots. 

To break up the busy green polka dot, I ripped a slim strip from the side and stapled on one of the stripe patterns to fill the gap. I love using this technique to bring in another, contrasting pattern. Tip: this is a great way to use a full length pattern branding strip you have left over! 

Envelopes? Of course. 


For my next layout I wanted create a ‘overflowing with cute’ design. So I reached for some fun filtered photos of my niece and made some little envelopes with the pattern paper from the collection. 

I don’t have an envelope punch board or die, so just took apart a small envelope I had in my scrappy space and traced it onto the pattern paper, cut it out, and folded it into an envelope-like shape. They are not perfect but I added so many die cuts you can’t tell. Tip: there are no imperfections on a layout, just opportunities to add a die cut! 

I prepped my background with a little Tim Holtz, Distress Ink in Picked Raspberry and the Heart Spiral Stencil from Peartree Cutfiles, and then a few white acrylic paint splatters. 

From there, I added my envelopes to the layout sort of overlapping each other a little to the left, and then started tucking and layering. I put a square or two of pattern papers in each envelope along with the photo - sort of a off kilter photo mat but also like a multi page letter. Then added all the floral bits from the die cuts and stickers,  some phrase stickers, and a few more die cuts to top it off. The finishing touch was the brads in a few little spots around the envelopes. 

Just before I set it aside, I felt the pink background was a bit too much - so ripped off a thin strip on the right and added a touch of a different pattern behind. Just like I did on the green polka dot layout above. Tip: if there is a design element you love, bring it into all the layouts your want. It’s not repetitive, it’s your signature touch! 

More pages in the making … 

Well I am off to make more good stuff with Good Stuff! If you are interested in playing with this collection, there are lots of goodies to choose from in the Scrap Shotz shop. Pop over and check them out at Simple Stories, Good Stuff 


Wednesday, February 2, 2022

Inspiration From The Feelin’ Frosty Collection by Simple Stories!

 Hi friends! It’s Karla back today with some projects using the awesome Feelin’ Frosty Collection by Simple Stories! This is such a pretty wintery collection with sweet images and designs!


I started off with a pink cardstock piece as a background and layered on papers from the Collection Kit, which includes a 12x12 stickers sheet and lots of cut apart papers! I used one of the 4x6 cut apart journaling cards that has all the fun winter icons in place of a photo and then placed a 4x6 photo beside it. I added in sticker elements from the 12x12 Sticker Sheet (sold separately as well HERE), the adorable Puffy Stickers (I might be addicted to these, lol) and the fantastic Foam Stickers around the page.


I cut one of the 3x4 journaling cards from the Collection Pack and cut it in half, adding journaling to the bottom half and adding the rest to the top right as an embellishment. 


I used the Hello Snow words from the 6x12 Chipboard Sticker pack as my title and added some splatters from the Avery Elle White Ink Spray on my page. One of the snowy brads from the Decorative Brad pack finishes it off! This pack not only includes lots of sticker brads (no more prongs to deal with!) in various sizes, colours and with different images, but also has a bunch of cute chipboard stickers!


For one of our Thursday Lives a couple weeks ago we put together a double page layout from the Winter Days Page Kit! This is a beautiful kit that makes FOUR layouts - two double pagers!! You can check out the Video HERE (or click below to watch) to get a closeup view of this page kit, a look at how it goes together AND how to use your leftover pieces to create pretty cards, which you can see below!!


Here's a look at the two double pages this Winter Days Page Kit creates! It's a great take along kit as it has all the backgrounds and punch out pieces to make them. Plus, it's super cute and has lots of space for many photos!


Here's a closeup of each page. You can pop elements up to give them dimension and even add glitter or sparkly drops as desired.


There will be ephemera left over... so I decided to create some quick and simple cards! We made one in the video above using a Vicki Boutin Fernwood Stencil and Distress Oxide inks in coordinating colours... and I just kept going to create a whole set! This is a great way to use up left over ephemera diecuts that we may... or may not ;) have in our stash! I added in some sentiments from various sticker books to finish them off.


Thanks so much for stopping by! Don't forget to check out our Facebook Page every Thursday at 1 pm MST for a Live Demo with fun techniques and new products to inspire you! Have an amazing week friends 💓