Sunday, December 30, 2012

December Daily: Days 11-15

The December Daily continues with Pages 11 through to 15 - thank you for letting me share. Just a quick reminder that the base of my December Daily is the Simple Stories line. I raided my stash for all other doo-dads which are all available in the Scrap Shotz store.


I would love for you to hook me up to your December Daily.

Saturday, December 29, 2012

December Daily: Catch-up


There was lots and lots of goings on before Christmas and we have enjoyed the beauty of Rosie's cards. Let me check in to see how your December Daily is going. Below are my days 6 through 10. (I used Simple Stories throughout my December Daily.)


How is your December Daily faring?

Merry Christmas!

On behalf of Scrap Shotz, we wish all our loyal readers, forum members and friends a very Merry Christmas. May you be blessed with love and happiness from your friends and family.

Friday, December 21, 2012

Christmas Inspiration - Embossing

Look at this beautiful card created by Rosie. I find the image breathtaking.


From Rosie..."I love getting out my embossing gun at Christmas time although I have not used it as much this year as I've fallen hard for Glitter Ritz ;)) and peel off stickers. If you're a kit subscriber the stamp set this stamp is from was one of your December kit add on choices and not surprisingly it is out of stock. Contact Sandy to find out if any more will be in stock. I kept this simple again, neutral coloured card stock and red embossing powder. Done in under 10 minutes!"

Thank you for the inspiration Rosie!

Thursday, December 20, 2012

Christmas Inspiration - Dies, Dies, Dies

Dies, dies, dies...how many do you have? Do you find multiple ways to use your dies? Today's inspiration shows a stunning card using a few dies, namely, Tim Holtz Tattered Poinsettia die and Dee's Distinctively Dies Wreath Builder die. 


Rosie used the  Canvas Corp Naughty or Nice stamps on kraft paper, the Tim Holtz Tattered Poinsettia die, Dee's Distinctively Dies Wreath builder die and Want2Scrap red rhinestones. She cut the poinsettia using the Tim Holtz die and glimmer misted the pieces with Tattered Angels Chalkboard mist,  Mr.Huey spray Blizzard, Shine and opaque white. Then the poinsettia layers were glued, starting with the largest to the smallest together and then allowed to dry. 


The poinsettia flower was then glued to the card base, adding wreath leaves under the flower. The sentiment was then stamped directly onto the card base. Gems were added as embellishments.

Stunning! Absolutely stunning!

Tuesday, December 18, 2012

Christmas Inspiration - Elizabeth Craft Designs and Copics

I have found another classically beautiful, yet quick and easy to make. The card is displayed below.


Rosie used the fantastic Elizabeth Craft Design peel off stickers available in the store.  Sandy has a great selection and if you still have a few Christmas cards to whip up they go very quickly using these stickers. Rosie used the silver poinsettia peel offs and followed Carolyn Waldschmidt's great instructions in this blog post. The flowers were coloured with Copic markers R27 and R39 and YG06 is used as the flower centers. The sentiment is a Making Memories rub on from my stash and in no time you have a beautiful card!" 

Another beautiful card which inspires us - thank you Rosie!

Monday, December 17, 2012

Christmas Inspiration - Masks

1, 2, 3...all done!!! Check out this fabulous card created by Rosie.


It has a simple yet stunning design and is quick to complete. Rosie adhered the mask to the cardstock with some repositionable adhesive, inked with Tim Holtz Festive Berries distress ink, trimmed and matted on white card stock then adhered to the green card base. Then Rosie adhered strips of red card stock to mimic ribbon on a present and matted the stamped sentiment from my stash and adhered to the card front. Lastly, she sprinkled Studio Calico wood stars from my stash on the inked background.  Studio Calico Mistable Thickers can also be used are are available in the store.

Friday, December 14, 2012

Christmas Inspiration - Stamps

Inspiration continues here at Scrap Shotz...look what I found to inspire you. Use the techniques to create Christmas cards, thank you cards for the holiday gatherings or birthday cards (can you really ever have too many Christmas cards?)

Look at this card which uses kraft cardstock, a stamp, pattern paper and scissors.


From Rosie..."This is a super simple card to make using your favourite holiday sentiment stamp, kraft card stock and Naughty or Nice stamps on kraft paper by  Canvas Corp, available in the store. Trim desired circular elements from patterned paper. Adhere to kraft card stock front in desired pattern. Stamp sentiment on kraft card stock, trim to desired size and adhere to card front. Adhere card front to kraft card base and add the Happy Holidays sentiment."

Don't you agree that this is a wonderful card? It's beautiful and easy to make - I can hardly wait to make some of these cards.


Thursday, December 13, 2012

Christmas Inspiration - Stickers and Dies

As promised, we have some wonderful Christmas inspiration for you, our readers! Be inspired by Rosie Neustaedter's card (shown below) using Elizabeth Craft Designs and Dee's Distinctively Dies Wreath Builder die.


From Rosie...

"This is a super easy card to make. I adhered a 6x6 double-sided sheet of adhesive to green cardstock then die cut the leaves using the Dee's Distinctively Dies Wreath Builder die. I peeled off the adhesive backing and applied Glitter Ritz transparent glitter in warm highlights.  Layer leaves as desired using glue and pop dots, tie May Arts string burlap around top. Either stamp or rub on sentiment on cardstock, trim to size and adhere with pop dots.

Another card using the same technique is shown below:


The sentiment is stamped with Tim Holtz Festive Berries distress ink. Don't you just love that sparkly, Merry Christmas?"

I think you will agree that these cards are absolutely stunning. As you can see, they take minutes to make and yield beautiful results.

Are you feeling inspired? I know I sure am - thank you Rosie!


Monday, December 10, 2012

December Daily with Rosie Neustaedter: Days 1 - 5

We are so fortunate to have Rosie Neustaedter sharing her delightful December Daily with us this month.

Rosie shares her philosophy on her December Daily...

"The album and foundation pages are Simple Stories. I have used bits and pieces from my stash, products from Studio Calico, Echo Park, Little Yellow Bicycle, October Afternoon to embellish the completed pages. I keep all the items in a large ziplock bag and Iris container so I don't have to search through my stash to find the Christmas items. At the end of the day I upload my photos for the day on my computer and then print one photo. 

If I know I do not have a photo for the day I will have set aside a piece of memorabilia or choose a topic to journal about for the day. If I have time that evening I will attach the photo to the page and embellish otherwise I do it first thing the next day and then photograph the completed day.

If you do not print at home you can save your photo(s) for the day in a folder marked "December Daily 2012" and then send to print all at once.

What helps me keep up is not stressing about creating a perfect page, I am focusing on preserving the memory not producing a creative masterpiece and that attitude really takes the pressure off."


Thank you Rosie - we look forward to seeing the rest of your December Daily!

If any of you loyal readers wish to share your December Daily with me, please let me know. I look forward to showcasing your work too!

Wednesday, December 5, 2012

December Daily: Day 1, 2 and 3

Welcome, welcome, welcome to December! Can you believe it is December? I know I can't but one of my traditions has been to create a December Daily. It has become one of my favorite albums and I along with my family adore pouring over the albums every December.

A word about how I approached my December Daily...my December Daily is a celebration of our month as a family. It isn't about all things Christmassy and wintery - it is a reminder of how we spent the month of December as Christmas nears. There are some spectacular days and some not so great days...those memories are captured. And yes, there are some terrible photos but they remind of so much.

So keeping with tradition, here are my first 3 pages of my December Daily! Before I show you the pages, I wanted to mention that December at Scrap Shotz on the blog will be one of inspiration. If we have inspired you in any way with our projects, please let us know!!!

Without further adieu, here are the first 3 pages of my December Daily.


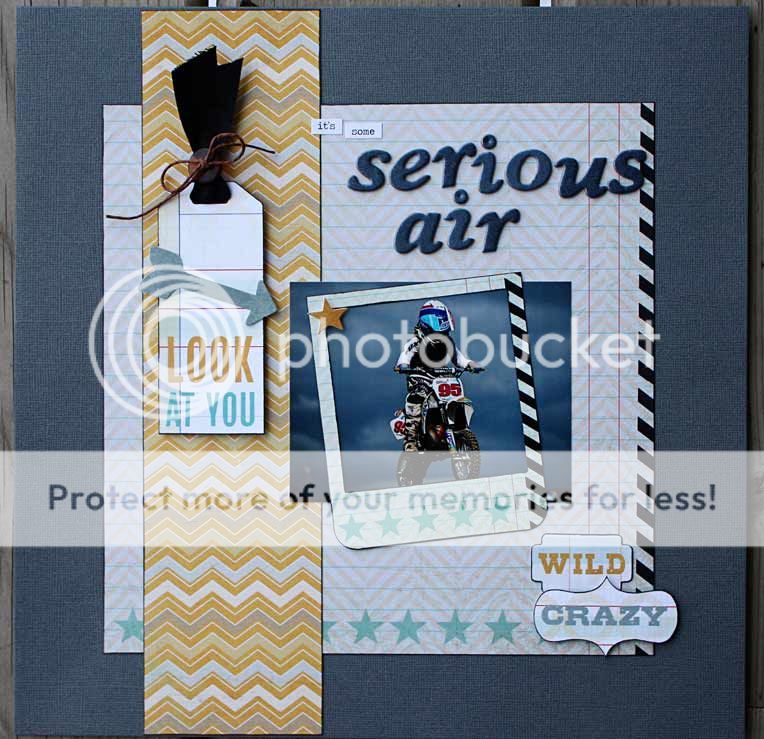
My entire December Daily is created using the Simple Stories line - the pattern paper, the labels, the die cut stickers. I augmented each page with left over American Craft thickers (numbers) and Urban Lily numbered chipboard circles...and what would my pages be without some bling, so there is lots of Prima, Kaisercraft, BasicGrey and Queen and Co gems and pearls!

Thanks for letting me share!

Thursday, November 29, 2012

Fabulous Find: Elizabeth Craft Designs Shimmer Sheetz

Today I am excited to share another Fabulous Find: Elizabeth Craft Designs Shimmer Sheetz. Have you been curious about this product which can be found here in the store.

Shimmer Sheetz are mylar sheets of various colours. They are extremely versatile as they can be altered in many different ways. These sheets are compatible with all companies' embossing folders, standard depth dies, embossing folders, punches, paints, markers and even inks that work on non-porous surfaces. Shimmer Sheetz are acid-free and thus are safe on scrapbook pages and appear stunning on cards and altered projects. There are 13 colours available and each package has 3 - 5"x12" sheets.

Look at the beautiful cards Rosie made with the Shimmer Sheetz.


*Dee's Distinctively Dies: Snow Covered Stacker Tree*


*Embossing Folder*

Thank you Rosie for these terrific samples!

Friday, November 23, 2012

Fabulous Find: Label Maker

It really is true...what is old, does become new again! Imagine my surprise when I saw this in the store!


This particular model is adorable! It's the perfect size for attending crops; it has a sassy colour and adds just that special touch for any project! Refills are also available in the store.

Have you used this wonderful tool? (It would fit perfectly in your special scrapper's stocking too!)

Tuesday, November 20, 2012

Fabulous Find: Pink Paislee Artisan Elements

In the November Scrap Shotz monthly kit, there is a delicious package of Pink Paislee's Artisan Elements. If truth be told, there are 2 other packages of Pink Paislee Artisan Elements *blush*

Let me share what I love so much about these amazing and versatile gems. Firstly, take a moment to ooh and aah over the cool shapes which can be used on any project, be it a card, layout or an altered item. Each element is intricately crafted with interesting swirls and embossing.

Secondly, I SO love that each element can be altered in several different ways. The package suggests paint, alcohol inks, mists and so much more. The close-up photo below shows the mists and pearls I used to colour the element.


I hope you can see how easy it is to write your journalling on the element too. Here I used the American Crafts Slick Writer - the Copics Multi-liner works wonderfully too!

In the example below, there are touches of Clearsnap Smooch in the grooves. I accented the intricate designs with Prima gems.


Below is my layout using the altered Artisan Elements.


Thanks for letting me share!

Wednesday, November 14, 2012

Fabulous Fundamental: Transferring Negative Images using Elizabeth Craft Designs Transfer Sheets


Good day Everyone! Today we have a special treat...a blog post from Carolyn Waldschmidt. She is going to demonstrate how we transfer the negative sticker image  using Elizabeth Craft Designs products. So without further adieu...

Today we are going to show you how you can use the sticker negatives that are left when using the Elizabeth Crafts Peel Off Sticker sheets. You will need to use a Transfer Sheet to move the images. If you have been using your peel off outline stickers you are left with the negative images on the sheet.


Choose the sticker image you want to transfer and cut it out of the sheet. Peel away any parts of the sticker sheet you don’t want transferred. As you can see there is very little waste in a peel off sheet.


Cut a piece of your transfer sheet to size for your chosen image. Peel off the liner of the transfer sheet and place the clear sheet over the sticker negative. Rub the image to adhere the sticker parts to the transfer sheet. Carefully lift the transfer sheet off with the sticker negative.


Place the transfer sheet with image on your chosen project, for example a piece of cardstock. Rub over the image once again to stick it on your cardstock. Peel off the transfer sheet and you have transferred the negative sticker.


 Keep your transfer sheet and place the liner back on as the transfer sheet can be used multiple times for this purpose. Complete and decorate your project. Here is a card I made:


Another use for the transfer sheet is to make a sticker repositionable. Choose the sticker image you want to make repositionable, in this case a sticker I had already glittered and colored. Cut a piece of transfer sheet to size for your image.


Peel off the back liner of the sticker you’ve prepared and place the sticker on top of the transfer sheet. Then cut out the image so you will have 3 layers, sticker, transfer sheet and transfer sheet liner.


When you peel off the transfer sheet liner you will get a sticker that can be used on multiple surfaces and repositioned as desired.  They can be placed on metal, glass, plastic or wax, giving you lots of options. Have fun!


 Thank you so much Carolyn!


Friday, November 9, 2012

Fabulous Find: Whimsy Stamps and Dies

Have you seen these amazing stamps and matching dies by Whimsy Stamps? Some of my favorites include


Why?

Not only do they stamp beautifully with the rubber image - let me tell you that the stamped image is very crisp, clean and sharp. This makes heat embossing so easy.

What was captured my heart is the matching die. I love love love that I can die cut the stamped image perfectly each and every time and place the stamped imaged on my project.

Allow me to show you the innovative and precise die cutting system. First you need to trim the stamp from the sheet of stamps. Remember to cut as close as possible to the image without cutting the image! Then stamp your image on some cardstock or pattern paper.


Now with a sturdy scrap of cardstock, use your die and cut the scrap piece of cardstock. Keep the now die cut cardstock scrap. This scrap is your key to success!


Carefully line up the cardstock scrap over the stamped image, making sure the image peers through your die cut template (aka cardstock scrap).


Then put your die in the cardstock scrap, lining up the 2 dots.

Sandwich your die and the stamped image...and voila, a perfect die cut stamped image!

Then attach the die cut stamped image on your project.

Enjoy!


Wednesday, November 7, 2012

Scrap Shotz November 2012 Kit Reveal

It's the beginning of November (can you believe it?) and that means the reveal of another stunning Scrap Shotz monthly kit! Let's check out the gorgeous work of our Creative Team...and welcome 2 new designers, Rebecca Hilligas and Jess Duerkson.

Look at this fresh layout by Jamie! I love those diamond shapes and what a great way to incorporate the various pattern papers into your layout.


Here is Rebecca's layout...I adore the giant "pinwheel" and the white dotted border design.


Check out this gorgeous card by Jennifer - the colours and design are superb!


Ellen made this gorgeous card - don't you just love the embossed background and dimensional pieces of pattern paper?

Here is Jess's beautiful layout using the kit - I love the "polaroid" photo being showcased!


I think you will agree this is another amazing reveal by our Creative Team - welcome aboard Rebecca and Jess!