Friday, January 26, 2018

January Kit Release - Kaisercraft Documented Projects with Katelyn

Hey Scrap Shotz Fans!

I get to share with you a project that features the January Kit Release. This month kit is filled with fabulous goodies including Kaisercraft's "Documented" collection which is perfect for a variety of projects including masculine themed projects. You can find the kit as well as some add on pieces at Scrap Shotz's

To kick off my post, here is my We Must Have Adventures In Order To Know Where We Truly Belong Scrapbook Layout which features the Documented Patterned Paper, the Documented Collectable and some trimmings. 

For my layout, I've used Creative Scrapbooker Magazine's January Sketch.


This is my take on this month's sketch.


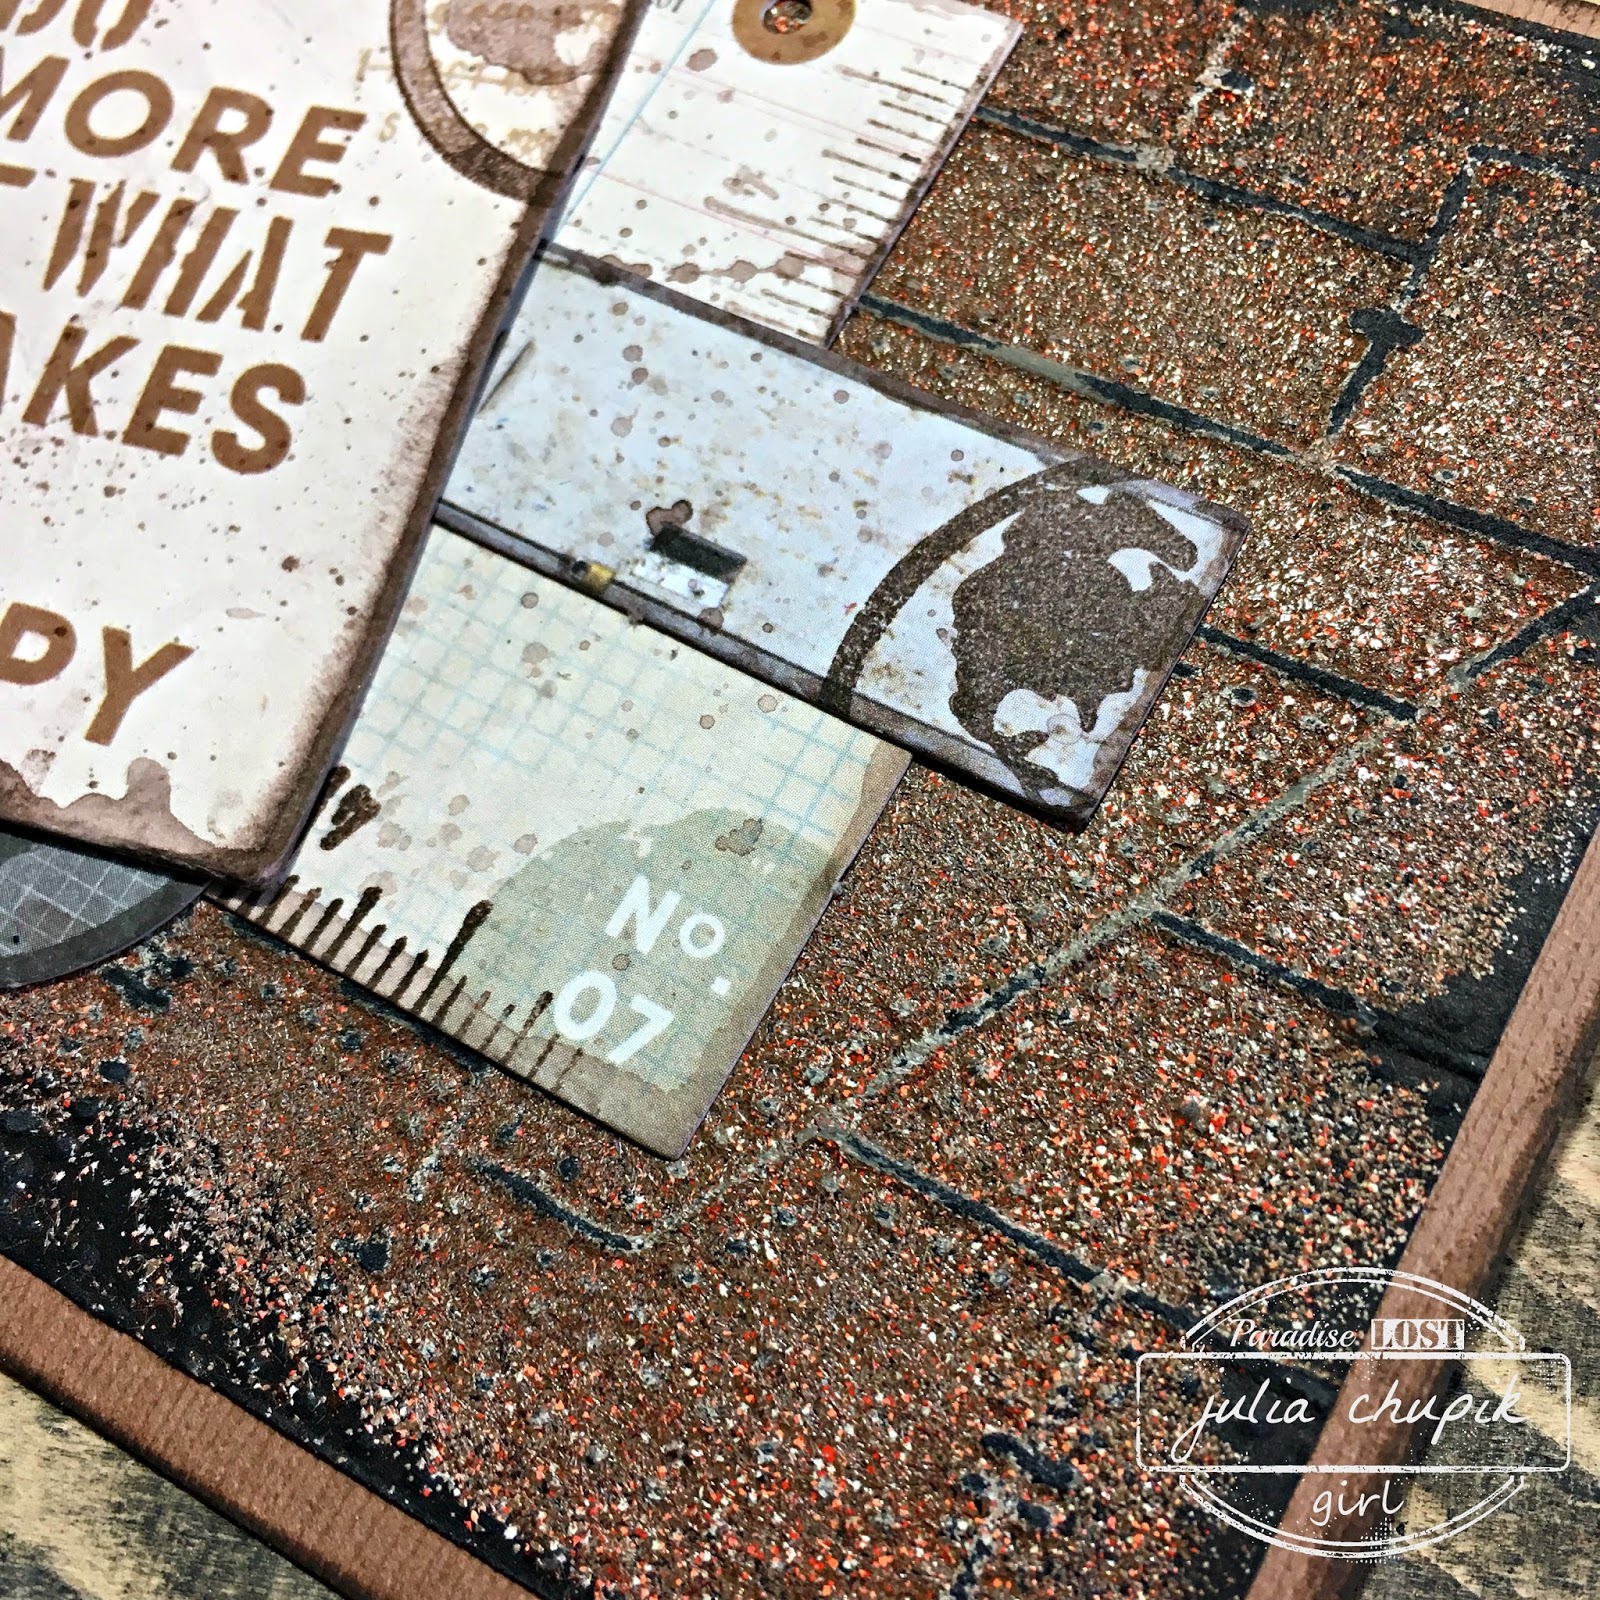
In the bottom right hand corner of my layout, I layered five different die cuts from the Collectables pack. I made sure to ink the edges with the Bark Ink pad from Kaisercraft. To add some extra depth, use 3D Foam Squares on some of the pieces.


At the bottom of each of the patterned paper pieces, they come with these fantastic decorated strips where the barcode is. I cut to of these strips off the bottoms of the papers. One strip is 8 3/4" long and the other strip is 5" long. To bridge a bit of a gap between the two strips, I cut a piece of ribbon that measures 5 1/2" long from the Tim Holtz Idea-ology Trimmings. Adhere a clock from the Collectables package in the corner where each photo meets. I made sure to ink the edges of the strips with the Bark Ink pad from Kaisercraft.


In the top left hand corner, I layered a few more of the collectable pieces. For the tittle on my layout, I used one of the strips at the bottom of the patterned paper and cut the saying apart. Make sure to ink your edges of the paper. 


For the circles, I used the Stitched Circle dies from Elizabeth Craft Designs. The 5" stitched circle is cut out of patterned paper from the Documented Patterned Paper pack. For the stitched circle ring, I placed the 4 1/2" stitched circle onto a piece of the Documented patterned paper and ran it through my die cutting machine. With the 4 1/2" stitched circle cut, place the 4" stitched circle in the center of the 4 1/2" stitched circle and run through your die cutting machine. Make sure to ink the edges using the Bark Ink Pad from Kaisercraft. 


When I went to adhere the layout together, I adhere my tittle last.


Scrap Shotz Supplies Used:

- January Kit
- Tim Holtz/Idea-ology: Trimmings (add on)
- Stitched Circle Die
- Sookwang Tape
- 3D Foam Squares

All of the products used on my project today can be found on the Scrap Shotz website. Make sure to stop by the blog next week, as the Design Team will be sharing more inspiration.

Thanks for joining me today!


Hello Sweetheart!

Well January is coming to a close far too quickly! It really has flown by and I don't know where all the days went. 
Cathy here today with a clean and simple project using some products you can find in the Scrap Shotz store. Featuring the adorable valentine line Hello Sweetheart from Carta Bella. I also used the Trinket Box Die from Eileen Hull.


I cut out the covers from mat board so they are nice and sturdy.

I painted both covers and the scored spine with Dylusions Black Marble paint. Love that his paint covers so well and dries so quickly.

I used the TH heart stencil and the gorgeous Nuvo Mousse in Pink Flambe for the back cover. It's so mettalicy ( pretty sure this isn't a word, but it should be!) and shimmery!

I cut the covers for my little booklets from a sheet of the Hello Sweetheart paper that matched the small flower print I used on the inside covers.

The inside of my Valentine Book. For the inside of the small booklets I just used regular printer paper and cut it 1/4" shorter than the measurments for the covers.

The back cover once the mousse had dried.


And the complete book all together!

The front is one of the small cut apart cards from the 12X12 sheets of paper and I added a few hearts and stickers from the gorgeous sticker sheet that comes with the paper.

Thanks for stopping by the Scrap Shotz Snap Shotz blog! I'll be back next week with a Valentine or two, maybe a layout as well. Check out the great Hello Sweetheart collection, so many possibilities for guys and gals cards!

Have a great Friday!


Wednesday, January 24, 2018

January Kit - Kaisercraft Documented Projects #2

Hi there!

I'm back with two more layouts made with the January Kit and the Kaisercraft Documented collection.

My first layout is based on the January sketch from Creative Scrapbooker Magazine. 


I tried to do something new with Copper Penny Nuvo Drops.  I used a pallet knife and spread the drops through a stencil from my stash. It worked beautifully.  However, the stencil is quite large and by the time I did the entire pattern, the drops had dried on the stencil.  I tried everything to get it off.  This is how my stencil looks now.  It's still usable and doesn't bother me, but I urge caution if you decide to try it.  


There is a lot of paper layering on the layout and everything comes from the kit.  I cut one of the 12" long phrase sticker to make the subtitle and finished the page with some copper rhinestones.


The next layout is a companion page to the first.


I started with a piece of the patterned paper and applied some gesso to the centre of the page.  Then, using the smooshing technique, I applied some Distress Oxides in Fired Brick, Frayed Burlap, and Faded Jeans.  It looks a bit like a hot mess, but I knew that only the edges would show.


I layered some pieces of patterned paper behind my photos and embellished the page with stickers, diecuts and a wood veneer piece from the kit. I made a few more diecuts with the Kaisercraft stamps and ink from the kit. There are a couple Prima Marketing puffy stickers from the November 2017 kit and a wooden heart from my stash.

With all the big titles I have been making with the pack of Vicki Thickers, I ran out of E's.  Not a surprise.  But, because the font is so simple, I was able to "frankenstein" a few E's out of some F's. I'm so glad I made it work, because that title just makes me smile.

I have to say that I made four projects with a lot of embellishments and I still have lots left over.  I loved working with this kit!

Thanks for looking!
Sylvie


Monday, January 22, 2018

January Kit - Kaisercraft Documented

Hi there!

I'm up today with two projects made using the January 2018 kit featuring the Kaisercraft Docomented collection.

My first project is a scrapbook layout. 


Since the page was going to have two vertical columns, I wanted a round shape to soften it and tie the two sides together. So, I started by inking a piece of the Smokey cardstock from the kit with the Kasiercraft ink cube, also from the kit and a Tim Holtz stencil from my stash.  I drew a circle in pencil and applied the ink within it.  Once the ink was dry, I erased the line. Then I splattered black watercolour droplets all over the page.

To make the title, I combined the Vicki Boutin Thickers from the kit and fussy cut letters from one of the pieces of patterned paper.

This page is about my journey to fitness this new year, so I wanted to hide the journaling.  So using a piece of the Cream Puff cardstock, I folded a card and adhered the photo to the front.  I decorated the inside with the Kaisercraft stamps and die cuts included in the kit.


To finish the page, I cut strips of patterned paper and and layered them under the photo with  embellishments scattered on the strips. There are ribbons from Tim Holtz Ideaology TrimmingsCompass Coins, and Nuvo Drops in Copper Penny, all kit extras. The butterflies are punched from a piece of patterned paper using punches from my stash.

My next project is a masculine birthday card made with the Kaisercraft Stencil from the kit.


I started by inking a 4 inch by 5 1/4 inch piece of white cardstock with Distress Oxides in Vintage Photo and Spiced Marmelade blending the colours together.


Once the ink was dry, I applied Versamark through the stencil and heat embossed the pattern using a copper embossing powder.


I mounted the finished background onto a piece of the patterned paper. The phrase is the branding strip from one of the patterned papers that I cut to fit. The globe is from the Kaisercraft stamp set and the ribbon and Nuvo drops are kit extras. 

This kit is very easy to work with and I'm loving my projects.  I'll be back in a couple days with a few more!

Thanks for looking!
Sylvie


Friday, January 19, 2018

January Kit Release - Project #2 from Julia

Hello & welcome back for day 2 of my January Kit reveal projects.

Today I have 3 cards that I made using products from this months kit and add-on's 
available at Scrap Shotz online store.


I used the brand new Baked Texture line of embossing powders from Seth Apter & Emerald Creek Craft Supplies. Watch for these embossing powders to be available at Scrap Shotz very soon!

~~~Make Everyday Your Best Day~~~
For the above card I used Patina Oxide, Dirty Sand, and Ancient Amber embossing powders.
Click below for the step-by-step tutorial video for the above card.


~~~Do Awesome Things Everyday~~~
1. To create the background for this card I first took the Stenciled Words stencil from the January kits and applied embossing ink with the Emboss-It Dabber. 
2. Next, after I removed the stencil, I sprinkled Ancient Amber Embossing Powder over the ink and heat set. 
3. I used the Charcoal Kaiser Mist to add some ink marks to the background.

~~~Do More Of What Makes You Happy~~~
1. I dry embossed my paper with the Riveted Metal Texture Fade from Tim Holtz & Sizzix.
2. I used my Ranger Emboss-it Dabber to coat my embossed paper before generously sprinkling the entire surface with Chunky Rust Embossing Powder. After pouring off the excess |I used a small brish to remove some the embossing powder from the edges before heat setting.
3. After heat setting I used a sanding block to expose some of the raised image.

Thank for dropping by today! Watch for more inspiration from the rest of the design team using the January Kit.


Products Used:

Sizzix Riveted Metal Texture Fade
Ranger Mixed Media Paper
Distress Paints: Old Paper; Cracked Pistachio; Peacock Feathers
Gesso
Baked Texture Embossing Powders - Patina Oxide; Dirty Sand; Ancient Amber, Rocky Road; Chunky Rust ***coming soon to the Scrap Shotz Online Store***

Thursday, January 18, 2018

January Kit Release - Project #1 from Julia

Hello & Welcome Scrap Shotz fans!

The January Kit reveal is finally here and it is totally worth the wait.
This month's kit features the Documented collection from KaiserCraft - its perfect for looking forward or back. The kits includes 9 pattern papers, 1 specialty die cut paper, 8 cardstock, 1 full pack of die cuts, a full size stamp set, mini ink pad, a pack of Thickers, a 6x6 stencil and twill.
Look at all those goodies!

I decided to use one of the professional photos taken for my son's graduation from high school. I figured since he was now halfway through his 3rd year of university that it was time. ;)
The layout is based on the January Sketchy Gallery from Canadian Scrapbooker Magazine.

1. I started with a 12x12 sheet of Bazzill cardstock - color is Smoky and inked the edges with

2. The pattern paper is called Measurement and is from the Documented paper pack - i trimmed this down to 11.5"x11.5".
3.I used my Tim Holtz Distress Tool and went around all 4 sides.
4. I inked the edges with Black Soot Distress Oxide; making sure to make small tears and curling up the edges in a few areas.

5. Next I added some stenciling - I used the Kaisercraft Mini Ink in Bark with the Corrugated Lines stencil from Stencil Girl Products.

6. I added some more stenciling - this time I used the 6x6 Stencil Words from Kaisercraft included with the kit with Dylusions Black Marble Paint.

7. The January kit also includes 2 pieces of twill - I took the Kaisercraft ink pad and gently ran it along the length of the twill I was using to frame the upper top left corner of my page. I used some strong double sided adhesive to attach this to my page and wrapping it around the edge .

8. A January Kit add-on is a spray bottle of Charcoal KaiserMist - I added splatters by removing the bottle top and gently shaking the nozzle over my page. I also added some white splatters with some watered down gesso and my Tim Holtz Splatter Brush.

9. Another January Kit add-on are these Mini Wooden Cogs & Gears. I used my Ranger Emboss-it Dabber on my gears before poring on the gorgeous new embossing powder from Seth Apter & Emerald Creek. Watch for the entire line of Baked Texture to be available at Scrap Shotz Online store very soon. For the gears I used Rocky Road - a beautiful chunky ep with black, browns and silver. I did 2 layers of ep to get a nice thick layer and good coverage.

10. My final step was to create my focal point using the paper ephemera from the Documented Collectable pack that comes included in the January Kit. I grunged each piece up with some stamping and inking before arranging and layering on my page with some elements being popped up by foam square adhesive.

Thank for checking out the Scrap Shotz Snap Shotz blog today!
Come back tomorrow for a couple more projects I made using the January kit.


Monday, January 1, 2018

Happy New Year!


Wishing all our Scrap Shotz kit members, customers and followers a very Happy New Year!

Warm wishes from Sandy and the team😁