
Rosie back with another bunch of Lawn Fawn projects using the latest Lawn Fawn release.
First up is a reveal wheel card. There are a number of new reveal wheel products:


There are 2 different sets of stencils, the set pictured here matches the Patch Add on, heart in the reveal wheel square add on, and the Easter egg reveal wheel add on.
You can see all the reveal wheel products HERE.

This was a fun card to make and I am going to walk you through my process.

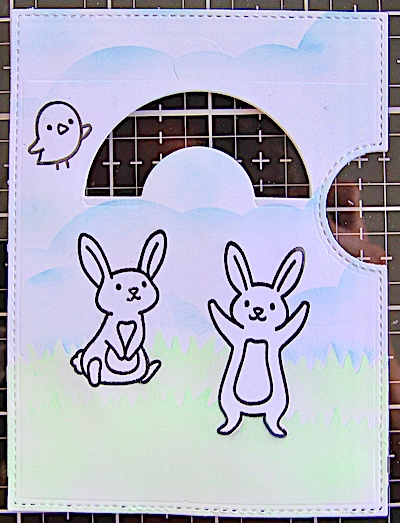
Die cut all the reveal wheel pieces, the window is cut with the Semicircle die add on.
I then stamped one bunny(on the left side) from the Butterfly Kisses stamp set and the second bunny from the Eggstra Amazing Easter set. I also stamped these images on Post It tape and fussy cut to make masks.
The birdie is from the Open Me set, I opted not to stamp and cute a mask for the bird.

I knew I wanted to ink the background so I also die cut masks from 2" Post It tape with the Honey Bee Stamps Cloud Border die and the grass is die cut from the Lawn Fawn Shadow Box Card Park Add On.

The clouds are inked with Distress Oxide Tumbled Glass ink. I used a very light hand when inking for a nice, soft look. I made sure to avoid inking the bird as I plan to colour it with copic markers later.

I used the negative portion of the grass mask to ink the grassy hills. The die not the same width as the panel so after inking the first portion, I shifted the mask doing my best to line up the blades of grass.

The grass is inked with Distress Oxide in Cracked Pistachio and then set aside to dry.
Once I was sure the panel was dry I moved on to setting the reveal wheel. Sorry I did not take photos of this process. You will take the small circle die cut and attach it to the back of the large wheel with a mini brad. Add small foam squares to the small circle ensuring they do not touch the brad. This will be adhered to the back panel once you line up the wheel with the window on the front panel. Remove the liner paper from squares. Using the embossed lines on the wheel, move the wheel until you can see the embossed lines in the arc then shift slightly up, next move until you see the emboss lines in the notch and shift slightly in. Now line up with the base and push down securing the wheel to the base.
You can now open brad and remove wheel to complete stamping on it.

Here is where the template would be super handy but I didn't have it. With the template you would place it on the wheel, holding them together with a post it and then stamp through your window. I very, very carefully used my front panel :).

Now it's time to colour the images, I began with the bird and bunnies, I always set aside any copic friendly ink stamped images for a little bit to ensure the ink is dry before colouring. Most times I stamp the images a day or to before I plan to use them.


I also coloured the Easter eggs I stamped on the reveal wheel with copic markers. You can now pop the reveal back on to the base and apply foam adhesive all over the base, ensuring it does not touch the wheel, remove the liner paper, line up the edges and press down. Then it's on to completing the card front.

I chose the green florals paper from the Spring Fling 6x6 Paper Pad, trimmed to 4" x 5 1/4" and adhered to to the card base.

The reveal wheel "sandwich" is then attached to the card with foam tape and card done!
Lawn Fawn has some very cute "treat box" dies, I've used the Butterfly Treat Box die set:

I die cut the base from a piece of 12x12 Unicorn Mane Really Rainbow Scallops, blooms from the 6x6 Spring Fling paper pad.

Super easy to put together, you fit a couple of Hershey Kisses inside.

I'm a big fan of the Simply Celebrate stamps so was happy to add the Simply Celebrate Spring set to my collection. I coloured this with Copic markers and die cut with the matching die. I then attached the hats with foam adhesive to a piece of card stock I dry embossed with an Altenew stencil.

I book ended the top and bottom with a piece of blue from the 6x6 Really Rainbow Scallops paper pad.

The sentiment is from the Simply Sentiments set and I added a scored line under the sentiment to tie it all together.
This final project also used the Simply Celebrate Spring set:

I stamped the butterflies then used a partial die cut technique to remove just the bottom portion around the butterflies.

I coloured the images Copic markers, cut a square of the floral paper from the 6x6 Spring Fling paper pad and rounded the corners. I then inked the white card stock lightly with Distress Oxide Squeezed Lemonade ink so you see just a hint of yellow peeking out from under the floral. The sentiment banner is die cut with the large banner die in the Lawn Fawn Fancy Folded banners set. I then stamped and heat embossed the sentiment from the Lawn Fawn Reveal Wheel Spring Sentiments.
Thanks so much for the taking the time to stop by!


No comments:
Post a Comment