Showing posts with label cut files. Show all posts

Thursday, November 28, 2019

Embrace Those Busy Patterned Papers

The November Scrapbook Kit featuring the Simple Stories, Winter Farmhouse collection has some fun and busy patterned paper! I love a busy pattern but once in a while I find them hard to work with - this month I am all about finding simpler ways to make the busy patterns in this collection work for me and loving it! 

If you have a magic machine (my name for any machine that can cut intricate designs on paper - magic), busy patterned paper is your best scrappy friend. Cut files backed with patterned paper look amazing! If your paper is super busy - choose files that have smaller windows or openings  (the sections you back) to show less of the busy and more of the cut file. Use a solid colour to cut the file will also help. I prefer white so it really pops off the page and contrasts fabulously with the patterns - giving the eye a place to rest. 

The Christmas Banners Background cut file from Cut To You offers a great balance between large and small openings making it a great way to showcase the simple and busiest patterned papers in this kit. Also, it’s just a really fabulous cut file! Check out how un-busy these busy patterns look now: 


I love how it turned out! The photo is of me as a little girl and clearly either I have or my family has stuck all of the Christmas present ribbons and bows on me as we opened presents - I probably did it to myself. The picture is pretty cute but wow, did you notice the couch I am sitting on? Speaking of busy patterns!  

Here are a few other ideas for embracing busy patterned papers in your projects: 
  • Add a thin layer of white Gesso over the page. This will make the colours more subtle and adds a mixed media element to your layout. 
  • Use patterned papers to mat your photos. The peek of the pattern behind your photo will really separate it from the background and draw the eye! Use a few different patterns to get that layered look. 
  • Instead of cutting patterned paper to the size you need  - rip it! Not only is this fun (and maybe a little adrenaline pumping if you only have a sheet or 2) it also looks fabulous. Bonus, the ripped edge will be white - giving the eye place to rest and break up all that busy pattern. 
  • Create a background image or design using small squares, triangles or circles of the patterned paper. A quilted heart using triangles of various patterned papers or a Christmas tree shape created with lots of small circles of the patterned papers. A quilt pattern, Christmas presents (oh with stitching for the ribbon), buildings, and more!
  • Cut the patterned paper in strips and use them like you would washi tape. Create a whole layout with these strips all down the page -  rip a few shorter than the others for a fun, washi tape look! 
If you still find your page is too busy (and I bet it's not), take a photo of your layout and see if you still think so when you see the layout in a photo. When we are creating we are just a couple of feet away from all the busy - preventing us from seeing the forest from the trees. I find taking a photo gives me an opportunity to see the project as if I had stepped back and I end up really liking it!  

Embrace the busy patterns - have fun, get crafty! 


Thursday, May 30, 2019

Try Fussy Cutting

Hello, crafty Scrap Shotz friends!

Today I am here to encourage you to find those pattern papers that you find a little intimidating. You know the ones ... the papers that have very busy patterns. They feel too busy for a background, .too beautiful to waste as a layer and are so fabulous you are intimidated and (gasp) you end up hoarding them in your stash. Not anymore!

I have to admit the papers in this month's Scrapbook Kit from the talented folks at Altenew felt this way for me - they are absolutely stunning, busy, gorgeous and worthy of a frame! I show you each of the papers in my 'favourite items' unboxing video on my YouTube Channel (Scrapstorian) if you want to see what I mean. Fabulous!


Brace yourselves, the first thing I do when I find a pattern I love but its too gorgeous and busy to find a way to use it as a solid 12x12 .. I grab my fussy cutting scissors and start making die cuts. Yup, that's right, I cut that beauty apart and make it a whole bunch of beauties. Then I feature them on a layout with a more neutral background to make them pop.

Inspired by the Just Nick Studio cut file that came with the kit and matches perfectly with the pink blossom with blue stems pattern paper I cut - I just started layering and tucking and poking and placing all the amazing and matching leaves I cut.


The colors I was working with are blue and pink with a dash of teal; so anything in the kit matching this description also got included. I love working with just a few colors, and making bold busy patterns more "Brande" friendly as die cuts.

Here are a few close-ups so you can see that I literally added everything that matched from the kit.


I loved creating this page - it was one of those layouts that just came together so well.

If you have a Kit this month, I would love to see how you are using the amazing products from Altenew. Please post and hashtag #scrapshotz

Happy crafting!


Monday, April 22, 2019

Get Your Glitter On

The April 2019 Scrapbook Kit included a eye catching, totally dazzling piece of 12x12 teal glitter cardstock from Best Creations. Stunning in colour, in glitter-ness and wow! As gorgeous as it is though sometimes these full sheets of brilliance can be a bit intimidating to work with - I hear yah, they are for me too.

So, I am here to share how I use amazing product like this in a way that adds subtle pops of shine to my layouts but does not take over the whole design. Instead of using the full sheet of glitter or making it really prominent on a few layouts, I challenged myself to use a little bit on each layout. I love the idea of a challenge - even the ones I create for myself! Here we go ...

First up I created a circle infused layout and used the glitter paper as one of the smaller circles to give each of the clusters a little extra texture and shine. Amidst all the other patterns, watercolor stickers, Nuvo Crystal Drops (Calming Aqua), string and more the glitter is a nice fit and doesn't overwhelm. I adore this photo of me, my little brother and my nephew from my wedding day!


Next up I used the glitter to mat a photo. Just a thin mat to draw the eye to the photo not overwhelm it. I love how it looked against this black and white photo of my husband and I at our wedding - you may have guessed glasses were being tinked during this moment! I used a free Cocoa Vanilla Studio Cut File to create those flowers behind the photo. They are designed to match the Happiness collection which was a big part of the Scrap Shotz kit this month. 


I had so much over on the left of this layout that I decided to do a little peek a boo tear on the right side for balance and popped some glitter up behind that to give it a little shine too. 

I love this trick for bringing balance to a layout or to just add something to catch the eye in a 'white' space. Just make a little tear, fold it back, adhere it in some way (I tend to use staples) and pop another pattern in the hole you created. Sometimes its fun to use this little tear as an anchor for an embellishment cluster as you will see I have done in one of the layouts below.  


For my next two layouts I was all about layering - and used the glitter paper as one of them. Just a little pop here and there to give the design a little something more than a pattern or cardstock paper can do.  

This first one it is just a small layer where there is a bit of gap behind the ripped pattern paper on the left and then balanced that with a couple of punched hearts on the right. Adding this teal colour to the layout also give me "design permission" to use some of the blue hearts from the stickers in the kit and add some dimension with the teal Nuvo dots in the kit too! 


Last but not least, I went layer crazy! I just love this photo of our wee puppy sleep smiling - maybe because its the only peace and quiet our house gets these days with a new puppy or maybe because I think her little puppy teeth look like wee planted hearts. Or both! No matter the reason this photo needed a couple of glitter layers because why wouldn't you!? 


Are you part of our kit club? We would love to see how you used the glitter paper this month. If you have had a chance to play, pop it up on our Scrap Shotz Facebook Group or tag us on Instagram. There are so many great ways to use this paper  - we would love to see yours! 

Want more information about this month's kit? Please swing over to the Scrap Shotz online store to see all the beauty in the April 2019 Kit don't forget the amazing Add-Ons too! Interested in more glitter cardstock? There are many colours available from Best Creations in the Scrap Shotz store. 

Thanks for swinging by and happy glitter paper crafting!


Friday, April 12, 2019

Farmer's Market Layouts using the April Kit

Hello friends! Karla back today with two layouts completed using the April Scrap Shotz Kit featuring the Happiness Collection from Cocoa Vanilla Studio. I love this kit!! The beautiful watercolour and florals are perfect for so many occasions, and since I am definitely in need of some bright spring colours (especially after snow in Calgary last night!!) this is just the thing to make me happy! I started off by using the Creative Scrapbooker Magazine April Sketchy challenge as inspiration along with photos of our family at the Cochrane Farmers Market in Alberta. I used the small flower paper as a border and layered a piece of white cardstock on top before stitching around with my sewing machine. My daughter had been practicing sewing and had green thread in the machine and I decided to go for it, lol. 


I used some free cutfiles from the Cocoa Vanilla website and cut out the 'lovely' title on white cardstock along with two circle wreaths included. These were the perfect thing to add to the page to coordinate with the sketch. I misted them with Glimmer Mists to add colour and customize them to coordinate with my page. I also used the packaging technique to add some of the mist to the background of the white cardstock. I really love combining fonts to create a title, so I added one of the 3x4 cards with 'weekend' in the center and a 'day' sticker from the Thicker Kaleidoscope Words sticker pack which is an Add-On available.  


I love the CV Happiness Accessory Sticker Sheet with the tiny word phrases! This is also an Add-On available in the shop. Don't forget as a subscriber you'll get first choice to get those fun Add-Ons you want to coordinate with the amazing kit! I layered some of the words to create some fun sentiments beside the photo of my two girls. 


I layered my photos on cardstock and paper included in the kit and then embellished with some of those Add-On Thicker stickers and little flowers that come in the Die Cut Ephemera pack, which is part of the Kit. I also added some enamel dots created with the Add-On Carnation Nuvo Crystal Drops. I love being able to customize the size of the dots I'm creating!! 


For the second layout I'm using a sketch from the SCT 365 Layout Class. I honestly love starting with a sketch! I often find I layer papers in a way that I wouldn't have thought of, and even if I use this sketch again and again it always turns out different each time! 


I used the 'good vibes' sentiment from one of the 3x4 cut apart pages in the Kit to start creating a title, adding the Add-On Thicker Kaleidoscope Stickers 'and' with 'happy times' from the Diecut Ephemera pack. I again used the packaging technique to pick up mist from my splat mat with a plastic package and then press it onto the white cardstock background. 


I absolutely love the tassels in the Diecut Ephemera pack in the kit and I used a bit of twine from my stash to create a hanging effect. I added a 'hello' from the Add-On Accessory Sticker Sheet and layered on the 'weekend' flair badge from the Kit. 


This wonderful flower diecut is from that free cut file (linked above) and I backed it with papers all included in the Kit. I added the pretty wood veneer butterfly and embellished with the tiny pink flowers - also in the Kit. A few more customized Nuvo Crystal Drops (an Add-On) finish off the pretty details.


 Thanks so much for stopping by today! Be sure to check back all month for lots of projects featuring this gorgeous Kit and Add- Onsand don't forget to check out the Reveal Video post HERE where you can see exactly what's included in the kit! Have an awesome weekend friends, and happy crafting!


Tuesday, September 5, 2017

Scrap Shotz September Kit Projects with Sylvie

Hi there!

I'm so excited to be sharing my first projects as part of the Scrap Shotz Design Team! I'm extremely honoured to be a part of this talented group. I love creating from a kit and I hope I'll be able to give you ideas on how to get the most our of yours.

The fact that the kit this month was the Carta Bella Transatlantic Travel line made me so happy.  I am in the middle of scrapbooking a recent trip to Cuba, and the minute I saw the collection, I knew it would work with photos we took on a sightseeing tour.


I loved the compass theme in this line, so I cut one using a Silhouette file.  I sprayed it with mist while it was still on the cutting mat. Once it was dry, I removed it from the mat and backed with some of the patterned paper.  For added dimension, I machine stitched the points on the compass. I used some old foam Thickers from my stash to create the title. I was inspired to use the quote from one of the 3x4 cards in the collection which worked so well with my compass. After that, there wasn't much embellishing that needed to be done.

I used an old arrow stamp to give a place for the Carta Bella stickers to rest.  I used some Tonic Nuvo Crystal Drops in Midnight Blue (a kit extra) to make my own enamel dots.  I LOVE those!

Speaking of the Nuvo drops, the Crystal Glace is a very cool product and I used it to make embellishments for this next page.


I started by punching a 1 inch circle and then taping it to my work surface with regular scrapping adhesive.  This keeps the circle from curling.  Then I applied thin layers of the Glace over the entire surface of the circle.  It starts out cloudy, but dries clear.  After 3 coats, I created my own flair badge! This is when it is still cloudy. ;)


While those were drying, I took a piece of vellum from my stash and using the Echo Park embossing folder (a kit extra), created a piece of embossed vellum.  The pattern of the embossing folder created two columns of words, so I decided to cut the vellum in half vertically and placed it above and below my photo to make it look like a long strip.  I cut another Silhouette cut file to create a leafy pattern from the "Vintage Letters" paper and layered strips of paper along side it.  The title is also a Silhouette file that was cut from the cardstock in the kit. I embellished the page with some of the tags and two of my "flair badges".

So, that's it for me today!  I'll be sharing more work tomorrow, but thanks for stopping by.  For information on all the products in the kits, be sure to stop by the store.

Sylvie


Tuesday, May 16, 2017

Scrap Shotz April 2017 Kit-XOXO and Otters

**Please Note: Photobucket very recently changed their terms of service and no longer supports direct linking for 3rd party hosting of images. To view the images not displayed, hover and right click over image, then choose either "open image in new window" or "open link in new window" **

Welcome here again for more kit projects created with the Scrap Shotz April 2017 kit.

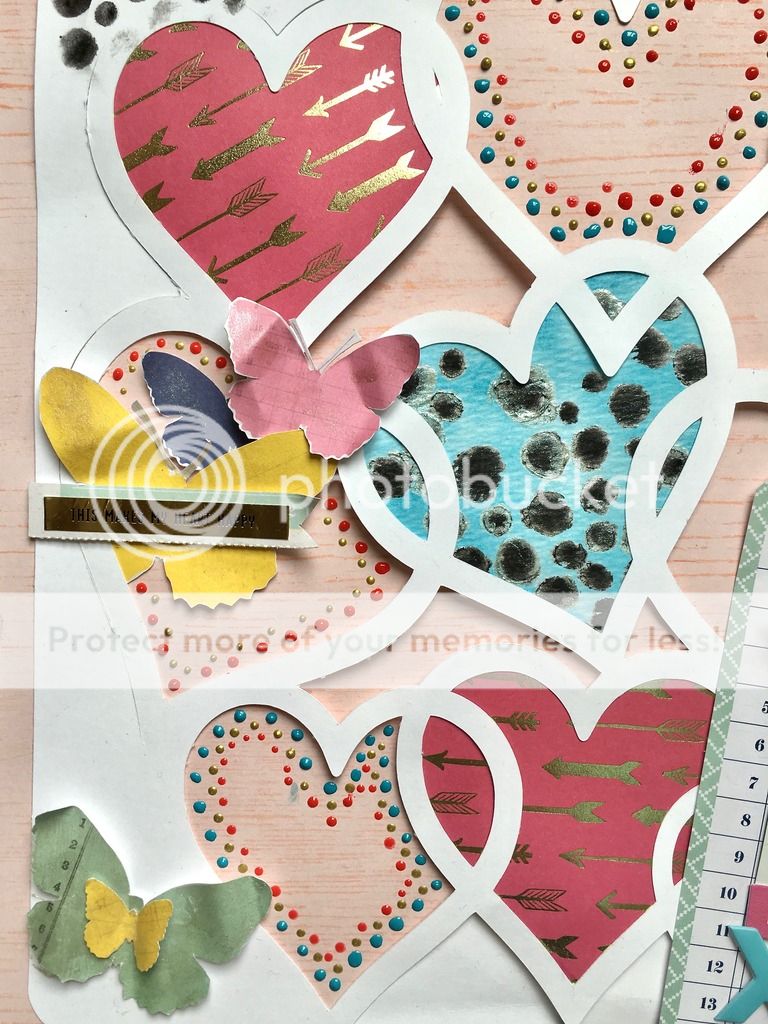
I designed and cut this heart die cut with my Silhouette Cameo.
The middle heart is stencilled with the Vicki Boutin kit stencil, black watercolour crayon, add-on Vicki Boutin Iridescent Glaze and Tim Holtz distress ink from my stash.
Two hearts are backed with the Vicki Boutin hot pink, gold arrow patterned paper and the negative spaces of the 3 remaining hearts are filled with Nuvo Crystal drops, fussy cut butterfly images topped with iridescent glaze and a phrase sticker from the Vicki Boutin line,
The tassle is had cut from patterned paper, wrapped with Kaisercraft gold washi tape and the ends rubbed with Nuvo gold Glitter paste.

Next up is this sweet card:

This Mama Elephant stamp set is so sweet and has a coordinating die to make it easy to cut out the otter images.
Vicki Boutin Iridescent glaze was spread through the Tim Holtz Splash stencil on Bazzil card stock. Once the glaze dried, Tim Holtz Distress Ink in Mermaid Lagoon and Blueprint Sketch was applied.
Otter images were stamped in black Memento Ink, then copic coloured. Red glitter heart was die cut from glitter paper with heart from otter die cut set.
A kit patterned paper piece is cut to size and embossed, hand cut banner is layered under circle shaker  frame which houses otters and dollar store sequins.
Sentiment is stamped in Hero Arts Unicorn pigment ink and heat embossed with Stampendous clear detail embossing powder.

Thank you for stopping by and there are more kit projects to come!