Showing posts with label embossing. Show all posts

Monday, October 17, 2022

October Kit Club - Vicki Boutin Print Shop!!

Hello friends! Karla here today with a look at a layout created with the October Kit Club, some Add-On's and products from the shop featuring Vicki Boutin Print Shop!! It is such a pretty collection, and there are so many ways to use it! I created this layout to scrap some photos I took of us in my oldest daughter's neighborhood, where you can see the downtown city lights. We don't get to see this view from our house so we all thought that was pretty cool!  


If you're wondering what the fabulous Scrap Shotz Kit Club is... check out the info HERE
You can get a closeup look at the October Kit Club in this video HERE!!


I used a piece of cardstock from the Ready To Use background paper pad as the base of my layout and added mixed media using the heart stencil included in the kit. I layered on Tim Holtz Translucent Grit Paste and Embossing Glazes for a textured effect and stamped images on using the Love This stamp set and Distress Oxide Inks. I added a title and puffy sticker embellishments using the Puffy Phrases stickers, also in the kit.


I added a cluster of elements from the Journaling Ephemera pack on the bottom left of the layout. I used the Creative Scrapbooker October Sketch as inspiration and a starting point! 


I journaled on a cut apart tag from one of the papers in the kit using a Zebra Sarasa Porous pen after adding lines with my Olfa ruler. You can see some of the blue washi sticker, from the amazing Paperie pack, peeking out from behind the tag.


I added on a butterfly, fussy cut from one of the papers in the kit and splattered on some of the blue metallic watercolor from the Cosmic Watercolors set. You'll also see various stickers and other ephemera pieces scattered around the page. 


Here's a look at the process video where you can see this layout come together! Watch below or click HERE to watch on YouTube. You can also find the full Live video on Facebook at this link HERE


Thanks so much for stopping by! Be sure to check out this week's Facebook Live Demo on Thursday for more inspiration on the Scrap Shotz Facebook Page. 

Happy Crafting friends! 


Monday, October 30, 2017

December Daily Mini Album with Lawn Fawn

Hi there!
This is my fifth year doing a version of a December Daily album.  Obviously, December is a busy time, so to make things simple I usually make my own mini album ahead of time.  The Perfectly Plaid 6x6 paper pack from Lawn Fawn is perfect for a mini album.


To start the album, cut the following pieces of heavy cardstock:

1 - 12" x 6"
3 - 12" x 5.75"
2 - 5.5" x 5.5"pł

Score the 12 x 6 piece at 3" and 2.5" from each end.


Adhere the two 5" x 5" pieces of cardstock to the outer flaps of the 12" x 6" cardstock making sure to centre the piece with an even border around it. This will be the cover.


Score the three 12" x 5.75" pieces at 3" inches from each end. Adhere the three scored and folded pieces together to make a paper chain.


Adhere the centre portion of the paper chain to the centre of the cover. Be sure to use very strong adhesive to do this step (I used wet glue) since this is the part that is the support for the book pages.

You can leave the book like this and it will give you 11 pages (not counting the covers). But, I do all 31 days of December, so I needed more pages. I cut and scored a two more 12" x 5.75" pieces and adhered them to the ends of the paper chain. I cut and folded three 5" x 10" pieces and adhered them to the centre of each panel to make flip up pages. I added more pieces and flip cards to the album until I had 31 pages.

Now that the album is finished, I wall papered every page with the Lawn Fawn paper.

For the cover, I embossed and watercoloured  the poinsettia stamp from The Ton. The pine branches and snowflakes are cut from a Kaisercraft die from my stash. The scalloped circle was cut from with my Silhouette. Swing Thickers from the September Kit  and some alphas from my stash make up the title. The dots are from Liquid Pearls in Gold.

The only page completed in the album is the dedication page. I keep all my Christmas/December Daily supplies in a pizza box and try to use any products that will work for my needs. Here, I used an old Elle Studio journaling card, some more Lawn Fawn paper cut with a Fiskars punch and the number one die cut from an old Spellbinders tag die.  The rest of the pages will be completed as the month progresses.


I have prepared a short video showing how the album looks with all the pages expanded.


I'm pretty happy with this album and can't wait for December to get started!

Thanks for looking!


Monday, October 23, 2017

The Ton Stamps - Peony Cluster Mini and Cozy Poinsettia

Hi there!

This month I got to play with stamps and die sets from The Ton.  This is a "new to me" stamp line, but I'm thinking there will be more added to my collection very soon.  The designs are so versatile and the detail is incredible.


I started with a simple card design using the Peony Cluster Mini.


After heat embossing with gold, I used some pink water colour to colour my image.  I'm quite the novice at water colouring, so I find embossing the image first is quite forgiving.

The flowers were then cut with the available die and using foam tape, mounted it on a nest of pink twine. All of that was then placed on top of the strip of pink cardstock which had been stamped repeatedly with the sentiment. To finish it off, I added some strips of washi tape, some rhinestones, and rounded the corners of the card.

Now that my creative muscles were flexed, I set out to play with the Cozy Poinsettia stamp.


The gold embossing and the water colours were still on my desk, so I used those supplies again.  This time, instead of using regular foam adhesive, I used the die to cut out some fun foam.  The larger image was quite warped (even though I had used water colour paper), and gluing the image to the fun foam keeps it nice and flat.  I think it will hold up better in the mail, as well.

I mounted the image on a piece of white cardstock and a piece of patterned paper from the Perfectly Plaid 6x6 pad by Lawn Fawn.  I embellished it with a small strip of washi at the top and some Nuvo Crystal Drops in Pale Gold.

The creative juices were flowing now, so I pulled out my Copics and started colouring.


Again, I'm no expert in Copic colouring and I only have a few markers.  I started by stamping the image with Black Archival Ink. The markers were R05, R27, R89, G24, G17, and YR09.  Then, Stickles were added to the centers.

Using an A2 sized card, I cut approximate,2 3/4 inches off the front of the card base and replaced it with a piece of Hot Off the Press Acetate. To cover the seam, I placed some washi tape. I stamped the sentiment on top of the acetate with Staz On Ink. 

Whew!  Lots of words to explain three pretty simple cards.  But, I just love how they turned out.

Thanks for looking and for any products not linked, please be sure to check out the store.


Wednesday, October 18, 2017

Concord and 9th Magnolia Wreath Stamp and Die Set

Have you seen the gorgeous Concord and 9th Magnolia Wreath Stamp and Die Set? It's gorgeous and uber versatile. When I purchase a stamp set, I brainstorm as many different ways I can to use the set, especially if the set is "themed" or "seasonal."

At first glance, you may think this set is for the holidays given that many cardmakers are busy making Christmas cards, myself included. Let me show you how I created some fun projects .... and I'm only scratching the surface of my idea list. (I will have more to share on my Instagram feed!)

Below I have a couple of autumnal cards to say thanks for sharing their recent Thanksgiving with my family. I played with my inks, taking advantage of the Hero Arts ombre Butter to Orange dye ink pad. I masked off the darkest colour as I knew I would be adding gold embossing to the base wreath image.


To the top layer of leaves I added Lawn Fawn Cranberry and Lobster dye ink colours to the edges using the "rock and roll" method. What I love about this technique is that each stamped image is unique - no set of leaves are the same as is the current season.


Then I adhered the leaves, added some Nuvo tonic drops for berries and a distress oxide stamped sentiment.

Next I created a couple of contemporary toned Christmas cards using the Distress Oxide inks in Peeled Paint and Lucky Clover. For each I stamped the second layer with VersaMark ink and embossed using some embossing powder to capture the light and sparkle of snow. Again, I used a Distress Oxide Vintage Photo stamped sentiment and finished it with some Jilly Bean twine.

The first card I kept simple and will be mass producing these for the Caring Hearts Drive.


For the second card, I add some Nuvo glitter drops in Rhubarb for the berries. Originally I had stamped the berries on the wreath but with the embossing it was too faint for my liking. And I finished it with a Distress Oxide Candied Apple stamped sentiment.


And a close up of the embossing and berries.


For my last project, I dolled up mini take out cartons with my autumnal coloured and embossed wreath. Each container will contain some apple crisp piping hot from the oven tonight to my friends.


I hope I've inspired you with these projects. There are several more projects brewing in my head which I am excited to share. These cards can be seen in person this weekend at the Scrap Shotz Fall crop.

-Virginia

Tuesday, September 5, 2017

Scrap Shotz September Kit Projects with Sylvie

Hi there!

I'm so excited to be sharing my first projects as part of the Scrap Shotz Design Team! I'm extremely honoured to be a part of this talented group. I love creating from a kit and I hope I'll be able to give you ideas on how to get the most our of yours.

The fact that the kit this month was the Carta Bella Transatlantic Travel line made me so happy.  I am in the middle of scrapbooking a recent trip to Cuba, and the minute I saw the collection, I knew it would work with photos we took on a sightseeing tour.


I loved the compass theme in this line, so I cut one using a Silhouette file.  I sprayed it with mist while it was still on the cutting mat. Once it was dry, I removed it from the mat and backed with some of the patterned paper.  For added dimension, I machine stitched the points on the compass. I used some old foam Thickers from my stash to create the title. I was inspired to use the quote from one of the 3x4 cards in the collection which worked so well with my compass. After that, there wasn't much embellishing that needed to be done.

I used an old arrow stamp to give a place for the Carta Bella stickers to rest.  I used some Tonic Nuvo Crystal Drops in Midnight Blue (a kit extra) to make my own enamel dots.  I LOVE those!

Speaking of the Nuvo drops, the Crystal Glace is a very cool product and I used it to make embellishments for this next page.


I started by punching a 1 inch circle and then taping it to my work surface with regular scrapping adhesive.  This keeps the circle from curling.  Then I applied thin layers of the Glace over the entire surface of the circle.  It starts out cloudy, but dries clear.  After 3 coats, I created my own flair badge! This is when it is still cloudy. ;)


While those were drying, I took a piece of vellum from my stash and using the Echo Park embossing folder (a kit extra), created a piece of embossed vellum.  The pattern of the embossing folder created two columns of words, so I decided to cut the vellum in half vertically and placed it above and below my photo to make it look like a long strip.  I cut another Silhouette cut file to create a leafy pattern from the "Vintage Letters" paper and layered strips of paper along side it.  The title is also a Silhouette file that was cut from the cardstock in the kit. I embellished the page with some of the tags and two of my "flair badges".

So, that's it for me today!  I'll be sharing more work tomorrow, but thanks for stopping by.  For information on all the products in the kits, be sure to stop by the store.

Sylvie


Monday, July 17, 2017

Scrap Shotz June Kit Reveal

Hello!

If you are looking for the details on the Design Team and Page Kit Designer Call, please click HERE.


The June Scrap Shotz kit features a local company, Wild Whisper Designs and their "World's Best" line.


Rosie here to share with you my first 2 projects created with the latest kit.


This layout is based on this sketch from Creative Scrapbooker Magazine:

 I turned the sketch and created the "swoop" with the sequins included in the kit.
 I also added a little glitter from my stash.

 The gold flowers are a kit add-on.

I sprayed numbers from my stash with Heidi Swapp Colour Shine mist and the crochet edged accent is from a previous Scrap Shotz kit.


This next project celebrates Father's Day and this line can be used for both Father's Day and Mother's Day projects.

I cut various pieces of patterned paper and positioned them in a square. I then taped off an area with painters tape, applied embossing ink then Emerald Creek Hammered Metal embossing powder and heat set. This embossing powder is chunky-ish so I applied heat to the underside of the paper so I wouldn't blow the powder all over the place-yes I have done that before ;). A strip of patterned paper completes this oversized photo mat. Nuvo Crystal drops from the kit above and below the paper block complete the "frame" .


I fussy cut locks and keys from one of the patterned papers and used the "love" key to create the "love dad" title. It's hard to tell from the photo but I highlighted 3 of the keys with a Wink of Stella marker.

I will have more projects to share in the next few days and check out our Design Team/Page Kit Designer Call, link is at the beginning of the post 😊

Thanks for stopping by!

Saturday, August 6, 2016

Water Colour Powders Tutorial

**Please Note: Photobucket very recently changed their terms of service and no longer supports direct linking for 3rd party hosting of images. To view the images not displayed, hover and right click over image, then choose either "open image in new window" or "open link in new window" **

Hello,

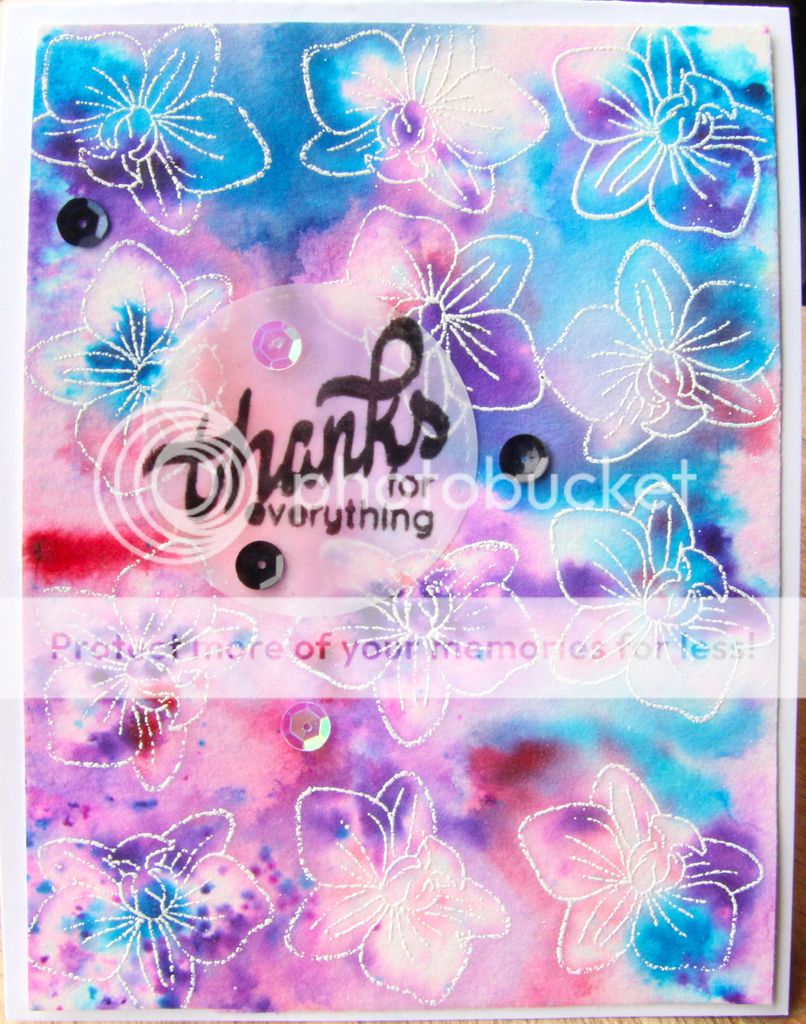
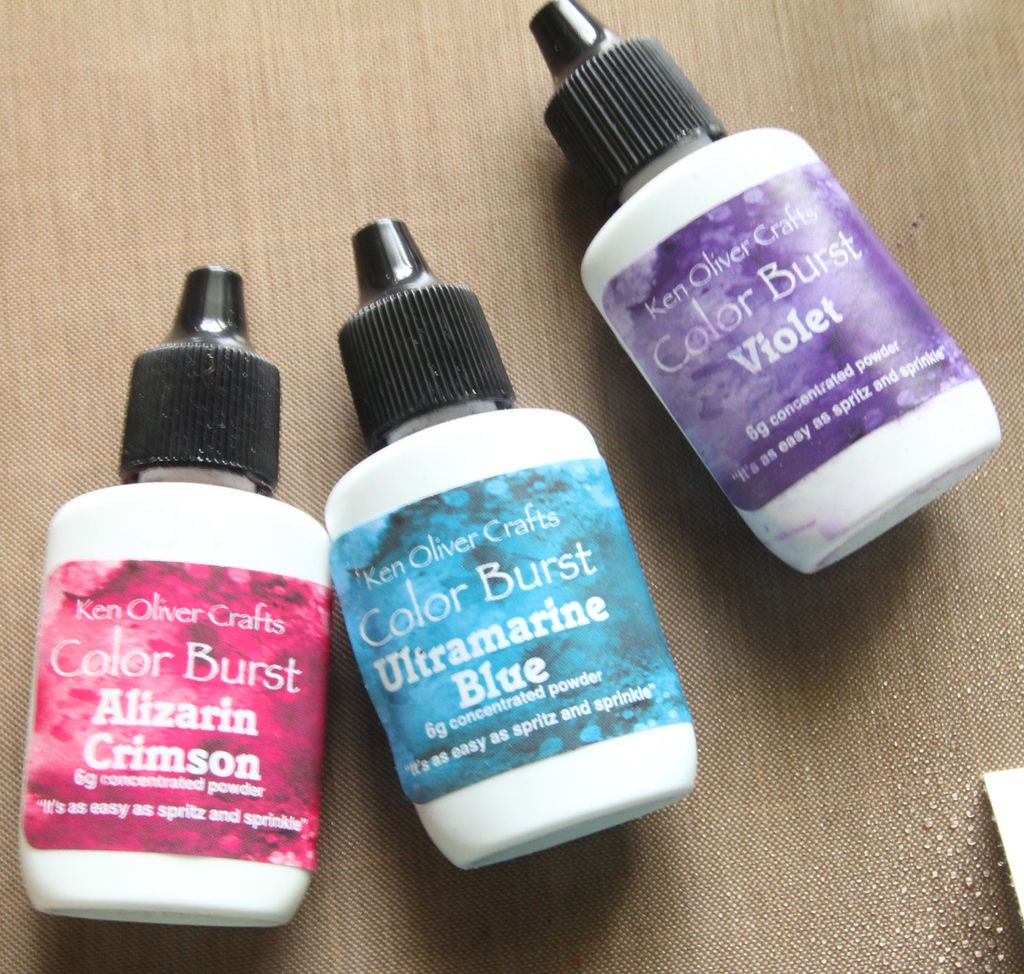
So pleased you can join me for a look at a couple cards I created using the Ken Oliver Color Burst Powders available in the store.
I am going to walk you through the process of making these cards. Please note that these exact colors may not be in the store but you can contact Sandy to inquire about ordering them.
You can create a similar effect with the Magenta-Nuance Watercolor Powders as well.

The Color Burst powders are available in singles in the store while the Nuance powders come in a set of 15 colors.

Let's take a look at the first card:


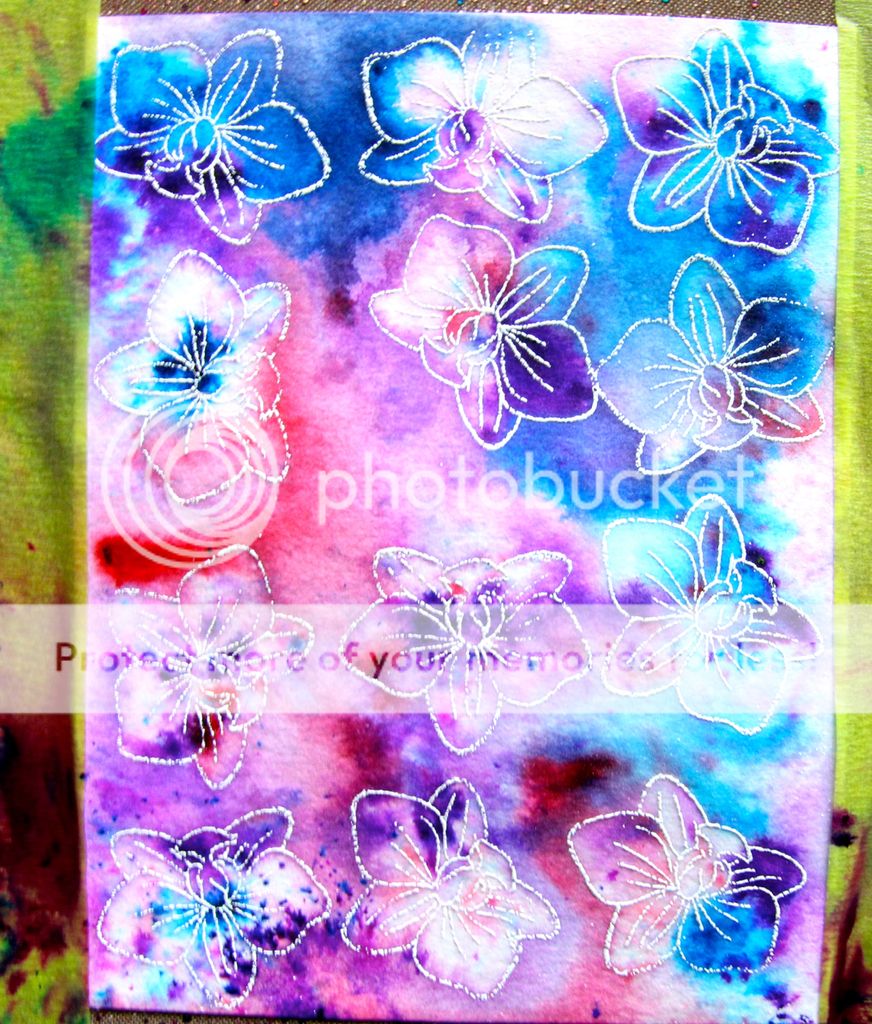
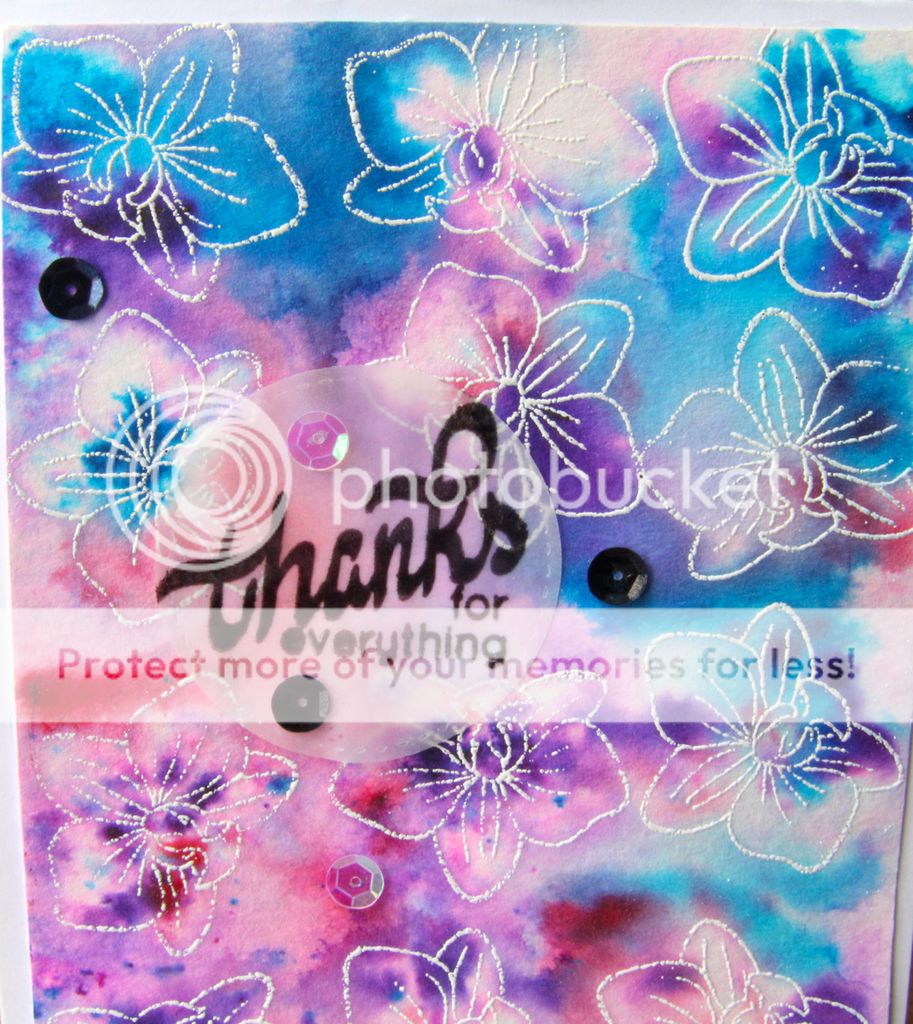
These are the colors I used for this first card:


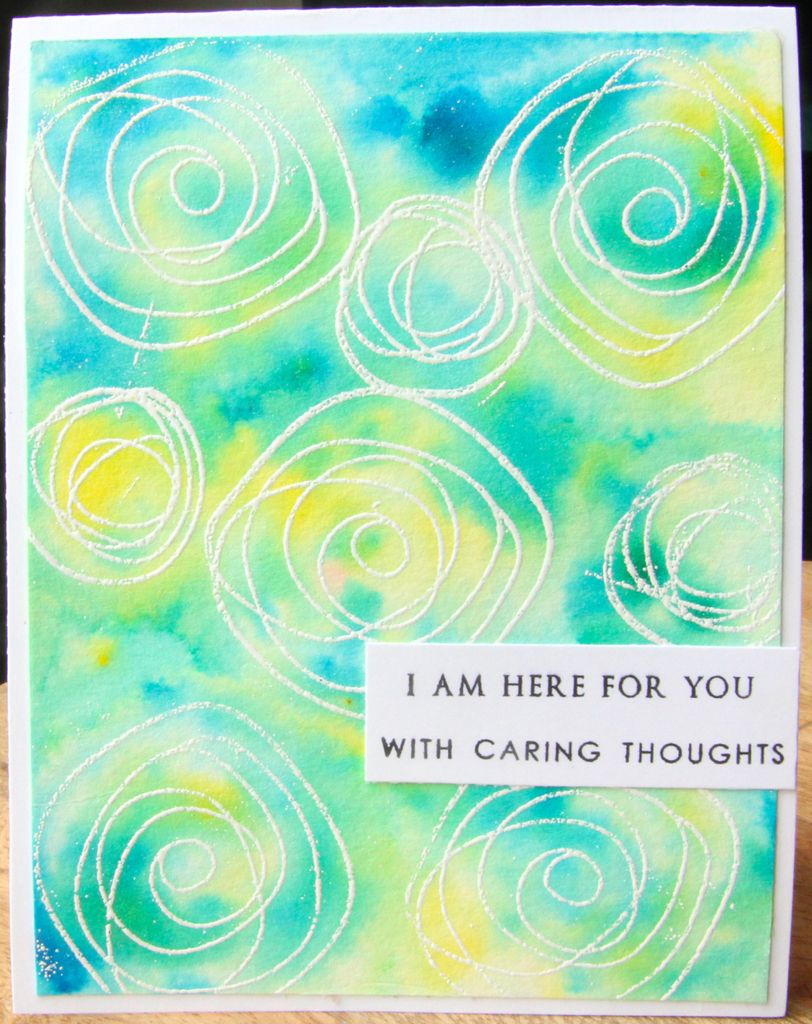
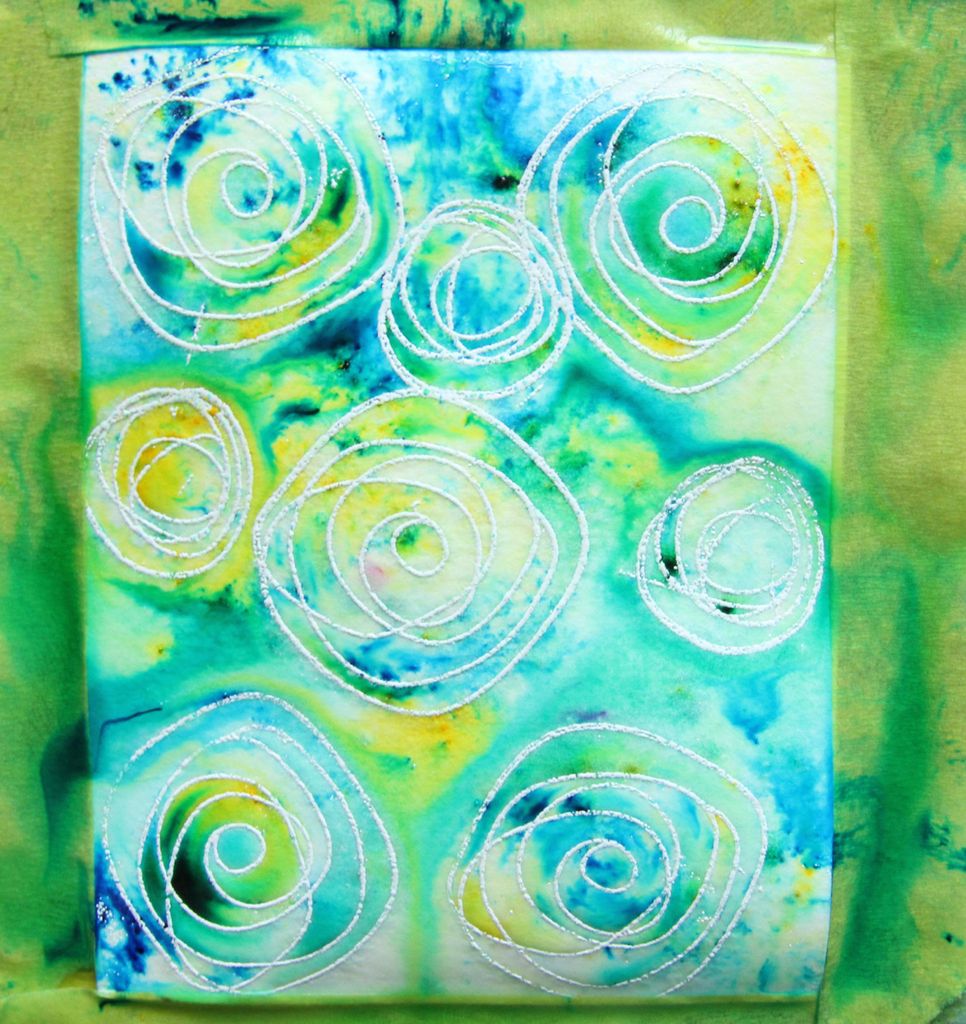
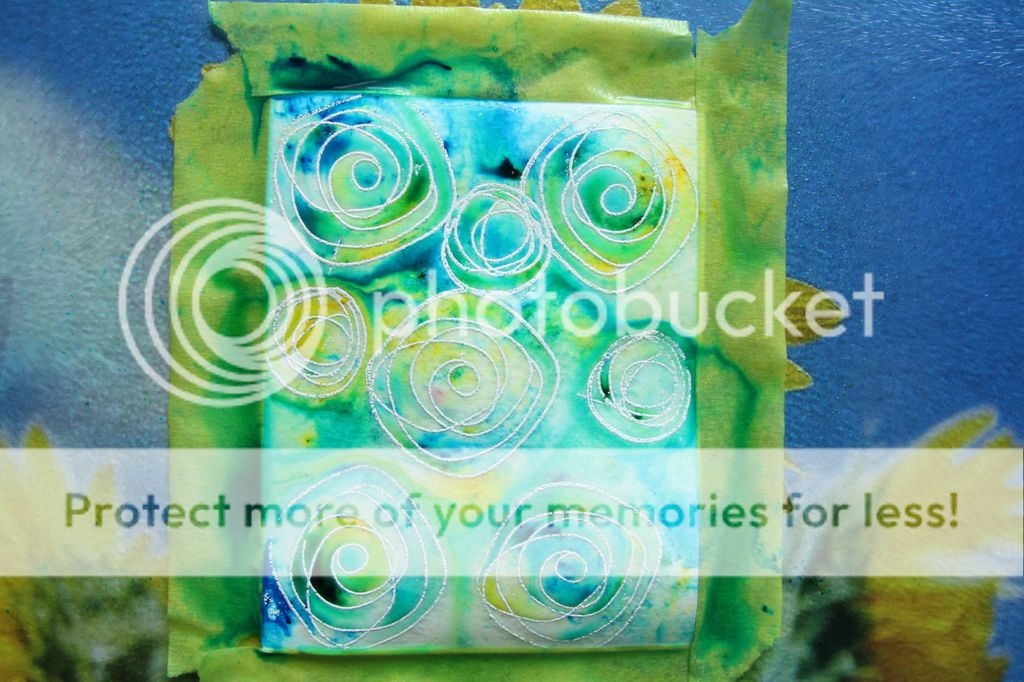
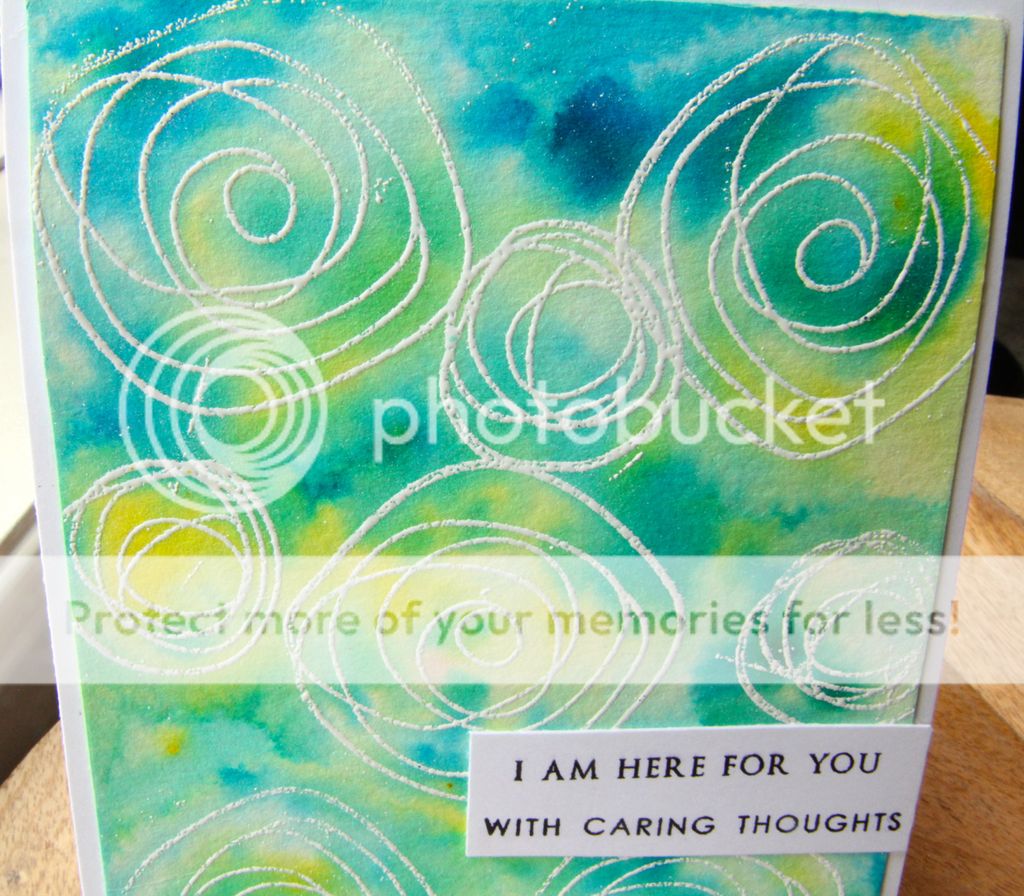
For this second card I used Pthalo Green, Lemon Yellow and Ultramarine Blue:


I experimented with color groupings prior to working on the actual card fronts to see which colors would mix without getting all muddy.

Step 1
Cut watercolor paper down to 4"x5 1/4", I used Strathmore watercolour paper.

Step 2
Stamp paper with chosen stamp and Versamark embossing ink. I used Altenew's Oriental Orchid* stamp set for the red/blue/purple card and My Favorite Things Circle Scribble* for the blue/green/yellow card. An outline stamp works best to allow open areas for your watercolor powder to fill.

Step 3
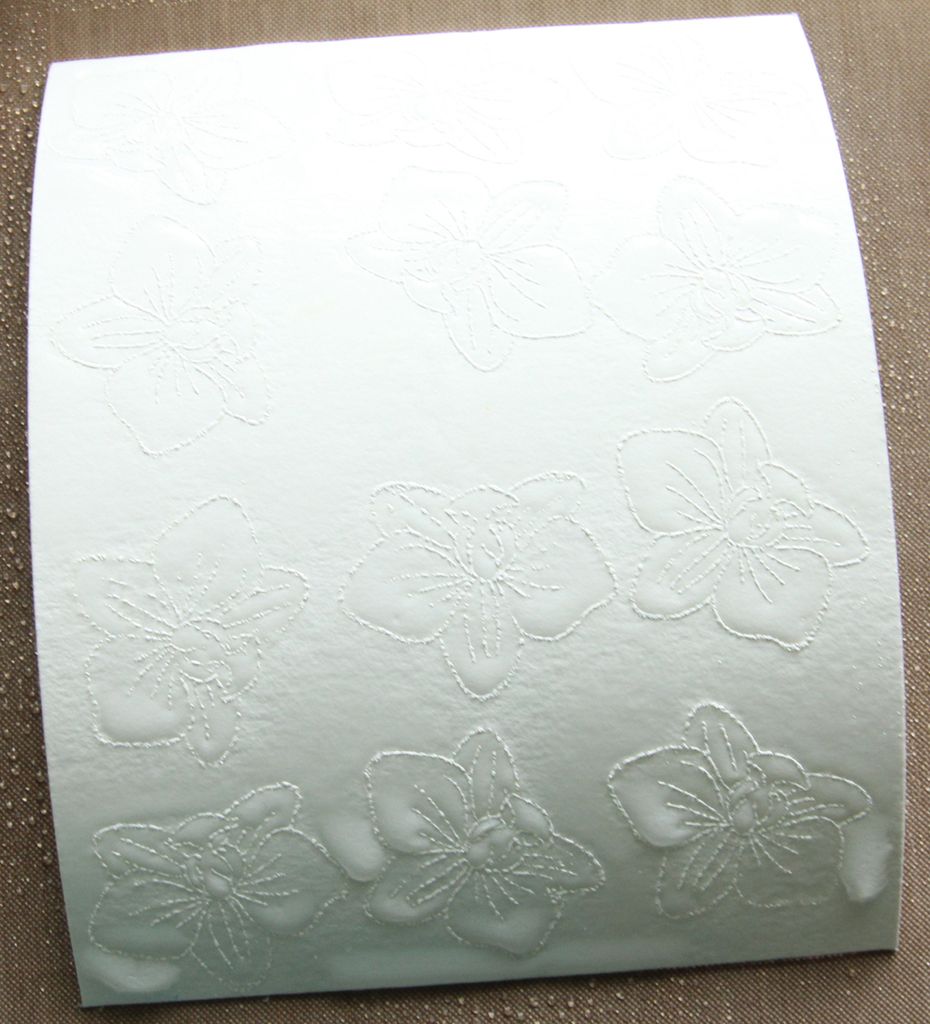
Sprinkle white embossing powder over the Versamark images and heat emboss. I've used Hot Stuff Embossing Powder in Glacier White by Emerald Creek Craft Supplies*

Step 4
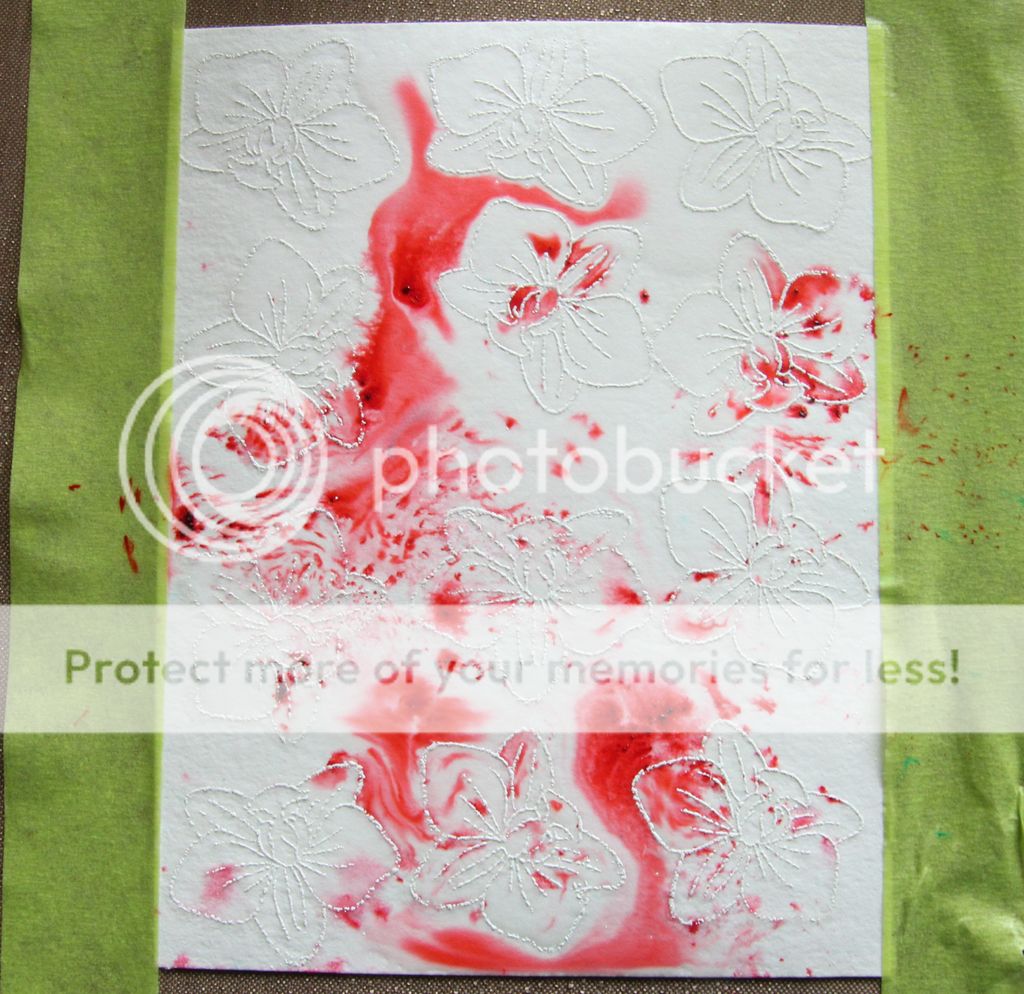
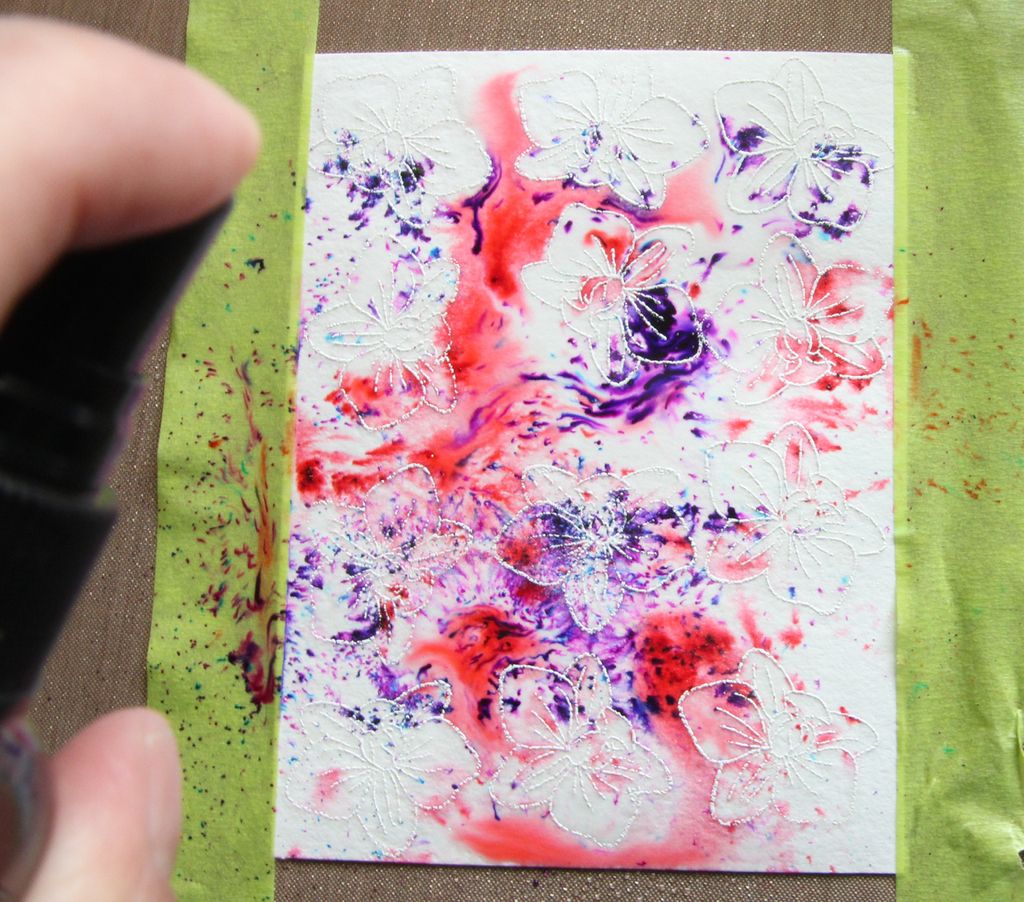
Let cool, then spray generously with water, you can see that the paper curled up once the water hit it, I taped the card front down to prevent the curl.

Step 5
Here I taped the paper down which also made it easier to drop various colors of watercolor powder exactly where I wanted them. 
A little goes a long way so tap the bottle lightly, you can always add more as you go. You can see the powder spreads or 'bursts' as it hits the water.

Step 6
Add additional colors and water, you'll see the embossed images begin to stand out as you add more colors.
Step 7
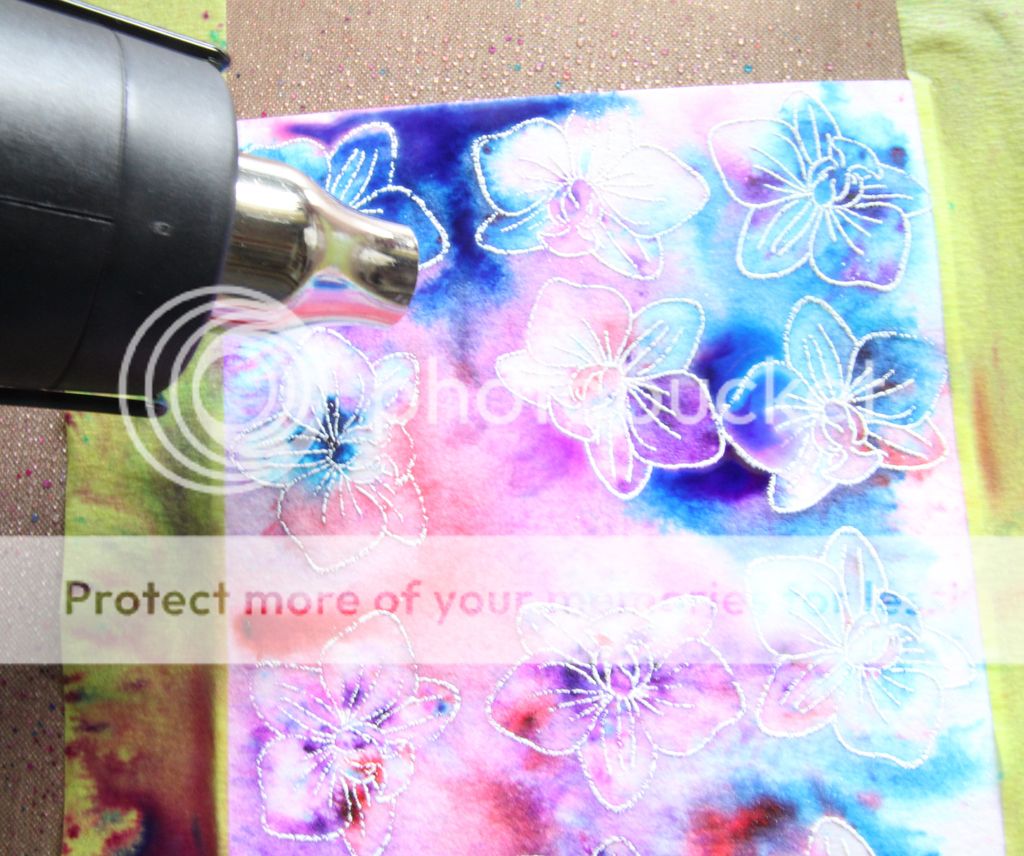
You can also use your heat tool to move around the colors while they are wet.

Step 8
Once you are happy with the results set aside to dry, I let them dry overnight.

I followed the same steps to create the card front for the blue/green/yellow card, here are a couple of photos of the card front in progress:

To finish off the cards I trimmed the fronts a tiny bit to remove the white edges left by the tape and applied adhesive along the edges and liberally on the entire paper to keep it nice and flat.
I die cut a vellum circle with the My Favorite Things Stitched Circle Die-namics*. The sentiment is from the Altenew Layered Lily* stamp set, stamped with black Versafine ink and embossed with Ranger Clear Embossing Powder. I applied liquid adhesive behind the 'thanks' and completed the card with a scattering of clear and black sequins.


I kept this card simple trimming the white edge left by the tape, adhering to the card base and adding a sentiment from the Altenew Thinking of You* stamp set. 

I hope you've enjoyed this tutorial and give this technique a try, it is a lot of fun!

*please note that items listed not found in the store may be available as a special order, contact Sandy directly to inquire.*

Thanks for stopping by :)

Happy Crafting!
Rosie