

Monday, May 31, 2010
Spotted in the Gallery!
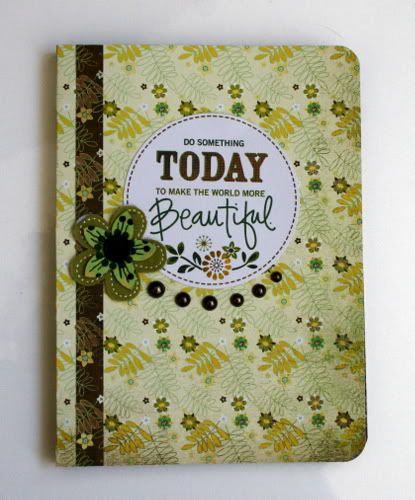
I couldn't resist sharing this gorgeous card with you this week! Jennifer (wustaz) added it to her gallery and I fell in love! Look at those layers and the embossing and the beautiful pearl accents! Fabulous work Jennifer... thanks for sharing!

Friday, May 28, 2010
Fabulous Friday - Anything But!!!!
Today we have a Fabulous Friday - Anything But challenge from the lovely Stephanie!
My challenge today is with Origami. I’m sure we’ve all tried it when we were children, and today we are going to make a shirt card for Father’s Day. So here we go:
Cut a piece of lightweight patterned paper to a 4 x 6 ½ rectangle. Chatterbox papers are perfect for this.
Decide which side (if it’s double sided paper) you want to be the outside of your shirt.
Lay the paper with the chosen patterned side down and fold your paper in half along with 6 ½ inch side. Then fold each side into the middle.

Flip your paper over so that the open middle is underneath. Take one end and fold it back about ¼ inch.

Leave this top edge folded back. Flip your paper over so that your open middle is face up and fold the corners of the top ¼ inch folded edge in at an angle. This will create your collar.

Then make a larger fold on the bottom edge so that it folds out. These will be your sleeves.

Then with your open middle still face up, fold the bottom up so that it tucks under your collar (approximately in half).

You should have something that looks like this, with the open edge on the inside.

Decorate your shirt – add buttons, a tie, etc.
Add it on to a card and you have a great Father’s Day card for your husband or Dad!

Thank you Stephanie for the fabulous instructions and the wonderful inspiration! Now...let's see your creations!
Thursday, May 27, 2010
Copic Thursday!!!
Now that we've wrapped up all our copic challenges I am giving you a week to choose a challenge that you didn't get a chance to complete, or one that you'd like to revisit...
You have until THURSDAY JUNE 3 to qualify for the copic grand prize of 20% off your entire order!!!
To qualify you must have completed and posted (or linked to the blog in the comments section) a
MINIMUM OF 13 OF THE 15 POSTED CHALLENGES
Thanks to everyone who participated in the challenges... hope you learned something!
Wednesday, May 26, 2010
Fabulous Find - EK Success Border Punches
Punches. We all have them but are we really using them to their potential?
The EK Success Slim Edger Punch - Embossed Curve is one of my favorite punches. Why? Well, it is super versatile. You can make a border from cardstock or pattern paper as seen below.

Or you can later your borders as seen in the layout below.

Or you can roll up a bunch of punched borders to make a rose as seen below.

I love this punch and would love to hear how you are using your EK Success Slim Edger Punch - Embossed Curve. Please share :-)
Monday, May 24, 2010
Spotted in the Gallery!
OK girls due to some technical difficulties... and after trying all day, I'm going to have to send you to see my choice this week!
Brenda has made some fabulous cards for her card crew challenge ... and THIS is one of my favorites...
You can see her card challenge for this week HERE
Sorry there are no photos... better luck next week!
Brenda has made some fabulous cards for her card crew challenge ... and THIS is one of my favorites...
You can see her card challenge for this week HERE
Sorry there are no photos... better luck next week!
Friday, May 21, 2010
Fabulous Friday - Inspiration Challenge
It's the May long weekend - woohoo! And we have some scrappy inspiration for you this Fabulous Friday. In fact, it's an Inspiration Challenge from Laurel.
Laurel used this Pottery Barn Kids picture as inspiration. Oooh...and there are so many possibilities!
 Here is the card she created!

Laurel would like to challenge you to create a card from the inspiration piece! Don't forget to link me up, ok?
Laurel used this Pottery Barn Kids picture as inspiration. Oooh...and there are so many possibilities!


Laurel would like to challenge you to create a card from the inspiration piece! Don't forget to link me up, ok?
Thursday, May 20, 2010
Copic Thursday!
OK girls as we draw to an end of our challenges we're going to try something a bit trickier...
We've mastered blending two colors that are in the same family... now we want to move on into feather blending... which is simply blending two DIFFERENT colors...
Virginia has taught several copic classes use these butterflies as a teaching tool... you can see where she has blended the yellow and red using this technique.
And another... Feather Blending Part Two
You can see some great samples HERE
Can't wait to see what you come up with for this one! It looks fabulous on wings and petals and so many other things!
We've mastered blending two colors that are in the same family... now we want to move on into feather blending... which is simply blending two DIFFERENT colors...
Virginia has taught several copic classes use these butterflies as a teaching tool... you can see where she has blended the yellow and red using this technique.
Here is a tutorial by Marianne Walker on Feather Blending

And another... Feather Blending Part Two
You can see some great samples HERE
Can't wait to see what you come up with for this one! It looks fabulous on wings and petals and so many other things!
Wednesday, May 19, 2010
Fabulous Find - Glue Gloss
Today I have a Fabulous Find for you! Have you heard or tried Clearsnap's newest product, Glue Gloss?? Well, you are in for a treat. Here is a picture of this amazing product.

Firstly, isn't the packaging just SO darn cute??? It looks like mascara! Even the applicator inside the hot pink tube bears resemblance to the mascara wand!
I am a bit of an adhesive fanatic so when I found this I honestly jumped for joy! Glue Gloss is fantastic for the small jobs like adhering beads, ribbon, glitter and sequins. Or what about those errant alphas that decide to pop up??? Glue Gloss is perfect for that! What I love the most about Glue Gloss is that I can adhere my ribbon securely with this liquid glue and the glue will not bleed through the ribbon.
A word of wisdow to share...Glue Gloss is not meant for the big jobs like adhering a large piece of pattern paper to your layout. This is not a heavy duty glue; it is for the small and light jobs. It may take a couple of strokes for you get a feel for how much glue you will need. It dries very quickly so work fast!
Below are a few examples of where I have used my Glue Gloss.


For the price, this adhesive is an excellent value!
Have you tried it? Please share your feedback with me!

Firstly, isn't the packaging just SO darn cute??? It looks like mascara! Even the applicator inside the hot pink tube bears resemblance to the mascara wand!
I am a bit of an adhesive fanatic so when I found this I honestly jumped for joy! Glue Gloss is fantastic for the small jobs like adhering beads, ribbon, glitter and sequins. Or what about those errant alphas that decide to pop up??? Glue Gloss is perfect for that! What I love the most about Glue Gloss is that I can adhere my ribbon securely with this liquid glue and the glue will not bleed through the ribbon.
A word of wisdow to share...Glue Gloss is not meant for the big jobs like adhering a large piece of pattern paper to your layout. This is not a heavy duty glue; it is for the small and light jobs. It may take a couple of strokes for you get a feel for how much glue you will need. It dries very quickly so work fast!
Below are a few examples of where I have used my Glue Gloss.

To add a bit more glitter to the tips of my Heidi Swapp flower, I dabbed on some Glue Gloss and dipped my flower petals into some ultra fine glitter.

The glitter on this butterfly was adhered using Glue Gloss. I have since made more of these butterflies and swiped Glue Gloss on the edge of its wings and then dipped it into glitter. I so love the results!
For the price, this adhesive is an excellent value!
Have you tried it? Please share your feedback with me!
Monday, May 17, 2010
Spotted in the Gallery!
How does one possibly choose one favorite from the gallery after a crop weekend???? The gallery is absolutely BURSTING with goodness!
Jennifer made this one and put it up as a challenge for us... totally fabulous!

Erica did this one... love these photos!
 This is one of Kelly's... I just think that family photo is priceless!

Make sure you check out the gallery this week... you won't be disappointed!
Jennifer made this one and put it up as a challenge for us... totally fabulous!
Erica did this one... love these photos!
 This is one of Kelly's... I just think that family photo is priceless!
Make sure you check out the gallery this week... you won't be disappointed!
Friday, May 14, 2010
Early Bird Make n Take
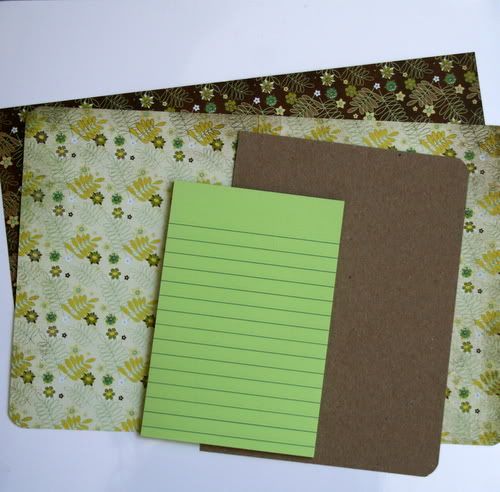
Welcome! Today is the day...oh yeah, the Scrap Shotz online crop, "Let's Play Games!" To get us into the scrapping mood, let's start out with an Early Bird make n take from Jen.
"You can't have a fabulous weekend of game playing without having a SCORE KEEPER or a Strategy Pad. In other words, my make & take project is a little post-it pad holder that you can use to make lists, plan your day, keep track of things... whatever you want.
Gather your supplies. You will need:
1 piece of cardboard / chipboard that is 5.5x7.5
1 4x6" post-it note pad
2 coordinating pieces of PP cut to 11.5x7.5"
2 eyelets
ribbon
pen
embellishments as desired
scoring blade
cropadile
adhesive
corner rounder (optional)
Score your two pieces of PP at 5.5" and 6" along the long side.
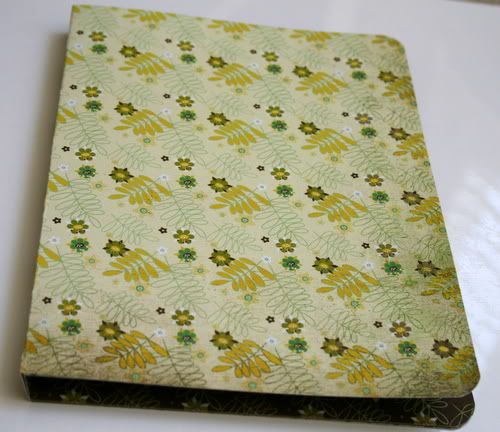
If desired, round the top right and bottom right corners of your chipboard.

Glue your cardboard to the right panel of the wrong side of your PP, so on the back inside cover. Round right side corners if desired.

Glue your other piece of PP down on top, forming a sandwich on the right side where your cardboard is. Be sure to match up your score lines. You may have a slight overhand at one end depending on the thickness of your PP. This will be the inside cover. Crease and fold at score lines and round corners if desired.

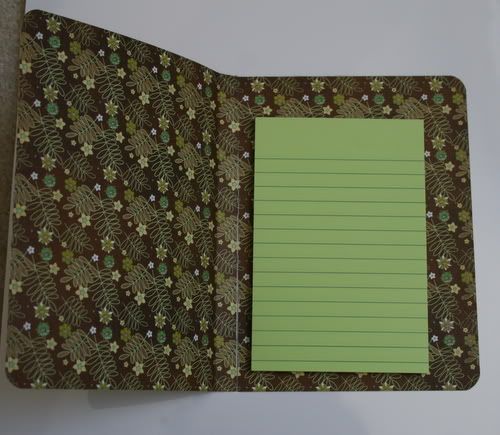
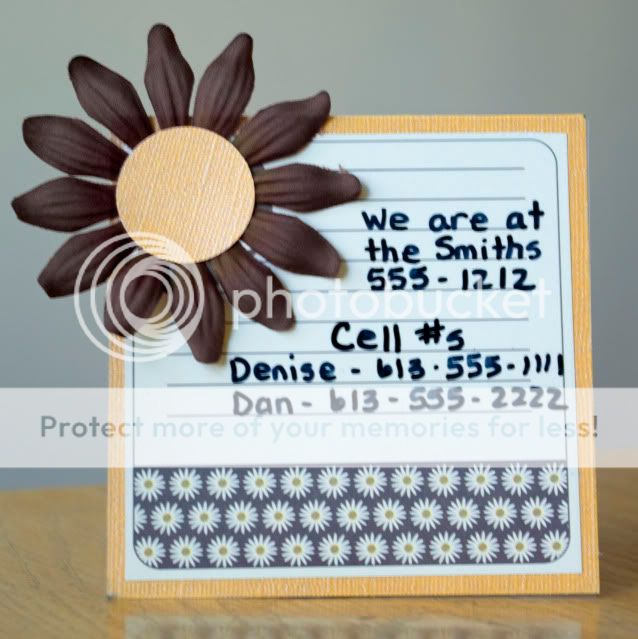
Glue post-it pad to right inside panel, off-setting it further down and to the left as shown.

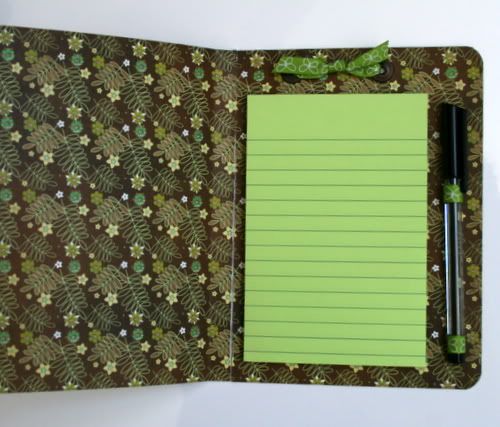
With your cropadile, punch and set two eyelets centered over your post-it pad and tie a ribbon bow or knot.

Fashion two pen loops out of ribbon and glue dots and attach alongside your post-it pad.

Embellish front cover as desired!

Voila!! You now have your own unique score-keeper, list maker, life strategy tool! :wink: Thanks for giving it a try and be sure to post your versions in this thread by MN EST Monday night for a chance to win a prize."
Thanks Jen!
***If you are interested in winning an extra prize, say from this blog, leave me a comment and I'll do a random drawing on Monday, May 17, 2010 at midnight.
"You can't have a fabulous weekend of game playing without having a SCORE KEEPER or a Strategy Pad. In other words, my make & take project is a little post-it pad holder that you can use to make lists, plan your day, keep track of things... whatever you want.
Gather your supplies. You will need:
1 piece of cardboard / chipboard that is 5.5x7.5
1 4x6" post-it note pad
2 coordinating pieces of PP cut to 11.5x7.5"
2 eyelets
ribbon
pen
embellishments as desired
scoring blade
cropadile
adhesive
corner rounder (optional)
Score your two pieces of PP at 5.5" and 6" along the long side.
If desired, round the top right and bottom right corners of your chipboard.
Glue your cardboard to the right panel of the wrong side of your PP, so on the back inside cover. Round right side corners if desired.

Glue your other piece of PP down on top, forming a sandwich on the right side where your cardboard is. Be sure to match up your score lines. You may have a slight overhand at one end depending on the thickness of your PP. This will be the inside cover. Crease and fold at score lines and round corners if desired.
Glue post-it pad to right inside panel, off-setting it further down and to the left as shown.
With your cropadile, punch and set two eyelets centered over your post-it pad and tie a ribbon bow or knot.

Fashion two pen loops out of ribbon and glue dots and attach alongside your post-it pad.
Embellish front cover as desired!
Voila!! You now have your own unique score-keeper, list maker, life strategy tool! :wink: Thanks for giving it a try and be sure to post your versions in this thread by MN EST Monday night for a chance to win a prize."
Thanks Jen!
***If you are interested in winning an extra prize, say from this blog, leave me a comment and I'll do a random drawing on Monday, May 17, 2010 at midnight.
Thursday, May 13, 2010
Copic Thursday!
Another week, another challenge!
This week we'll be practicing coloring things to look white... on white paper...
This week we'll be practicing coloring things to look white... on white paper...
Why do we even need to color it you ask??? Well the answer is simple... white is never REALLY white! There are always shadows and light sources and hints of color to consider...
Sherrie Siemens has a great tutorial on coloring snowmen (can really be used for anything white...)
And another from Marianne Walker...
Suzanne Dean also has a video to show how to color white...
Even though it's almost summer, feel free to pull out those snowpeople stamps to practice on... Christmas will be here before we know it!
I did this cutest shaggy dog... might be a bit too grey? I love him anyways...

Can't wait to see what you come up with!
Tuesday, May 11, 2010
Ssshhhhh! Here are some Crop Sneaks for you!
Are you *game* for a few more hints????


Remember...you didn't hear these from me! LOL
Any thoughts????


Any thoughts????
Scrap Shotz Online Crop - May 14, 15, 16
Got weekend plans??? Well, let's just say you do now! LOL
Here is a sneak peek for you.

Can you guess?
Scrap Shotz is hosting an online crop titled, "Let's Play Games!" Our amazing Design Team has whipped up some awesome challenges, make n takes and games. Oh did I happen to mention prizes? Yes, there are prizes!!!! So I ask again..."Got weekend plans???"
Here is a sneak peek for you.

Can you guess?
Monday, May 10, 2010
Spotted in the Gallery!
Hello again! Well it's been a great gallery week as usual! I'd like to show you this gorgeous layout from Shannon's gallery... she has done an amazing job with glimmer mist and cloud die cuts, and created a really cool seperation between land and sky... thanks for sharing Shannon!


Friday, May 7, 2010
Fabulous Friday - Blueprint Challenge
This Fabulous Friday is a Blueprint Challenge from the lovely and talented Lorraine.
Here is my effort!

And here is my layout!

Have fun! Don't forget to link us up to your project using the Blueprint!
Thanks Lorraine!
I love sketches but have never made one in PSE before this one. I went back to Denise's tutorial from last November and went to creating. It was fun! The challenge this week is to use this sketch in your own way. Flip it. Spin it. Twirl it! Whatever works for you. Use it as a springboard to create your layout.
Here is my effort!

And here is my layout!

Have fun! Don't forget to link us up to your project using the Blueprint!
Thanks Lorraine!
Thursday, May 6, 2010
Copic Thursday!
I'd like to thank everyone who has been following along with our challenges... we've been learning so much!
Our winner for the month of April is Dot!!! She did and uploaded all four April challenges and has won a free copic marker!
This week we are coloring wood. Check out the challenge and tutorials HERE
I did some coloring a while back and came up with this card for a friend's anniversary...

Can't wait to see all your wood creations! Thanks for stopping by!
Our winner for the month of April is Dot!!! She did and uploaded all four April challenges and has won a free copic marker!
This week we are coloring wood. Check out the challenge and tutorials HERE
I did some coloring a while back and came up with this card for a friend's anniversary...
Can't wait to see all your wood creations! Thanks for stopping by!
Tuesday, May 4, 2010
May Product Reveal at Scrap Shotz
Oh boy! The May Product Reveal at Scrap Shotz was SO amazing! Check out these amazing works from our talented Design Team.
I love this ingenious idea from Denise...

And this fantastic layout from Jen...

I also love this card from Stephanie

And Lorraine made this gorgeous project...
 Don't you think these ladies are amazing????? I sure do!
I love this ingenious idea from Denise...
And this fantastic layout from Jen...

I also love this card from Stephanie

And Lorraine made this gorgeous project...

Monday, May 3, 2010
Spotted in the Gallery!
We left the Scrapshotz ladies with some sketches for NSD and I'd like to share some of the fabulous creations that were waiting for me when I got home!
Laura did this one...

And this is out of Caroline's gallery...

Laura did this one...

And this is out of Caroline's gallery...

There are so many more... you should really check out the gallery! And maybe even try your hand at creating something of your own from the sketches posted!
Subscribe to:
Posts (Atom)
