Showing posts with label Simple Stories. Show all posts

Saturday, August 10, 2024

Simple Stories Simple Vintage Meadow Flowers Layouts & Video!

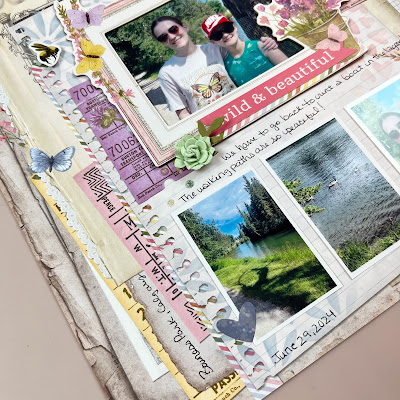
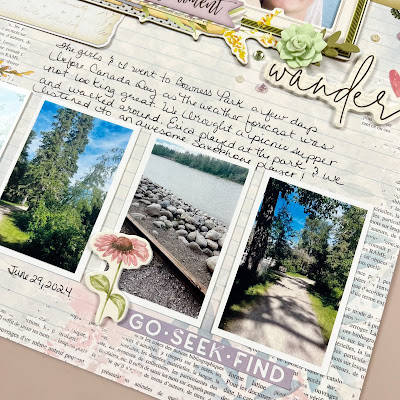
 Hello friends! Karla back today to share the layouts I created in one of the Scrap Shotz' Thursday Live Demos using the beautiful Simple Stories Simple Vintage Meadow Flowers collection. This collection is so lovely for spring or summer with its soft colours and vintage feel, and could work for so many different occasions! You can follow along to see the process to create these layouts, which came together quickly and easily HERE!


I used two 12x12 backgrounds from the collection pack that had preprinted layers already, creating a quick and easy layout base.


I used the chipboard frames for my focal photos, sizing my pictures using my Canon Selphy.


There are so many beautiful stickers on the 12x12 sticker sheet included in the collection pack,plus lots of pretty ephemera and chipboard elements to add dimension.


I used Vicki Boutin stencils and Distress Oxide ink to add some subtle areas of stenciling, using coordinating colours.

\

I used the preprinted lines on the background paper to write my journaling directly on the background.


This paper was perfect for our trip to a local park for a nature hike and picnic on Canada Day!


I added some of the foam stickers, pretty 49 & Market flowers and various gems to finish it off!


Be sure to head over to the shop to check out Simple Vintage Meadow Flowers! Happy crafting friends!


Monday, May 6, 2024

Double Page Layouts with Simple Stories Simple Vintage Spring Garden

Hello everyone! I have two double page spreads to share with you today using the Simple Stories Simple Vintage Spring Garden Collection. I also continued with the Easter theme from my last post. Get ready for some flowers, bunnies and butterflies. 


For the first layout I distressed a variety of papers to layer under the photos. I used some of the cut-apart cards in the paper pack for journaling. 


I also cut-apart some tags and attached some string from my stash. Finally, I embellished the layout with butterfly bits and pieces, cardstock titles, chipboard stickers, foam stickers and enamel dots

My second layout uses the frames to the max. Even though they have embellishments incorporated, I added more for dimension. 

I added some bunnies and butterflies using a variety of embellishments - bits and pieces, chipboard stickers and foam stickers. 


I finished it off with some enamel dots and cut apart cards with twine bows. 


Thanks for stopping by today and make sure to take a peek in the shop!

Monday, March 18, 2024

Simple Stories Simple Vintage Spring Garden

 Hello everyone!

I have two layouts for you today using the Simple Stories "Simple Vintage Spring Garden" Collection. I managed to use some Easter pictures as there are bunnies and eggs on some of the papers!


I began this layout with one of the premade chipboard frames. I selected a title from the foam sticker pack and propped it up with some extra foam adhesive on the back. The cut file is free on the Scrapbooks and Cards Today blog. I cut the white outline first and then erased the outline of one bunny so I was left with just the inside. I copied and pasted those two pieces 16 times and then cut out the blue paper. This was so much easier than trying to back the white frame! I suppose I could've cut the blue sheet as one piece and laid the white outline on top but I didn't want to risk the paper tearing while cutting. I had some trouble with the white paper because it wasn't thick enough. I used blade level 4, force 33 and speed 4 with overcut. It worked really nicely on the blue paper because it came off as one piece but I was able to pop each piece out without any tearing. 


The tags are found on a cut apart paper in the paper pack. I used some chipboard stickers and a cardstock sticker to embellish the tag. 


The finishing touches were a chipboard bunny over a bits and pieces flower and enamel dots on the frame and bunny bows. 


The second layout uses this really pretty background paper from the kit. The scallop is a sticker on the cardstock sticker page in the kit. 


The pictures are matted with pieces from the manufacturer strips on several papers. 


I also cut apart some tags to matte the bottom right photo and the journaling card. I fussy cut the flowers and used lots of bits and pieces, foam stickers and cardstock stickers to embellish the page. The doily and the embroidery thread were the only pieces from my stash.


That's all for now. I'll be back again in a few weeks with a two-page spread.
Have a great day!

Wednesday, December 6, 2023

More Simple Stories Simple Vintage Tis the Season Layouts

 Hello again! I'm back with more of the Simple Stories "Simple Vintage 'Tis the Season" Collection. Get ready for lots of embellishments!


The first layout uses one of the patterned papers as a border with some black cardstock around the inside. I noticed there were three journaling cards that all had similar brown paper with bits a pieces layered in behind. I added a few more to each card and added my text. The remainder of the layout has foam stickers, chipboard pieces and brads to create clusters. 


The second layout uses one of the premade background papers. I tried to layer chipboard pieces behind the photos and in the corner clusters. The kit has an entire paper of cut apart tags from which I've used three to decorate the page. A little twine from my stash makes them look finished. My last task was to splatter black paint around the pictures. 

That is all for today. Have a scrappy day!

Monday, December 4, 2023

Simple Stories Simple Vintage Tis The Season Layouts

 Happy December everyone! I have two Christmas layouts today using the Simple Stories - Simple Vintage 'Tis the Season Collection. This collection has all the Simple Stories staples - ready-to-go background papers, cut apart tags, cut apart journaling cards and patterned papers for layering. 


The first layout uses a patterned paper as a frame. I cut out the striped paper to make an outside frame for another layout and cut a second frame from the leftover paper. I don't usually put a frame on my layouts like this, but it definitely created a look I would try again. The brown distressed papers on the left hand side are from the cut apart cards. On the right-hand side I tried to do a similar look with a different paper. I used brown ink to make it looked distressed and match the other side.

The big floral picture is actually a large piece of chipboard. These are great for filling the negative space on a layout. Another feature are the foam stickers. They were used for some of the flowers and titles to add some dimension. I also used some cardstock stickers that are in the paper kit. The final touch was to spatter some white gesso with a bit of water added to it.


My second layout uses a premade background paper. I was looking for a way to not always frame all my pictures, so I used photo corners from my stash. I also used a few doilies from my stash to add dimension. The trickiest part of the layout was to try to get the lantern as part of the image cluster on the bottom right. First, I fussy cut it from a different paper, then I cut through the background paper and tucked the lantern behind the white flower. The stickers are a variety of cardstock and foam stickers and a few foam-backed brads. Lastly, I splattered some watered down white gesso. 

That's all for today, but I'll be back on Wednesday with two more layouts!

Wednesday, October 4, 2023

Simple Stories Here and There Layouts

Hello! Today I have two scrapbook layouts featuring the Simple Stories "Here and There" Collection.

If you did any traveling recently, this will be the collection for you! The main colours are dark blue, dark orange and pink. They really make light and bright pictures jump off the page. The shop has the kit and many embellishments available.


The first layout was inspired by the September challenge sketch in the Scrap Shotz Facebook group. I tend to have a hard time leaving white space on a page so this sketch was good for forcing me to use only one corner of the paper. 

To start, I double matted my photo. Then I cut some strips of paper and used a cardstock sticker for the strips at the bottom. The diagonal paper came in the kit but I added a piece of ribbon for dimension. The flowers are fussy cut from one of the papers. The rest of the embellishments are chipboard stickers or cardstock stickers. The final touch was to use a white pen to journal and then splatter some gesso.


My next layout was built around the title. I used my Silhouette Cameo to weld together the letters from the font. I backed each letter with a different colour from the striped paper in the kit. It always takes me so long to do but it was worth it. This page has more cardstock stickers for embellishments. I kind of cheated with the photo matting and just put strips of paper down the sides of the photos. Overall, I'm glad I got three more large pictures from our Wisconsin Dells trip on a layout!

That's all for today. Have fun scrapping!

Monday, August 28, 2023

Simple Stories - Simple Vintage Essentials

Hello! I am back in my craft room after a busy summer. It feels pretty good to being back in creative mode. I was excited to work with this line. "Simple Stories Simple Vintage Essentials" is very monochromatic, and I love how colors pop on it!

These older photos of my sweet granddaughter make me smile, and her bright coat helps them jump off the page. I used a few different patterns from the patterned paper pack, cutting squares at 4.5 inches and mounting them on a mat, that was mounted on a dotted background that was adhered to a cardstock base.  Over the quad patterned paper, I mounted another pattern in a larger square, popped it up on foam and used that as the base for my photos. The gold heart accents and the gold thickers are from my stash and the clipboard clips are from the Chipboard Clipboard ephemera pack. 

I really like the pattern on this paper with all the rulers on it. I mounted a 8" strip in the middle and built my layout up from that, using foam to pop up the photo, different words from the foam sticker sheet and a die cut Hello from my stash. The postcard and other layering bits were from the ephemera packs, and more of the clips from the Chipboard Clipboard pack. I knew that this photo was going to be on a layout as soon as I took it. That's my sister climbing up the ladder on our RV attempting to get a cell signal at the Big Valley Jamboree. 

This layout was fun. The layers under the photo were already done for me, I popped one of the ephemera pieces on a bit of foam, then mounted it on another. So easy to get the multi-layers! I put that onto a patterned paper piece that I cut around the tags about halfway up the page, distressed them a bit, inked the edges and sewed around it a couple of times. The flowers are 49 and Market blooms that also had a bit of distressing. I used the labels from the ephemera pack with the inserts intact. (You can use the frames or the words separately if you'd like.) To give the labels a bit of dimension, where ever you could see them, I put glossy accents on the rivets to make them look 3D. I also put glossy accents on the clips and on the heart under the photo. 
 

Of course, I ended my scrap session with some cards. These were fun and easy to create, and I think they'll be ones I use quickly. They'll be great for office greetings and occasions.


Thanks for having a look! Anytime you have a question, please just ask. Have a great week!


Thursday, August 17, 2023

More Scrapbook Layouts & Pocket Pages with Simple Stories Trail Mix!

Hello friends! Karla back again today with four MORE fun layouts using the awesome Simple Stories Trail Mix collection! If you missed Monday's post with the first four layouts and a video created with the same supplies, be sure to check that out HERE! For the first layout I used the fun background paper that reminds me of flash cards, above and below my photos. 


I added in some Bazzil Cardstock in a matching colour and matted my photos with the Fall Color Vibe 6x8 Paper Pad. I created a pocket in the photo on left and used the cut apart journaling library card as a piece that can be pulled out. Last year we decided to recreate a photo (the OG!) from 2018 with all the kiddos from our yearly camping trip. I used some Simple Stories Color Vibe alpha stickers on the top of this card.


I used the foam stickers along with various stickers and ephemera from the collection and embellished with The Robin's Nest Dew Drops.


Next, I created a pocket page documenting our meals in the shelter at the campground.


I used some of the 4x6 and 3x4 cut apart cards to tuck into my pockets.


Then I layered stickers and tags to finish it off.


I turned over the pocket page and filled the backside with more photos and embellishments.


When I'm creating a pocket page I normally add the photos I want to be on the page and then decorate around them.


I chose the nature cards and images for this page and added a friends chipboard sticker.


Lastly, I created a page using more of the reds and browns from the collection.


I added various strips of the left over papers and some splatters with Tim Holtz Mica Spray for a few shiny splatters! 


I added in some stenciling with the Tim Holtz Brush Hex Stencil from the mini 3 pack and Distress Oxide Ink. I added in some more of the The Robin's Nest Dew Drops to finish off the layout! 


I can't believe I made 8 layouts in the last few days using this Simple Stories Trail Mix collection! I still have a few more things left in the collection and I already have plans for them ;) 

Thanks so much for stopping by! Have a happy crafty day!

PS. Don't forget to stop by the Scrap Shotz Facebook Page at 1 pm MT on Thursday for a fun LIVE Demo - every week!!