Rosie here with the first of a few projects using the April kit.
You all loved this kit and the add-ons so much that we had to scrape together some bits and pieces to go with the collection kit I had ordered separately to put together some projects but it's all good!
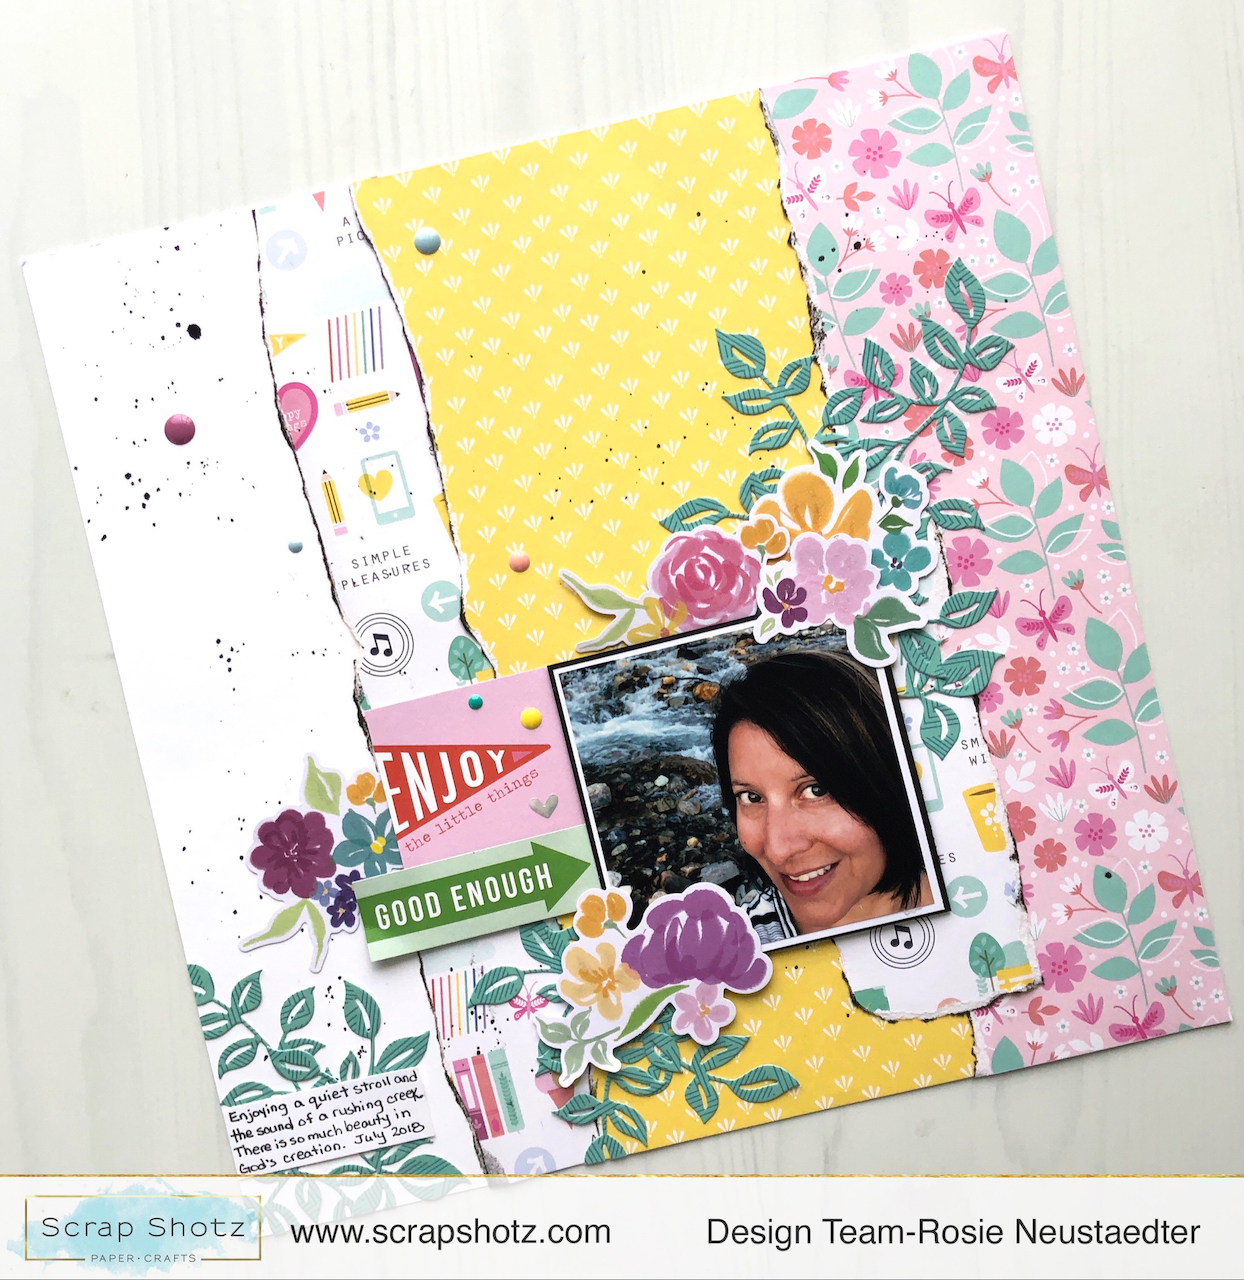
I'm thrilled to bring you some inspiration for your kit starting with this layout that was also inspired by the Creative Scrapbooker Magazine-V.I.P. May challenge "Scrapbook A Photo of You".
The patterns and colours in this paper line are so modern and fresh and super easy to work with.
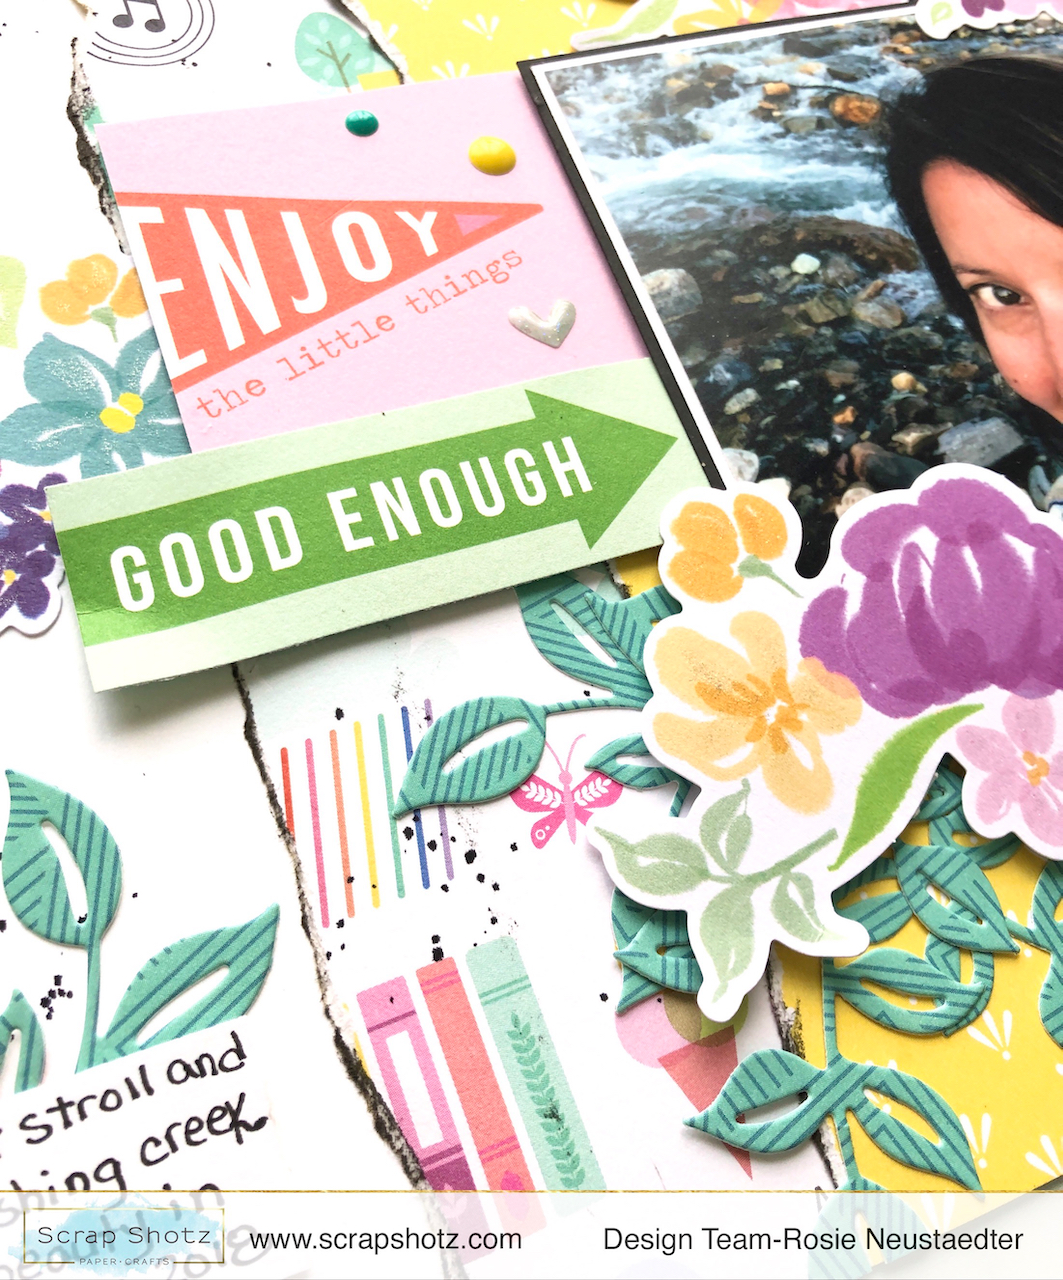
I tore the edges of the patterned paper and inked with a dark grey ink then layered them leaving a white border on the left side and than splattered black in with the Altenew Jet Black watecolour brushmarker.
The green leaves are die cut with the Pink Fresh Studio Curvy Leaves Die Set from the Reality Check paper and then layered them under the top right and bottom left corner of the photo that is double matted and then adhered with Studio Katia Foam Tape. I also layered florals from the Keeping It Real Floral Ephemera pack.
Enjoy the Little Things and Good Enough are fussy cut from the Reality Check paper.
This layout came together fairly quickly so I'm off to work on some more projects!
Please share your April Kit projects to inspire others, either on Instagram, tag @scrapshotz or in the Facebook Scrap Shotz Paper Crafting Group and also tag your project #sszshares to give us permission to share your creation on social media :).
I'll be back with more projects with this kit and the team will also be sharing May kit projects and showcasing store products in the next few weeks.
Hello again! I have one more Carta Bella "Summer" layout to show everyone today (and I may have one more ready for the crop on Friday and Saturday!
I used the Creative Scrapbooker Magazine April sketch as inspiration for this layout. It was an easy sketch to follow and worked so well with this background paper (the flower cart is part of the paper).
I layered some chipboard, tags, stickers and fussy cut flowers to add dimension to the layout. The numbers I cut on my Silhouette Cameo. I made 5 text boxes, each with the correct number. Then I sized them until they fit the page. I didn't like how the pink paper didn't pop off the background so I outlined the edges of the numbers with a black Sharpie. I also had to get some enamel dots on there!
Don't forget to join us on Friday and Saturday in the Scrap Shotz Paper Crafting Group on Facebook for a virtual International Scrapbooking Day Crop. There are challenges, games and live demos. Can't wait to see you there!
This month I'm playing with the Carta Bella "Summer" Collection. It's full of small details and pastel colours. I made a layout and a birthday card and have some more goodies to show you on Thursday!
I saw this lemon paper and just had to use it with my lemonade stand picture from last summer. It's a pretty busy paper so I started with the title. I cut the yellow cardstock at the same angle as the lemons. The green title is a cut file in the Silhouette Store. I offset the title and cut it out again on white paper and pasted the green letters on top. The background needed something to bring focus to the picture so I drew a lemon on a white paper. I used distress ink and a blending tool to create the yellow on the lemon. I then used a black Sharpie on the edges to make the lemon pop. I finished off the layout with some frames, tags, stickers, brads and journaling.
This kit is perfect for card making. There is a happy birthday tag in the cut apart papers that I used as my sentiment. The flowers are fussy cut from one of the kit papers. The centers are brads that add some shimmer. The final touch was to add a scallop border using a punch.
Don't forget that International Scrapbooking Day is this weekend. We are having a crop Friday and Saturday in the Scrap Shotz Paper Crafting Facebook Group. Make sure to join the group and check out the crop album to see the rules, schedule and challenges. It's going to be so much fun with live demos and games throughout. See you there!
Hello friends! Karla back today with some fun projects to share!! I was so excited to get to play with the New Vicki Boutin Color Study collection!! It is so bright and fun and I had a great time pairing it with other supplies to make some really awesome projects. First, I created a 12x12 scrapbook layout using the Color Study 6x8 Paper Pad and Vicki's Foundations Heavyweight Mixed Media Paper. Honestly, I don't know why I've never used this Foundations paper before!! It has always been popular and sells out so quickly, so I was really excited to finally get some. Let me tell you, after one layout, I won't be able to go back! If you're adding any kind of wet medium it's so awesome - and if you just want a nice sturdy white background paper it's perfect as well!
I matted my photos with the pretty purple paper from the 6x8 Paper Padand added some glittery detail with the Cosmic Shimmer Glitter Kiss in Lilac. You'll also notice some stamping on the background using the small dot stamp from the Hello Stamp Set and the Lilac Glitter Kiss. If you want to check out more ways to use the Cosmic Shimmer Creative Expressions products, check out this VIDEO HERE.
I also layered various mixed media elements before adding the photos, including dry brushing and doing a plastic packaging watercolor kiss method with the new Vicki Boutin Gel Crayons (be sure to check out the video below to see all kinds of fun techniques!), using the Color Study Fresh Stencils with Denim Shimmer Shaker, which is a mica powder that creates a beautiful shimmery paint when you add water, and creating splatters with the Pure Gold Shimmer Shaker powder.
I used stickers from the fabulous Sticker Book which is full of 171 Stickers on 6 sheets!! I love that there are words, images and sentiments included! I added some stamped spotches from the It's All Good Stamp Set and the cool colour wheel stamp in the Hello Stamp Set using Distress Oxide Ink.
I fussy cut the paper and clip image from the journaling cards in the 6x8 paper pad and layered it on to add my journaling and added a title using the Color Study The Details Thicker pack. I love all the little dots and fun words in this pack!
Next, while I had all these supplies out, I decided to create a fun, bright card! I added all the mixed media elements and stamping that I used on my layout above onto a white card base and then layered it onto a piece of cardstock edged with Glitter Kiss to create a fabulous glittery paper effect!!
and various ways you can use them shown in the video below! (Don't forget to sign up to be notified by email when they are back in stock if they have sold in the store!)
I also created this slimline Hugs card with one of the Mama Elephant Slim die sets. You can find them in the Scrap Shotz shop HERE. They are really fun to work with and work well together. Don't forget if something is out of stock you can add your email to be one of the first to be notified with it comes back in. I stencilled over the beautiful Color Study Paper using the floral stencil in the Fresh Color Study Stencil Pack and Distress Oxide Inks. There are two new stencil packs in this collection and they are really such an amazing price point with beautiful designs!
I added stamping using the It's All Good Stamp Set. I just love the images included, and there again are two sets available in the Color Study Collection - at a really great price!! I diecut the HUGS from the Memory Box Twiggy Hugs Die. Memory Box has beautiful dies and I love the font on this sentiment. I cut four layers to create some dimension and layered it over some vellum to allow the beautiful paper to show through. I used some Crystal Glaze on top of the butterfly, which was stamped with Distress Oxide, to give it some shine and texture.
I used the fun circle paper with the flowers in the It's All Good Stamp Set and heat embossed with white embossing powder. I added some diecut leaves and used Tonic Nuvo Dream Drops in the flower centers to finish them off.
Here's a video where you can check out just how this card came together! If you want to check out the full Facebook LIVE replay, you can find that HERE.
Thanks so much for stopping by! Be sure to check out the amazing Vicki Boutin Color Study collection in the Scrap Shotz Store. And don't forget to set your reminder for Thursdays at 3 pm MST when I do a Facebook Live each week doing demos using fun new products, sharing techniques and showing you what is new in the shop! Have an amazing, crafty week friends!
This line made me yearn for those warm, lazy, sunny summer days that I'm sure are on their way! I used photos from last summer to inspire you to get those fun, vibrant photos into your scrapbook!
I used the wood buttons and the stickers from the line. The title is stamped right on the layout!! Brave, right? I guess the worst thing that could happen is that I would have had to cover it if it went wrong, but yay - it was pretty effective!
Another bright layout with ephemera and thickers from the kit. I used glossy accents on the cocktails and some distress inking on the banners, as well as random foam backing. I added some messy doodling and a few enamel dots - DONE!
I loved the rainbow on this patterned paper so much that I hated to cover it. The gorgeous sparkly title words are from the line and there were so many great words to choose from. Some ephemera pieces and another super sunny photo and the layout is complete.
This trio of cards was created from scraps that were on my desk with some "Sunkissed" ephemera. Fun and easy!
Thanks for looking! I know that we'll soon have lots of beautiful summer photos to scrap. This kit will suit them to a tee!
I put these layouts together for you to see how lovely they are! I used some foam tape for dimension and pulled out my Tonic Dream Drops, Glitter Drops and Crystal Glaze to add some shimmer and shine! Here are the first two pages.
And the next two are just as beautiful!!
Here's a Video where you can check out some closeups and how I put one of these pages together!
I love the pre-printed backgrounds! They definitely give you ideas about how to layer and place elements on other pages you'll create!
All of the elements come in a punch out format and there are clear instructions about where to place each element as well as reference photos.
I love that they've left lots of room for lots of photos!
This would be a lovely kit to give to a friend, to do together on a crafty on-line 'zoom' or even to give premade as a gift!
The ephemera and designs would be lovely for birthday photos, Mother's Day, spring and summer!
I love the shine that the Tonic Nuvo Drops gave to the flowers, butterflies and the frame hardware.
I used Distress Oxide Inks in coordinating colours on a few embellishment punch outs to add edging detail.
You'll even end up with a few extra embellishments to use on another page or card!
Thanks so much for stopping by! Don't forget to check out the Simple Stories Simple Pages Dreamer Page Kit in the shop!! I hope you have an amazing day and a very crafty weekend ahead!!
Are you one of the lucky ones who has the Simple Stories, Hello Today in your stash? This super fun collection is near all sold out from the Scrap Shotz shop, so a bunch of us do. I blame my need to have this collection on Design Team member Karla! Her layouts were so inspiring, I had to have it too and ohh I am loving playing with this one!
All the Numbers
For my first layout I started with a Bazzill Cardstock, Raven and some Picket Fence, Paper Glaze in Black Pansy and a Tim Holtz number stencil - inspired by the numbers in the Hello Today collection. I wasn’t sure if the black glaze would shop up on the black background but it sure does and wow I love it - a nice subtle touch of texture and shine.
From there I found this fantastic photo oh my littlest brother, printed in black and white, and just had fun tucking and adding any of the die cuts or stickers that were numbers. I wanted to create this sort of ‘all the ways I love ya bro and think you are one of the coolest humans I know’ sort of idea.
I was a little torn on if I could pull off the black and white flowers but I think it totally works for the memory and story. Some white splatters to finish it off (seems I need something messy on every layout) and I love it!
All About the Title
For some reason anytime I see a pattern paper or embellishment with a lot of orange, especially when paired with yellow or red, I think retro and I think bowling. Perfect! I had some cool Instax bowling photos to document!
Inspired by the ‘Hello today’ die cut in the Hello Today Page Pieces I decided to anchor the entire design on this title. I ripped a couple of my favourite pattern papers for the bottom of the page and then started added the photos and little layers here and there all around the title. I used some Tonic, Nuvo Crystal Dots in Moroccan Red as paint to add a little colour behind all this goodness.
There was a little too much white space above all this good stuff so I added a little bit of a confetti look up top with some die cuts, chipboard pieces including some cute hearts, and of course splatters.
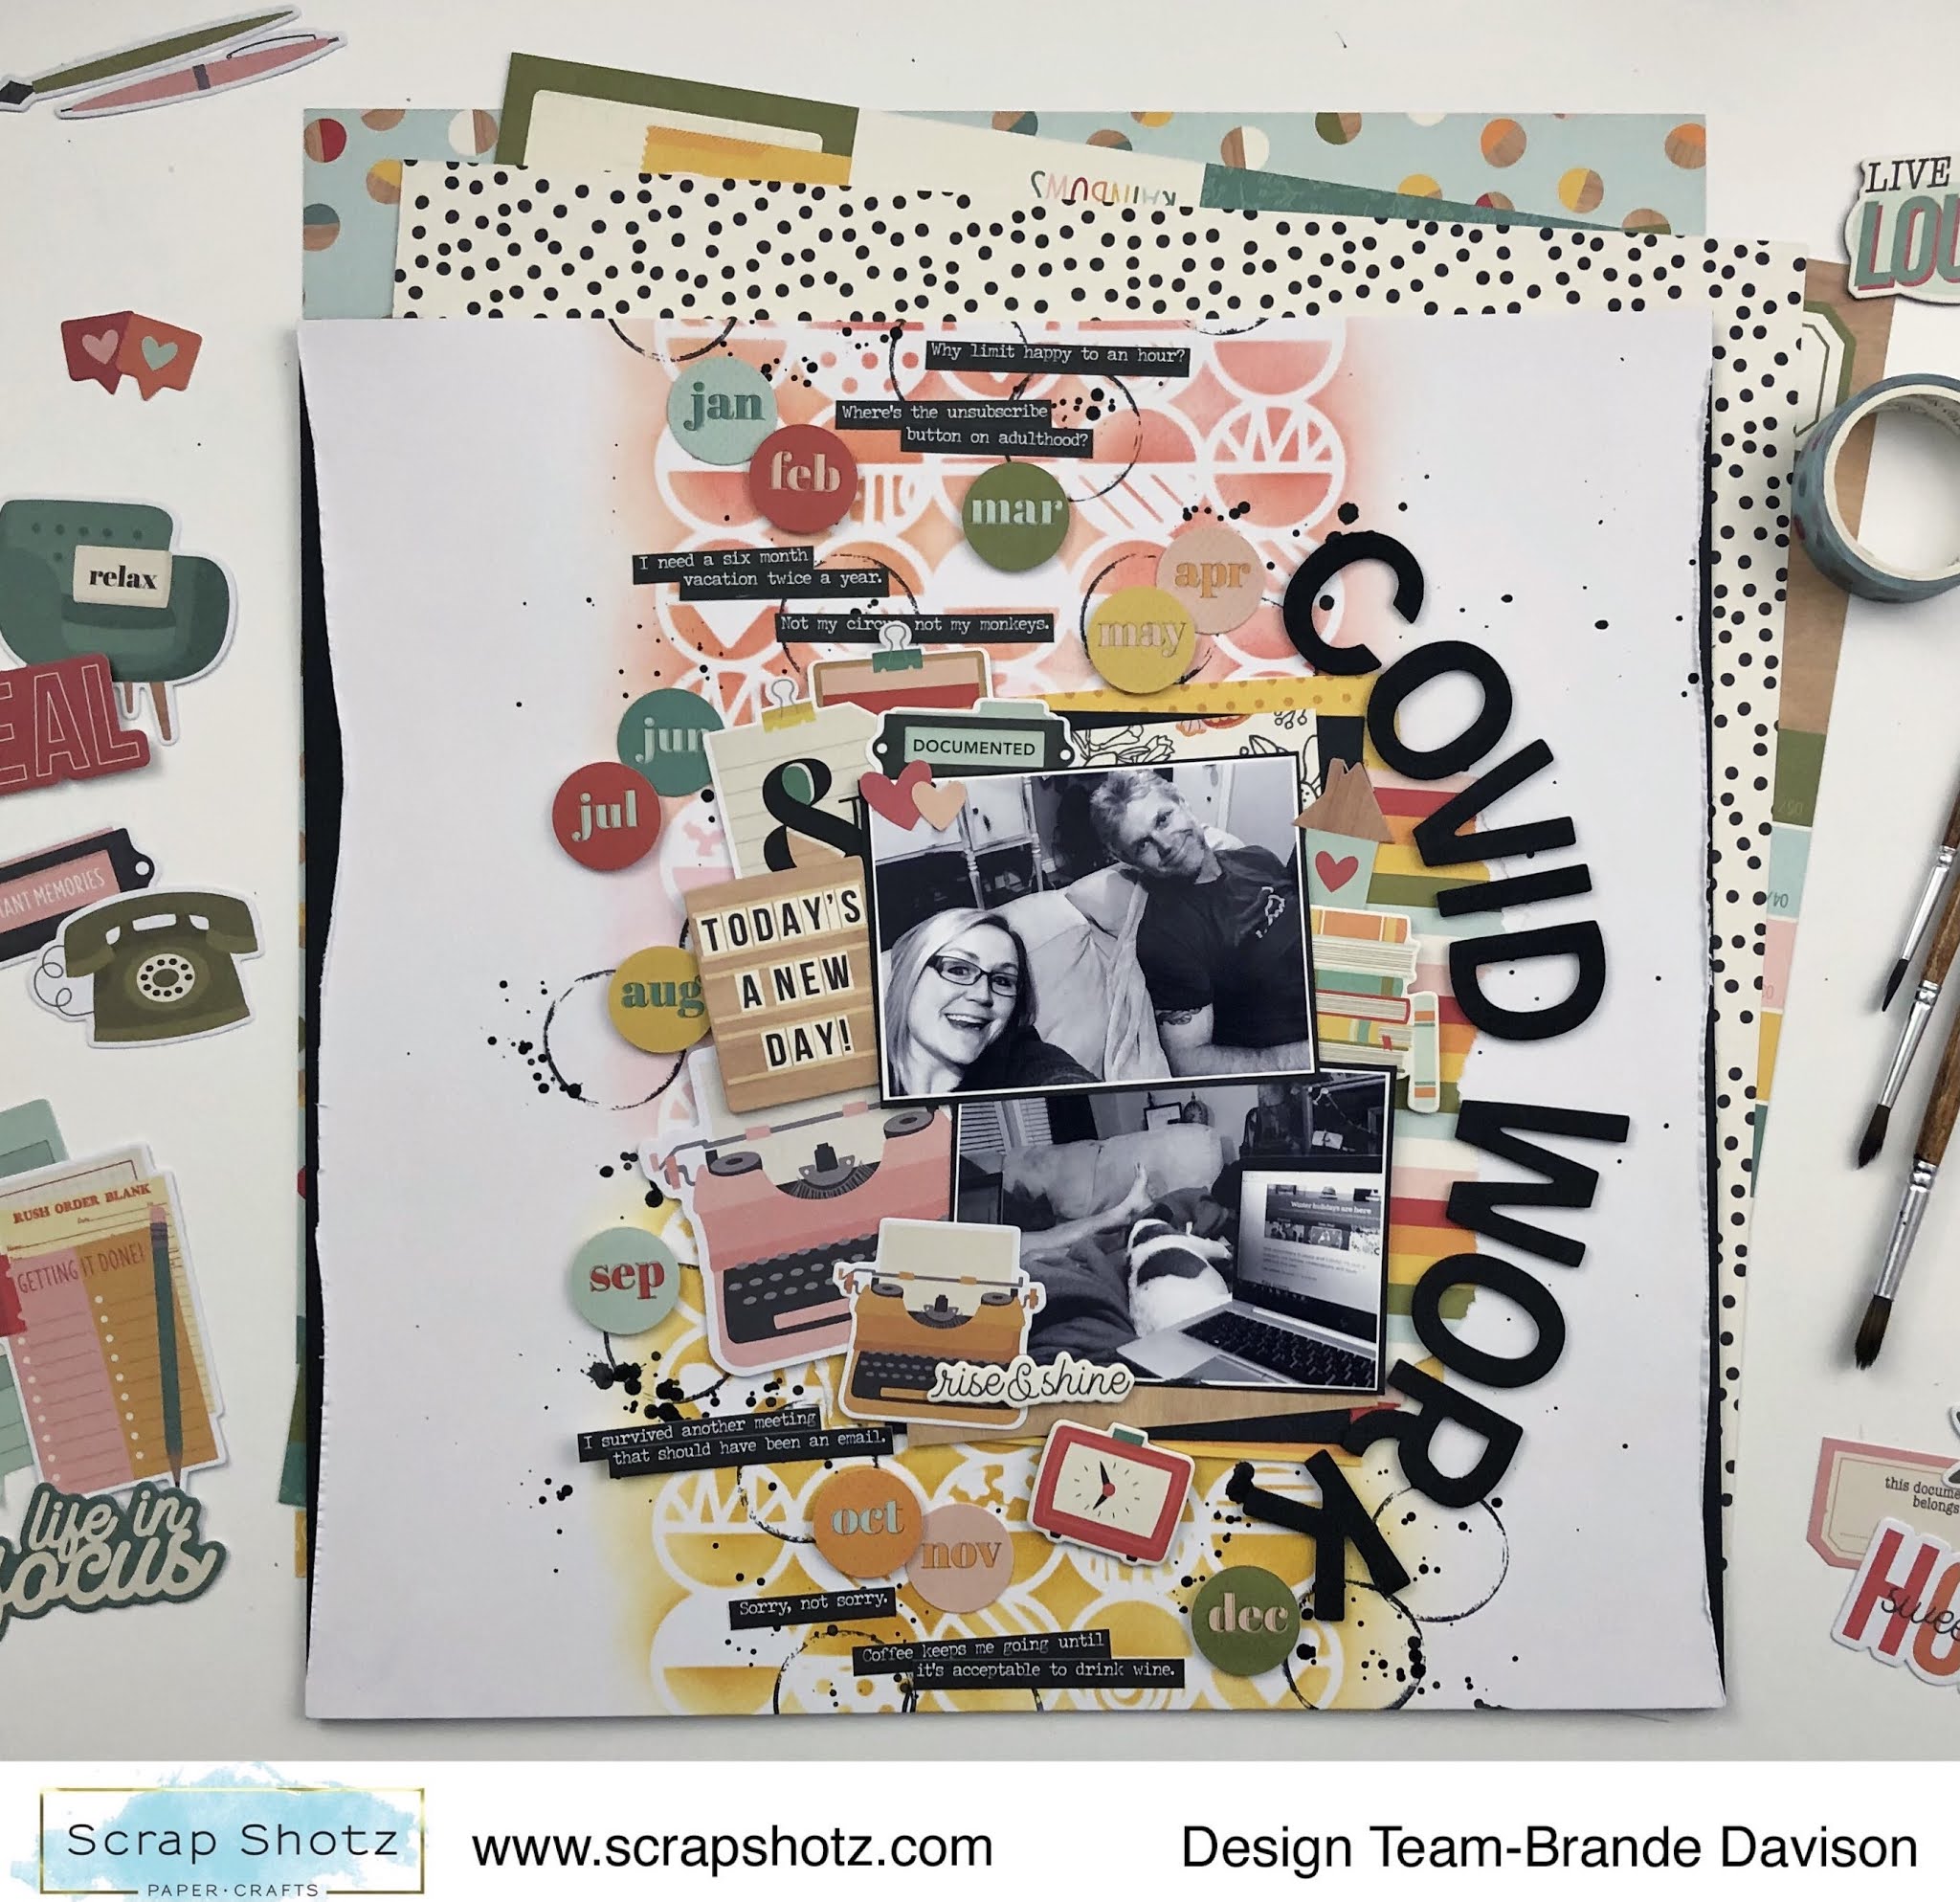
All the Circles
For this layout I was inspired by the die cut circles for each month in the collection! So cute! So I grabbed a circle stencil from my stash and used some Tim Holtz Distress Inks in matching colours to the collection and a Ranger Blending Tool to create a multi coloured background.
From there it was a matter of playing with the circle die cuts and my photos to bring it all together. I used these bold black foam alphas from my stash and some cheeky Tim Holtz phrase stickers in black to bring a little drama to the page - I love the pops of black.
Such a fun collection to play with. If you had the chance to grab some of these goodies from the shop, we would love to see your projects. Drop your project onto the Scrap Shotz Paper Crafting FaceBookGroup or tag is @scrapshotz on Instagram!