Showing posts with label Stickers. Show all posts

Sunday, February 7, 2021

Scrap Shotz Paper Crafting Group Challenges on FB


Did you know there is a Scrap Shotz Paper Crafting Group on Facebook? It is a community of creativity, inspiration and friendship. Check it out if you didn't know; we would love to have you participate!

Recently, several of us have been inspiring each other with challenges such as using stickers or Project Life cards or glitter on your project. There is no time limit to complete the challenges and the challenges can be interpreted however you like. When completed, we post our projects in the thread. 

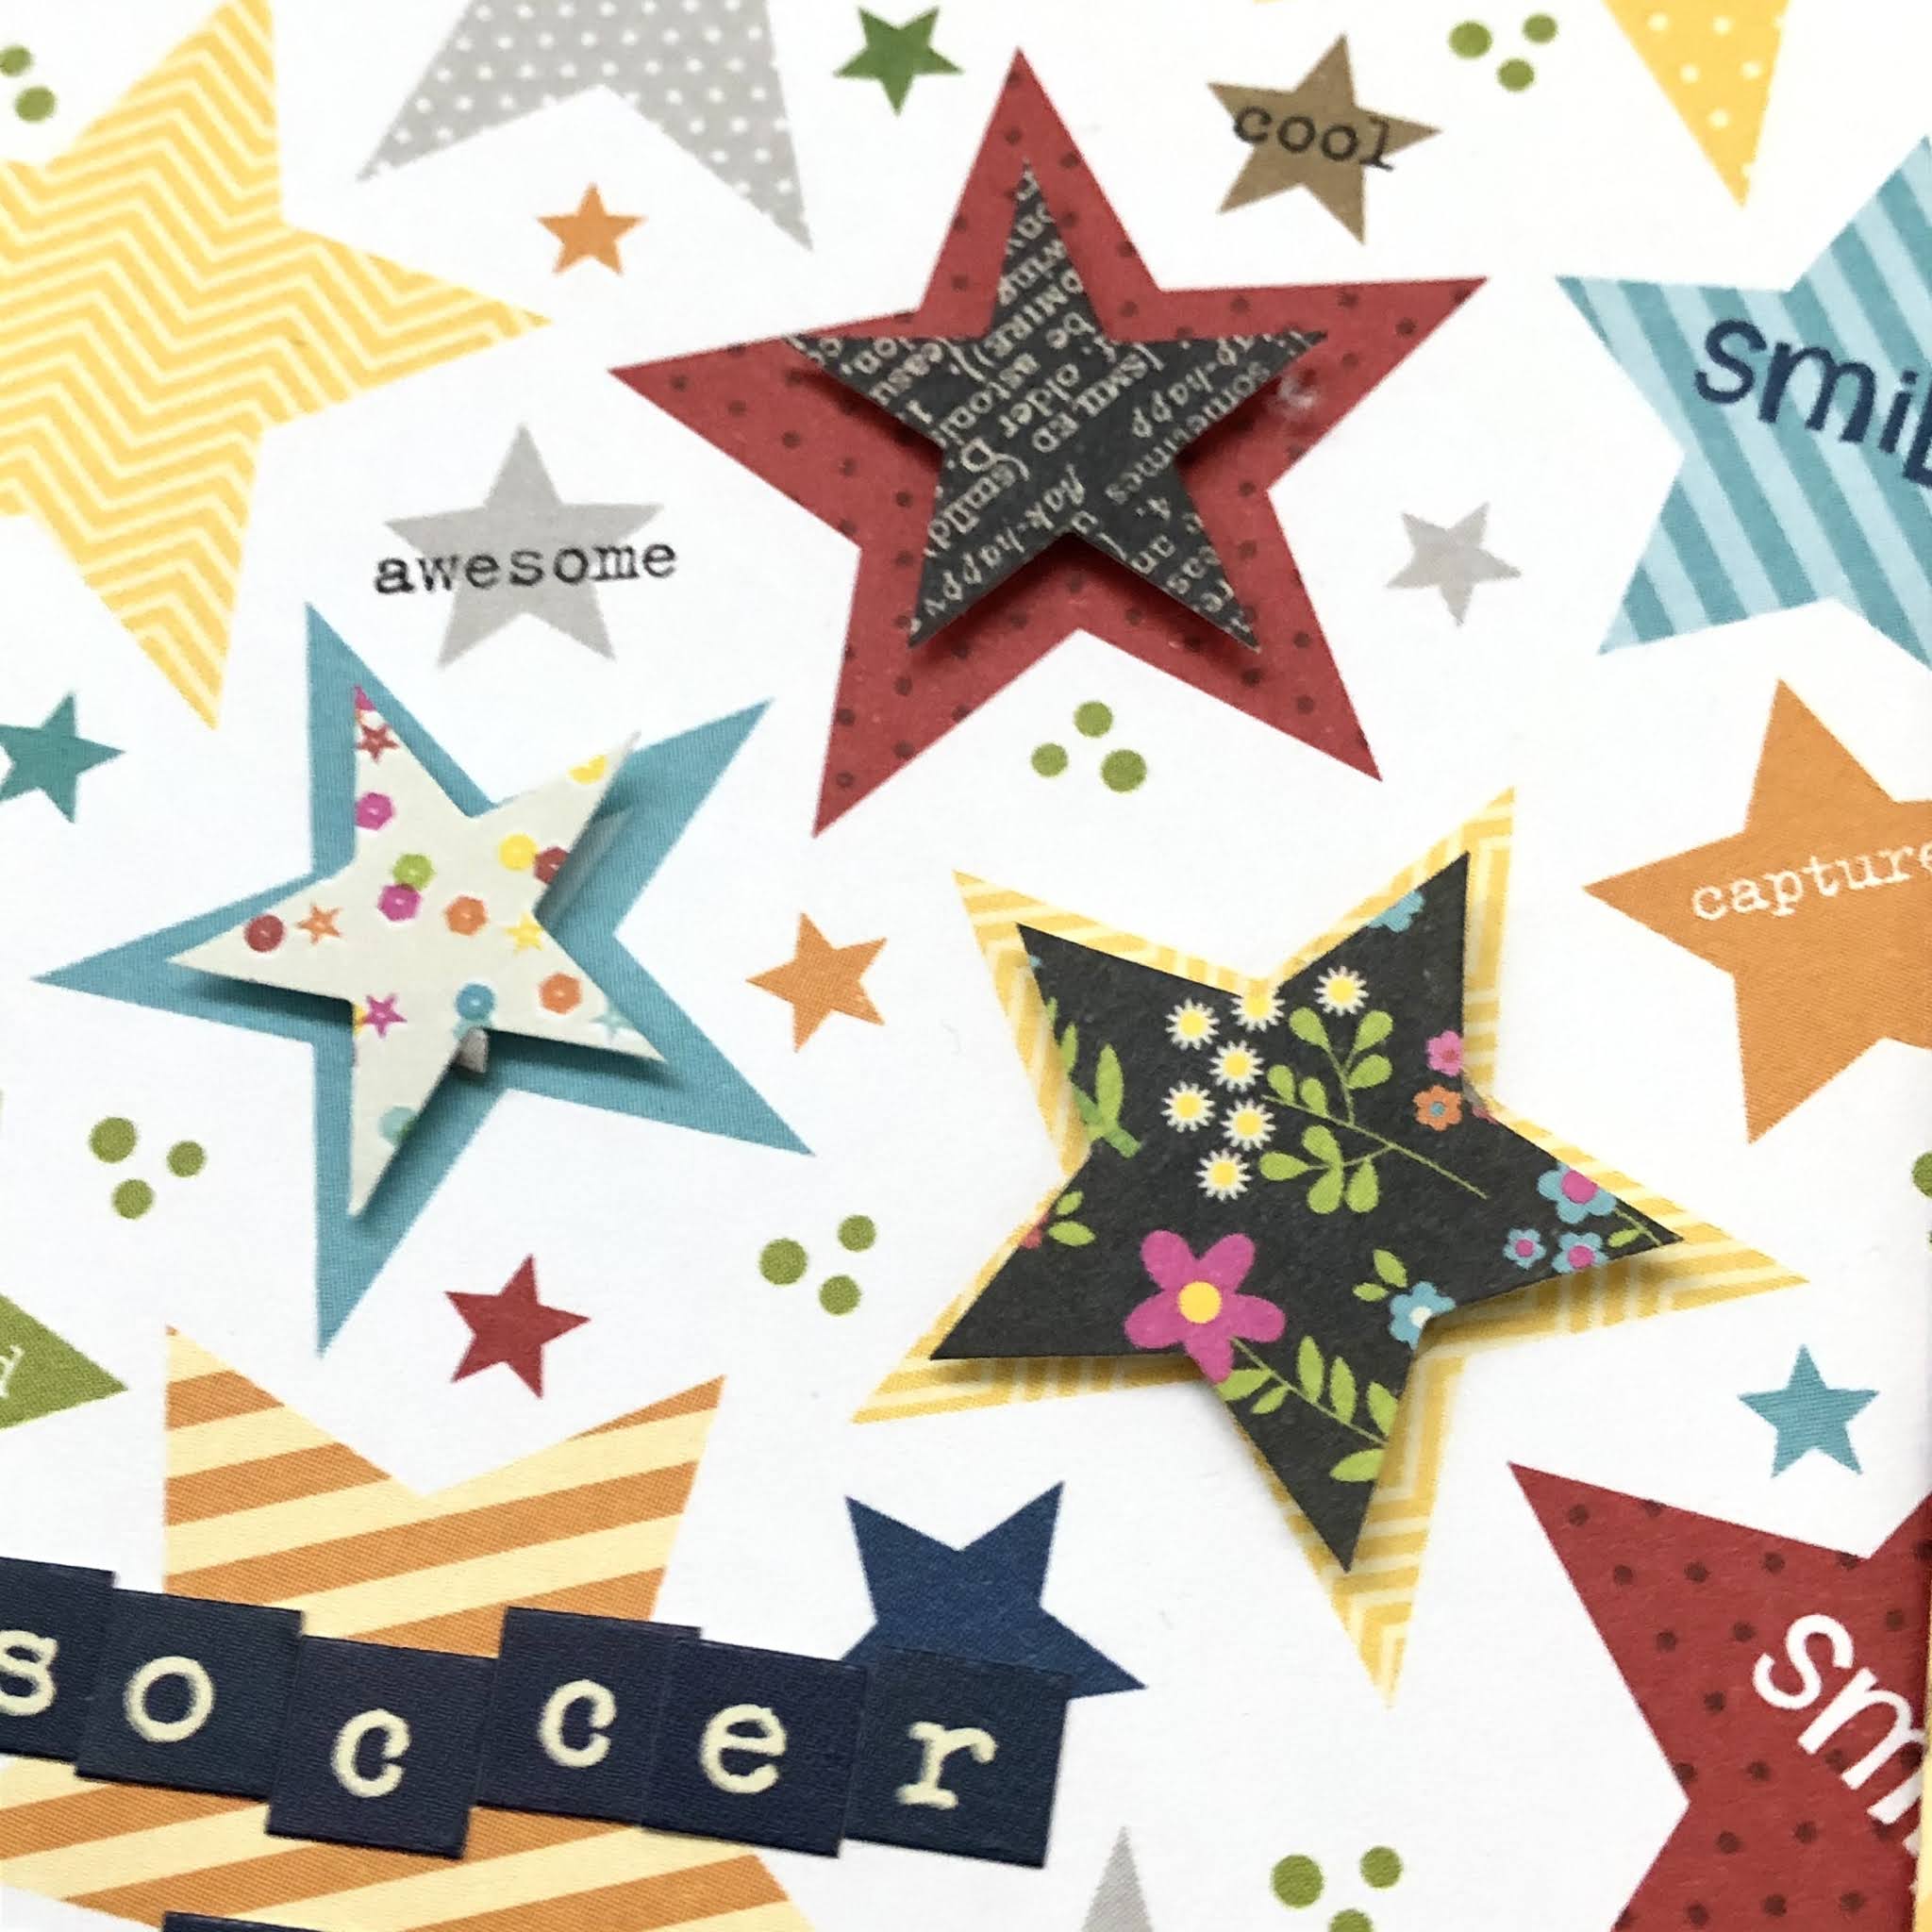
For the stickers challenge, I used stickers 

One of the challenges is to use stickers on your project. We all have stickers in our stash and if I was honest, I have collected and loved stickers since I was a child. (In fact, I just might have some stickers from second grade!) 

Here are a few interpretations on the challenge. Using a "plain" background piece of pattern paper, I used a book of Simple Stories and Teresa Collins stickers to augment my focal point photo as well as dress up the pattern paper background. Foam squares were added to one or more stickers within a grouping to create dimension. As well, interest is added to the background by varying the size, shape and colour of the stickers within a grouping.  Mini alphas were used to add journaling phrases within the groupings.


Supplies Used: Amy Tangerine (pattern paper, date roller stamp), Simple Stories (sticker booklet), Teresa Collins (sticker booklet), Mini alphas (various sources), Dylusions Sprays

In this example, stickers were used to "lengthen" the pattern paper strips that were shorter than the other pattern paper strips. (I love this Bella Blvd paper line and wanted to use every last piece!) Don't be afraid to mix and match paper lines and manufacturers. Here I mixed stickers from Bella Blvd, Teresa Collins, Simple Stories and Making Memories. 

As well, stickers can be easily modified with products such as sprays, Copics and paints. The large Bella Blvd alphas and some of the matching stickers were sprayed with Mr. Huey "Shine" to vary the brightness on the layout.


Here is a close-up of the sticker clusters - 


Stickers can also be used to emphasize the shapes in the background pattern paper. Stickers of the same shape but different size and popped up with foam tape on the background is used to create interest in the background. A white gel pen to doodle on the alphas adds awesome details to the title.


A close-up of the popped up stickers can be seen here...


Thanks for dropping by! I hope these ideas inspire you to use the stickers in your stash on a project soon. Don't forget to post your projects in the FB group too!

-Virginia


Monday, March 9, 2020

Prima Capri Collection - Scrapbooking and Cards

Hello friends! Karla back today with 3 beautiful projects to inspire you using the gorgeous Prima Capri Collection, designed by Frank Garcia! If you missed the walk through video and closeups post, be sure to check that out HERE, and now you can check out all this lovely product in action.  First up, I have a pretty scrapbook layout using the March Creative Scrapbooker Magazine Sketchy Challenge as inspiration. I love the pretty florals in this collection, and even though they first remind me of spring or summer, I've actually used Fall photos in this layout, and I love the way it turned out!


I matted two 3x4 photos with some coordinating cardstock from my stash and tucked in lovely elements from the collection, clustering some of the images from the Ephemera Pack along with a beautiful puffy sticker butterfly from the Puffy Stickers Pack!


The Wood Stickers are equally beautiful and add a wonderful texture to the page. I added the Prima Say It In Crystals gems to the page for added bling! They match all the elements beautifully and add an iridescent shine. 


I cut up some of the cut apart pages from the Prima Capri 12x12 Papers and created one more cluster on my page. I used the post card cut apart for my journaling and added a navy flower to match the matting and other pops of blue on the page from the Mulberry Paper Flowers Pack


I just loved the way the florals and images worked together on the layout so much that I wanted to create a couple cards using all these fun supplies too - and I added some tiny rainbow embellishments from the new Dress My Craft rainbow jar. (Watch for this to show up in the store soon!!) I decided to turn these cards into birthday cards using the fantastic NEW Stamping Village Collaborative Birthday Stamp Set! Be sure to check out that lovely set if you haven't seen it - it's a collaboration between many of the industries top stamp companies, and supports an awesome cause!


I used some dies from my stash to cut out various elements of the papers and then added all those fun embellishments from the collection - wood and puffy stickers, flowers, ephemera and gems! I used the Dare 2B Artzy image for a fun celebratory sentiment on this card!


Here I stamped the Gina K sentiment from the set with Salty Ocean Distress Oxide Ink and used some foam tape to add even more dimension. These cards are ready to send out for a special friend's birthday now!


Thanks so much for stopping by! Be sure to head over to the Scrap Shotz Store to check out the Prima Capri Collection and the Stamping Village Collaborative Birthday Stamp Set, and of course have a wonderful, crafty week ahead!


Wednesday, March 4, 2020

New Product - Prima Capri Collection & Video

Hello friends! Karla back today with a look at the beautiful Prima Capri Collection, designed by Frank Garcia. The colours and images in this collection are stunning, and you'll find yourself reaching for it for so many different occasions! I can totally see travel, but also wedding, spring and summer, photos you'd like to scrap of little girls - or maybe vintage tea parties.... Seriously, you're going to love it!


Here's the video where you can see all the amazing crafty goodness closeup!


The Prima Capri 12x12 papers can be purchased individually, but you may just have to have two of each... they are beautiful!


The front sides (above) have a wonderful gold shattered foil effect, and below you can see the beautiful back sides. There are lots of cut apart elements on these pages - perfect for cards and pocket pages too!


There are two different Ephemera packs available - here's a look at the 32 piece package. The images coordinate with the papers and other elements below and various pieces have the same gold foiled effect again!


The Florals that are available in this collection are such wonderful colours, and those Crystals are just the perfect bling!


There are two different packs of Stickers to match - Wood and Puffy!


Be sure to head over to the shop to check out the Prima Capri Collection and grab it while it's still available!


 Thanks so much for stopping by! Have a wonderful week friends!


Wednesday, June 19, 2019

June Scrap Shotz Kit - Explore Nature In The City Layout

Hello! It's Karla back today to show you a double page layout created with the June 2019 Scrap Shotz Scrapbooking Kit, featuring the Heidi Swapp Wolf Pack Collection. This is an amazing collection of papers, ephemera, stickers, letter stickers and more that will have you creating in no time! I found some photos of my family from a few summers ago when we visited the Big Hill Springs Provincial Park in Calgary, Alberta, and it was awesome to see how wonderfully this kit worked for a day trip in the woods! 


I started off with a sketch from the SCT365-2019 Layout Online Class. I love starting with a sketch! I cut my papers similar to the sketch guide and layered them on cardstock, included in the kit. A grid ruler is so awesome when it comes to lining up layers and getting things even. I used some Ground Espresso Distress Oxide Ink to shade the edges of all the paper layers.


Next, I layered on washi tape from the kit, added my photos to the layout and created a title using the coordinating Thickers from the kit. I used one of the vellum frames from the Ephemera Pack to frame a smaller photo on the left.


After I got the base done it was time to have fun adding embellishments!


I wrote my journaling on a card included in the Ephemera pack and layered it on some scraps of paper.


I added some cardstock and acetate embellishments from the Ephemera Pack too.


I just love the variety of papers in this kit! And those Embossed Stickers have so much texture and dimension!


I used one of the acetate embellishments with a silver foiled 'Explore' sentiment to add another element to my title. These Thickers are so gorgeous, with flecks of white dotting a black background.


I used various sizes of enamel dots from the kit and layered them along with some Add-On Puffy Stickers


Be sure to check out the June 2019 Scrapbook Kit and available Add-Ons in the Shop - and get all the details on the Reveal Blog Post with closeups and a video!


Thanks so much for stopping by! Have an awesome week my friends!

Hugs,
Karla


Friday, October 26, 2018

New Product Reveal with Karla!

Hello friends! It's Karla back today with a look at some beautiful new products in the Scrap Shotz Store that will be perfect for your Christmas crafting - the Kaisercraft First Noel Collection and the Sizzix Tim Holtz Thinlets Die Swirling Stars.  The colour scheme of these papers, stickers and diecuts are so elegant!


The 12x12 Sticker Sheet has so many beautiful stickers! I love the package of diecut ephemera ðŸ’› The sticker pad has over 800 stickers, and they are going to be perfect for all your Christmas craft projects. And, the Sizzix Swirling Stars dies will be awesome to use all year round!


These papers are so beautiful! Here's a look at both the front and back sides. The only hard part will be choosing which side to create with 😉


Here's a video as well where you can see a closeup of all these products and designs:


I had so much fun creating with these supplies! First up was this layout of my daughter when she was 3 at Christmas. She looks so adorable in her little green dress and curly hair!


I used some of the ephemera diecuts to layer on the background paper and added some fussy cut presents and stickers. There are really so many fun options for layering!


I diecut one of the swirly star dies from a stitched circle diecut using kraft cardstock. These dies are so cool because they create a negative image. You also get several small star dies in different sizes and shapes which I used to cut some glittery green and red cardstock from.


I love the background paper with the beautiful ornaments printed right on it. I layered my photo on top of various other scraps of paper to create a messy frame.


I even used the star dies to cut into a corner of my layout, adding a triangle of kraft cardstock and backing it with the green border I used around the layout.


Next, I wanted to make some pretty Christmas cards using all the beautiful supplies I showed you above! 


I diecut oval shapes from ivory cardstock and layered them over different papers and then used fun foam to pop up the oval cut out layer for dimension. For this card I used a tree and stockings from the diecut package and added a sticker from the sticker booklet.


I used the three wise men cut apart card from one of the 12x12 papers as my focal image for this card and added stickers from the booklet and a sentiment from the diecut package. Inside each card I added a sentiment strip and added a circle sticker on each envelope, again from the sticker booklet.


I used an angel sticker and some diecut trees for this card. Left over stars from diecutting yellow and kraft papers added lovely details to the cards, inside and out.


Thanks so much for stopping by! Be sure to head over to the Scrap Shotz store to check out the Kaisercraft First Noel Collection and the Sizzix Tim Holtz Thinlets Die Swirling Stars, and don't forget you can always browse what's new HERE! Have an awesome weekend friends!


Wednesday, March 21, 2018

March Kit - Simple Stories I Am Layout #2

Hi there!

Today I'm sharing another layout made with the beautiful March Kit featuring the Simple Stories I Am collection.


As with all Simple Stories collections, it comes with cut apart sheets for pocket page scrapping or as embellishments.  I started this layout with this 4x6 card and used it as part of my title. I used some old Thickers from my stash to finish the title.   All the embellishments on this page are from the sticker sheet, diecuts and chipboard from the kit.

I had quite a long story to tell, but I didn't leave myself any room to journal directly on the page.  So, I made a journaling card from some patterned paper and tucked it in behind the 4x6 card.


For my second project, I needed a quick card for a friend's birthday and since I had the collection spread out aaallll over my desk, I decided to use the kit.  ;)

Once again, I started with a cut apart sheet as the base of the card, and used scraps as layers behind it.  My friend is a quilter, so all the pieces are machine stitched.  The layers are placed on a 4 1/4" x 5 1/2 " cardbase  piece of the Lagoon cardstock and embellished with stickers and diecuts from the kit.  The ribbon is from the January Kit.  The "Happy" is a sticker from the 4x6 Sticker Sheet set, as is the "sunshine".  I cut the word from one of the longer word phrases.  I never have a problem cutting an embellishment and only using part of it.  The "birthday" is from a scrap of black cardstock and a die from my stash.


Be sure to check out the store for this collection.  Not only is it beautiful, but it's chock full of stickers and diecuts and paper.  I can see myself using these supplies on may projects to come!

Thanks for looking!
Sylvie


Friday, October 27, 2017

My Favorite Things: Grateful Stamp

Hello! It's Julia here today and I'm sharing 3 cards and a tag I made using products

First up are 2 cards I made featuring this gorgeous stamp from My Favorite Things.

I started by choosing 2 - 4x6 journaling elements from the Simple Stories Collection Kit. These are perfect for making a quick card. I then used my Tim Holtz Stamping Platform to stamp my image. I wanted to do some layered stamping and the stamp platform made this so easy to get the look I wanted.
 On this card  I first stamped with Cracked Pistachio Distress Oxide ( I spritzed my inked stamp with water before stamping). I cleaned my stamp and let my stamped image dry before stamping it again with Walnut Stain Distress Oxide. I added the coordinating stickers and mounted on my white cardstock base to finish.

On this card, I used the same technique but used  Candied Apple & Black Soot Distress Oxides for the layered stamping. On this card I used the branch stamp from the MFT stamp set and stamped it in Peeled Paint and Fired Brick Distress Oxides before fussy cutting and adhering to my card under the Heart sticker.  

It's never too early to get Christmas cards and tags started - 

I created this tag using a piece of pattern paper from the Simple Stories Cabin Fever Collection. I used Distress Grit-Paste to create my snow with a palette knife and stencil. Next I took the bear, snowman and Snow Days element from the Carta Bella Cabin Fever Chipboard stickers sheet to create my scene. 

The chipboard stcikers from the Carta Bella Cabin Fever collection were just so dang cute that I decided to use up as many of the small ones as I could. The Mosaic die from Tim Holtz/Stampers Anonymous was perfect to create the background for this next card. I added and stamped crazy dog and  assembled my card. This card is too chunky to mail but it be great for a hostess gift this upcoming holiday season.

Thanks for joining me today and I hope you have been inspired by the design team this month.


Products Used:

 
Simple Stories: Cabin Fever Collection Kit
Carta Bella: Cabin Fever Chipboard Stickers