Showing posts with label stencil. Show all posts

Sunday, October 30, 2022

Print Shop, Vicki Boutin - October Scrapbook Kit - Continued


The new Print Shop collection from Vicki Boutin is this month’s scrapbook kit and wow is it fun to play with! 

I love how much variety Vicki includes in her collections - this one feature florals and snails to scissors and paint splatters. There are so many memories you can document with that range of goodies! 

Cardstock Grid Layout 


For this layout I wanted to showcase this fantastic coordinating cardstock in this month’s kit - what a colour! I had to add a little mixed media to bring the ‘me’ to the design so reached for the kit’s circle stencil and some Distress Inks. 

Using a ruler I drew a line down the middle of the page horizontally and vertically using a couple of different widths of journal pens to create the grid. Then I used the circle stencil and a random combination of Distress Ink stormy sky, crushed olive, saltwater taffy and a bit of black soot to add pattern to each grid square. 

I didn’t worry too much about how much of each colour I used and purposely made sure it was a bit uneven so it was a little messy. I finished off with the plus sign stamps with Paper Rose Studio, Premium Dye Ink in Intense Black and some black splatters. 

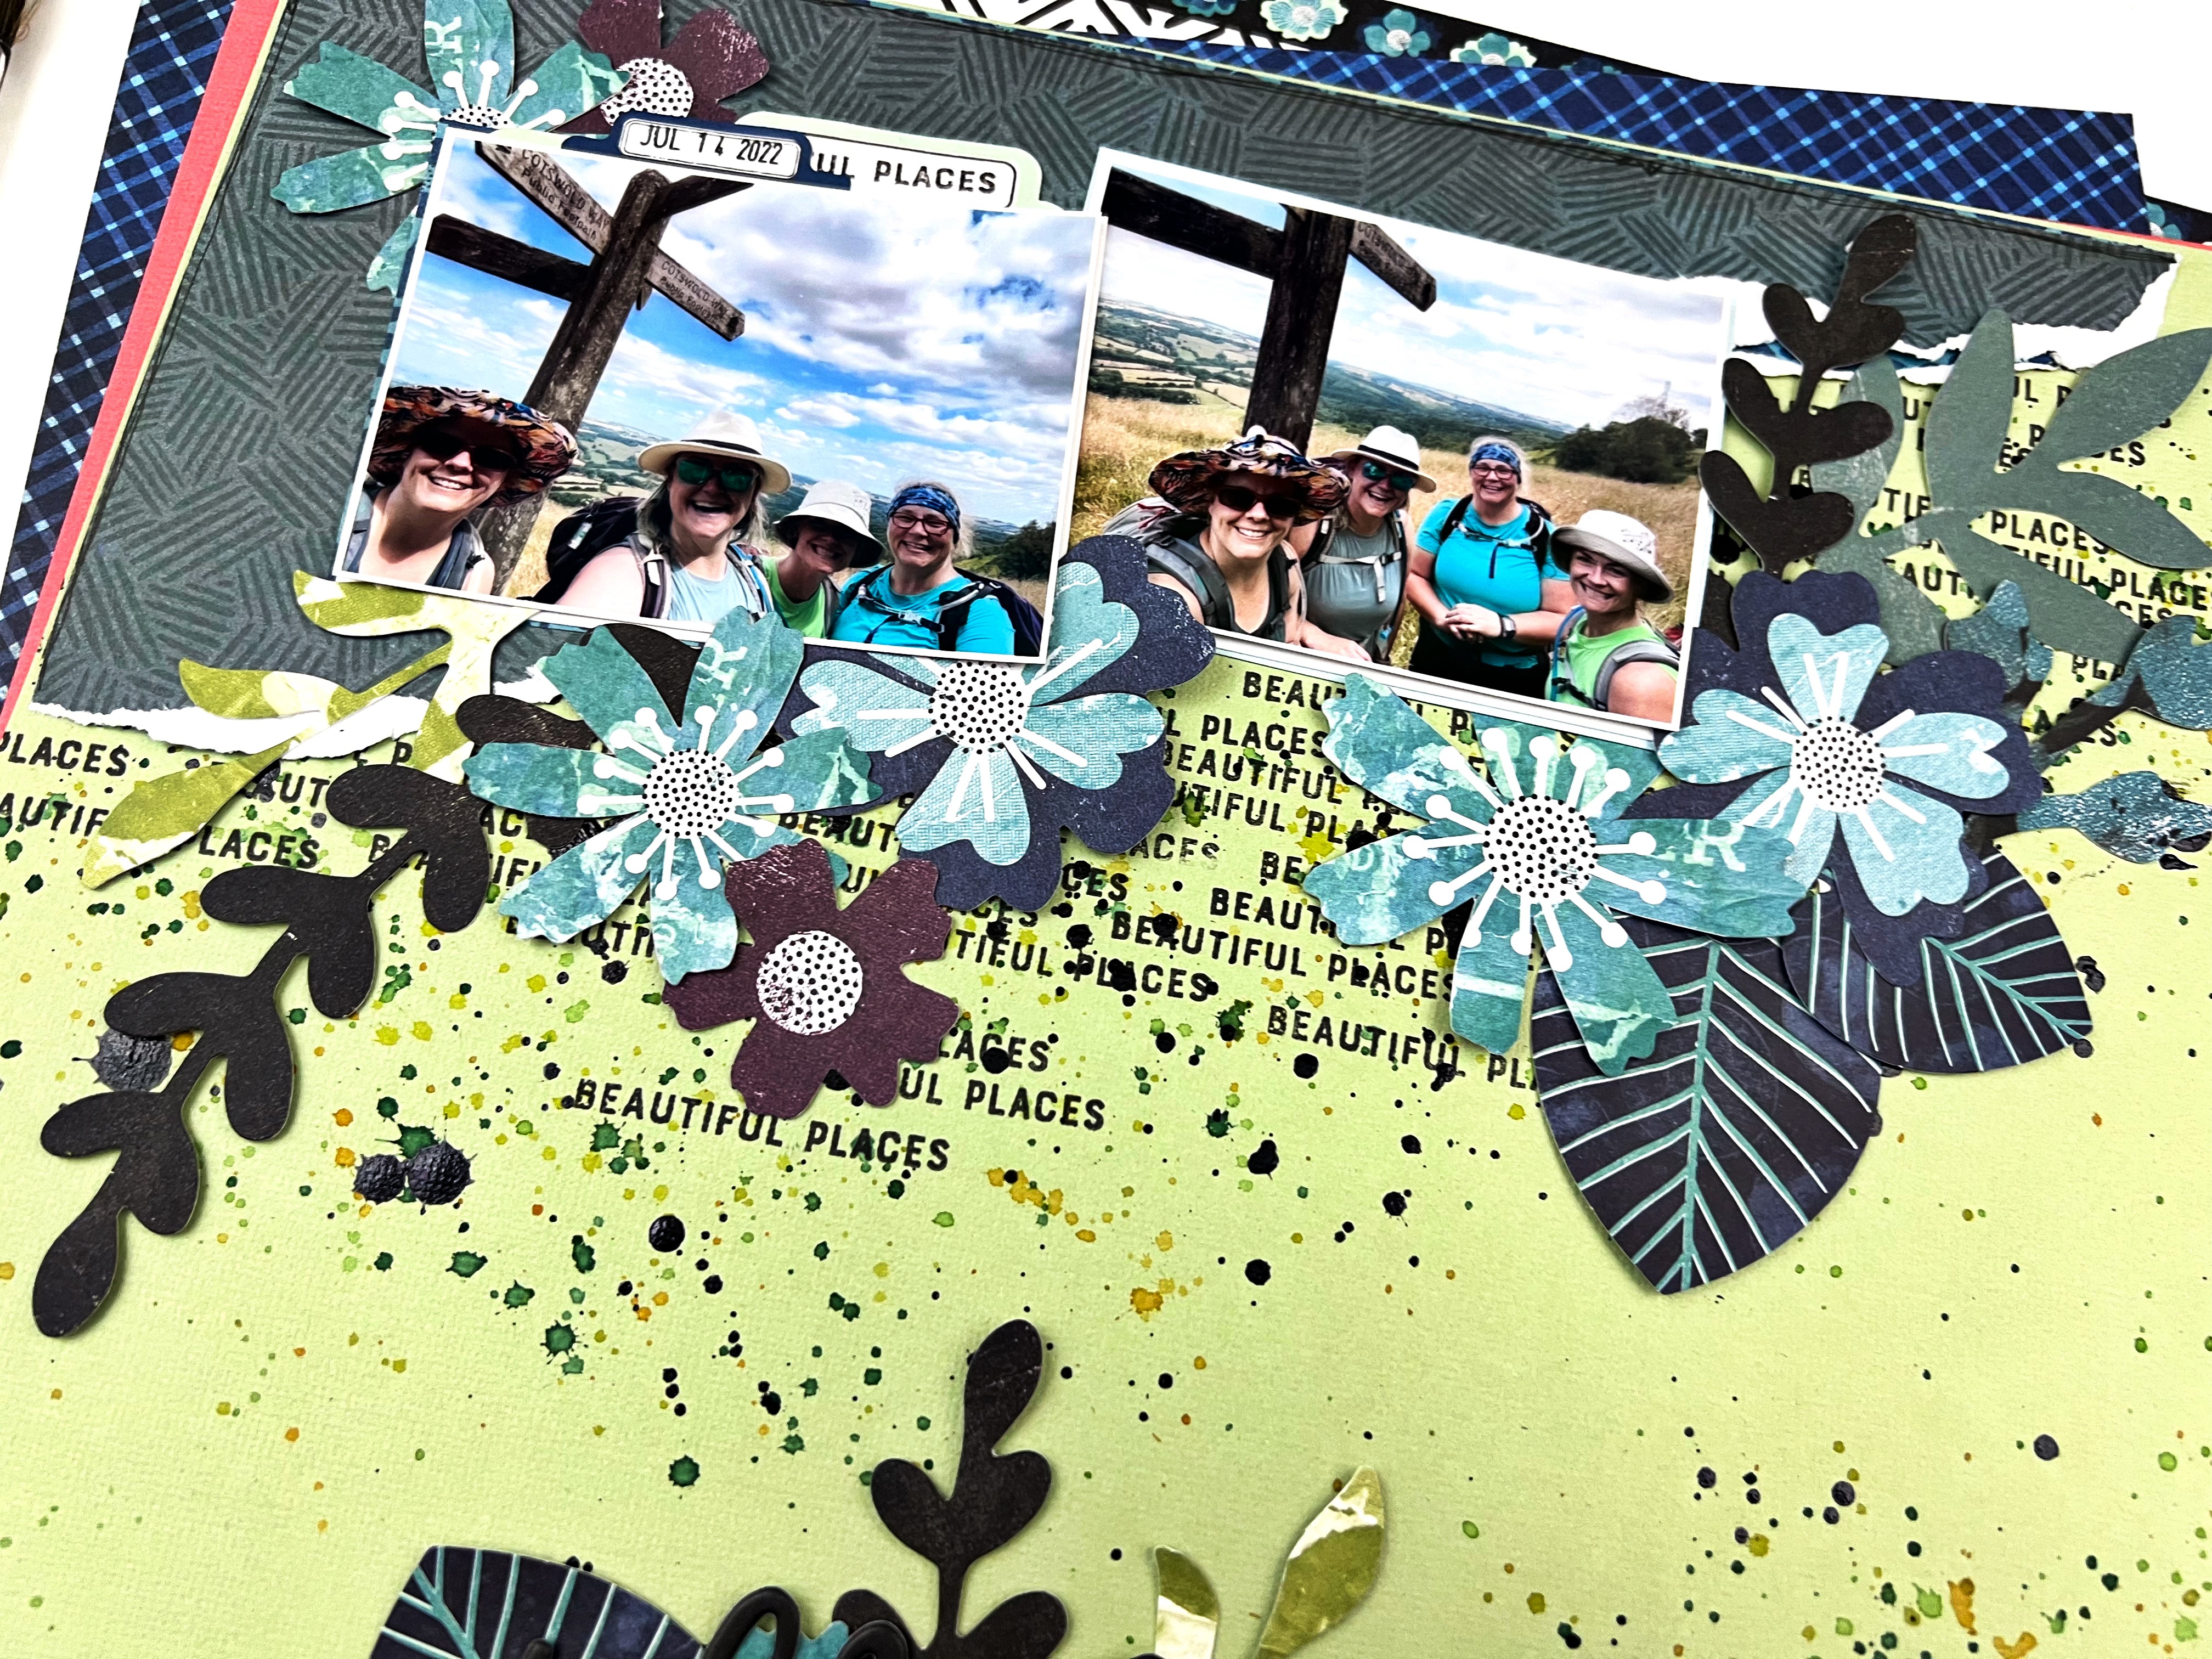
After that I created a cluster of pattern paper behind each of the three photographs and dropped them into one of the grid squares. Making sure each cluster included one of the cut apart tags. Then the real fun begins - embellishments! I had so much fun tucking things here and there until it looked busy. 

All the Patterns 

For this next layout I reached for all of my favourite patterns from the kit and made strips of paper 6 inches wide and of varying heights (about 2 inches each). I wanted to create a cascade of paper strips all messy down the middle of the page to give me lots of places to tuck embellishments. 

Before adhering the strips down, I used a paper punch to give one edge a notebook journal edge. I also used my ruler and a journal pen to create some random stripes across the paper strips. Once adhered down, I went through and added any embellishment that was about creating, making, being awesome and even the cardstock scissors found a home tucked in the layers of pattern paper for this one. 

I have lots of goodies left to play with and you can bet this kit will be on my desk for a while yet - such fun! 

You can also check out the first two layouts I made at Print Shop, Vicki Boutin - October Scrapbook Kit - these ones focused on the floral and botanical ephemera. 

If you are playing with the kit, we would love to see! Pop your creations up on the Scrap Shotz Paper Crafting Facebook Group or tag us on Instagram so we can ohh and ahh! 


Saturday, October 29, 2022

Print Shop, Vicki Boutin - October Scrapbook Kit

I am loving playing with the new Print Shop collection from Vicki Boutin - this month’s scrapbook kit! All the amazing colours and florals and oh my! 


I decided to start my Print Shop adventure with a focus on the flowers and botanical ephemera. There is a great mix of florals, leaves and stems that make layering on a page super easy. Here we go … 

Monochromatic Botanicals


For the first layout I pulled all the blue, green and purple botanicals from the ephemera kit - I also picked out papers from the collection and corresponding cardstock go the same colour scheme. My idea was to feature the design on the top and bottom of the page with all the leaves and such ‘growing’ towards each other to fill the space between. 

I prepped the cardstock background with a bunch of repeated stamping with the word ‘beautiful places’ from a past Vicki Boutin stamp collection using Paper Rose Studio Premium Dye Ink in Intense Black. I also added some black splatters over the stamping using some Nuvo Crystal Drops, Black mixed with a touch of water. To add a touch of colour I splattered some Distress Ink in mowed lawn, crushed olive and peeled paint too. 


From there, I ripped some of the pattern paper to create an anchor for my photos on the top and bottom of the page - making sure to not cover all the stamping and splatters. I added my photos and then spent the next bit tucking and layering the ephemera I had put aside until it looked messy but somehow still organized. 


A little trick if you want to layer after the big stuff like photos and pattern paper are stuck down - only glue or tape down the very center of things so you have lots of room to tuck and layer behind. When it’s all in place you can go back and gently add a few more spots of glue to make sure it stays put. 

The title ‘perfect day’ was the final touch - I love how it’s nestled in with the leaves and stems! 

Overflowing Envelopes


For my next layout I had an idea to create a line of envelopes all overflowing with florals and butterflies. I had three photos of me and my wee niece where she tried to take the selfie of us that make me laugh so much. I thought the ‘overflowing’ design would be a way to how my love this little peanut often feels the same. 

I selected a few of my favourite patterns from the collection and used my Big Shot and the little envelope die from Paper Rose Studio to create 4 envelopes - they are sort of hard to see in the final layout, I may have overflowed the overflowing look.

I selected this text pattern from the kit so there was some pattern but nothing that would overwhelm the envelopes. I prepped the background with the repeated heart stencil from the collection using Distress Ink in scattered straw, saltwater taffy and a touch of crushed olive. First rubbing the inks through the stencil randomly so they blended here and there and second as light splatters across the page. The text pattern already has some black splatters,  so I added a few more to bring some more black in. 


I adhered the 4 envelopes across the hearts and added my 3 photos, then just started tucking and playing with the florals from the die cuts, stickers and chipboard stickers in the kit. A few butterflies here and there added some contrast. Finally I added the title from the phrase puffy stickers in the collection for a pop of black. 


I am off to play some more! There is a whole pattern paper of cut apart tags that I have my eye on - be back soon to show you what I come up with. 


Tuesday, December 22, 2020

Storyteller - A Touch of Mixed Media


The November Kit was all the things Vicki Boutin, Storyteller and wow is it a beauty. The messy but beautiful, grunge but classy, vintage but fresh look of Vicki's collection never disappoint - and this collection has purple, a unicorn colour in scrapbooking, so I was particularly excited! 

From my kit, so far I have made a Tag Mini Album and now I am venturing into 12x12 layouts (my go-to format) to capture some hiking memories from the summer with the fam-jam.  


I was inspired by the messy lines of some of the patterns in the Storyteller collection so decided to give it a try myself. Not to cover the page, but as a sort of anchor to all the branding strips, washi and bits of paper I thought would look neat all layered together as a horizontal stripe just off center on the page. 

This looks fancier (but in a messy way) than it is - I simply found 3 Distress Inks that matched the collection and dragged the edge of the stamp pad down the page all .. wait for it .. messy like! I didn't wait for the inks to dry as I wanted a little bit of a blend which gave me that touch of green there - perfect for hiking photos! The Distress Ink colours are Peacock Feathers, Seedless Preserve, and Fossilized Amber (my fav!). 


Then, one colour at a time, I rubbed a bit of off each stamp pad onto an acrylic stamp block and adding a spritz of water I used my paint brush to add some splatters of the same colours all around the page. I like using my stamp block for this because it wipes off so easily. 

To finish off the mixed media, I used a simple Tim Holtz repeated circles stencil, Distress Ink in Black Soot and a blending brush / dobber thing to add some random circles on the left and right of the stripes. Just enough that some would show from behind all the embellishments. Although looking at my page now I see you cant see any I added on the left - oh well! 

On the home stretch now, it was all about picking various bits and pieces from the stickers, the chipboards, scraps from past pages, branding strips (the pretty side) and other bits to create a messy layered cluster over the stripes. 


I could not resist adding way too many hearts just above the photo - haven't seen the family in a long while now thanks to COVID-19 so I poured some heart love onto my page for them! (PS is there ever too many hearts on a page? I think not!)


The final touch for me was some random Tim Holt Tiny Attacher Staples and a bit of Nuvo Crystal Dots in black watered down just slightly (again using my acrylic stamp block) and splattered on the page as a final messy and shiny touch. Tip - cover your photo with a scrap piece of paper and be sure to wash your brush right away or it wont be a brush any longer when you splatter with Nuvo.  


Thanks for swinging by! If you try your hand at a 'touch of mixed media' or are playing with the Storyteller collection we would love to see - tag us on Facebook and Instagram! 


Thursday, June 18, 2020

Over the Rainbow

Hello Crafting Friends!

Rosie back with a couple of rainbow cards using the Altenew Over the Rainbow stencil


You must have a spray adhesive to for this stencil as the lines in between each individual rainbow are quite flexible, they will move very easily if they're not held down with spray adhesive. I used Pixie Spray which will hold the stencil in place but not tear the paper when you remove it. Even still, I had a bit of overlap as you can see in the card above


After stencilling the rainbo, in of course, rainbow colour order I trimmed the rainbow, mounted it on black card stock and then popped it up with foam adhesive on a card front which was also stencilled. You just see the peek of violet ink along the bottom edge of the rainbow.

I also popped up the sentiment on white card stock across the rainbow and added a bit of shine with Studio Katia Iridescent Bubbles.

Next up is a "monochromatic" rainbow.


I inked the individual rainbows with the Altenew Deep Blue Seas mini cube set: Sea Breeze, Tide Blue, Turquoise and Starlight.
The white spaces are much more crisp in this card because I laid the stencil over masking paper, cut out the insides and then masked the strips on either side of the area I was inking.


I stamped the sentiment directly over the rainbow with Altenew Jet Black ink for the outline and the halftone inside with Altenew Cloudy Night ink. It's from the Altenew Halftone Everything Stamp set which is not in stock, but the Halftone Thanks is in the store and will give you a similar look.

Lastly, I embellished with Wendy Vecchi Enamel Accents in Forget-Me-Not. You'll see the silver hexagon in the upper right...I used that die cut to cover up a blob of enamel accent and saved the card :). No mistakes just crafty opportunities!

Happy Crafting!


Tuesday, June 16, 2020

Awesome, Hug and Hello: Altenew Mega Bloom Stencil

Hello Scrap Shotz peeps!

Rosie here sharing projects created with the Altenew Mega Bloom Stencil

This is a 6x6 stencil that will completely cover an A2 sized or 4 ¼" x 5 ½" card front.


I made two cards beginning with the foiled image.


I applied DecoFoil transfer gel through the stencil on a 6x6 piece of white card stock and set aside to dry, it takes about an hour to dry. Once it was dry I placed a sheet of Deco Foil Summer Rainbow Transfer sheet (cut down to 6x6) over the image and ran it through my Minc machine. An FYI, heat is required to transfer the foil with this medium. 

If you don't have a Minc you can use the Deco Foil Transfer Gel Duo medium instead as it can be used with your die cutting machine to press the foil into the media.


This next card uses the off cuts from trimming the original 6x6 foiled panel down to a 4" x 5 ¼" panel.


I glued the strips over top of white card stock inked with Abandoned Coral Distress Oxide ink through the Tim Holtz Gradient Dot Layering stencil.

I then inked white card stock with Abandoned Coral and Wilted Violet Distress Oxide ink and die cut 'hello' with the Photoplay Say It With Stamps Hello Die Set. It's adhered to the shadow die cut from black card stock and mounted on the card front with foam adhesive
Prior to gluing it down I sprayed it with Glitter Dust Aerosol Spray


For this card I inked the bloom with Altenew Chamomile and Snapdragon ink, adding pencil details with Prismacolor pencil crayons.
The sentiment is from the Taylored Expressions Simple Strips Stamp Set Background, die cut with the coordinating Simple Strips Die and the sentiment "mat" die cut with the Simple Strips Backer Die.


I embellished the bloom with Studio Katia Gold Foil sequins.

I hope you've enjoyed these projects, I had a great time making them :).

Happy Crafting!