Showing posts with label Prima Marketing. Show all posts

Thursday, January 7, 2021

The Yummiest Sugar Cookies

A final layout showcasing the Prima Marketing Inc., Sugar Cookies Christmas Collection Scrap Shotz sent me to play with this month! 

Over the last couple of weeks, I have shared four 12x12 layouts using this collection, a couple of cute ones and a couple of pretty ones. The pinks and florals and retro Santas and crystals of this collection have made it so versatile. Easy to scrapbook everything from cozy photos of the puppy to beautiful photos of my family, and now a photo of me and my sister sipping yummy Starbucks lattes.


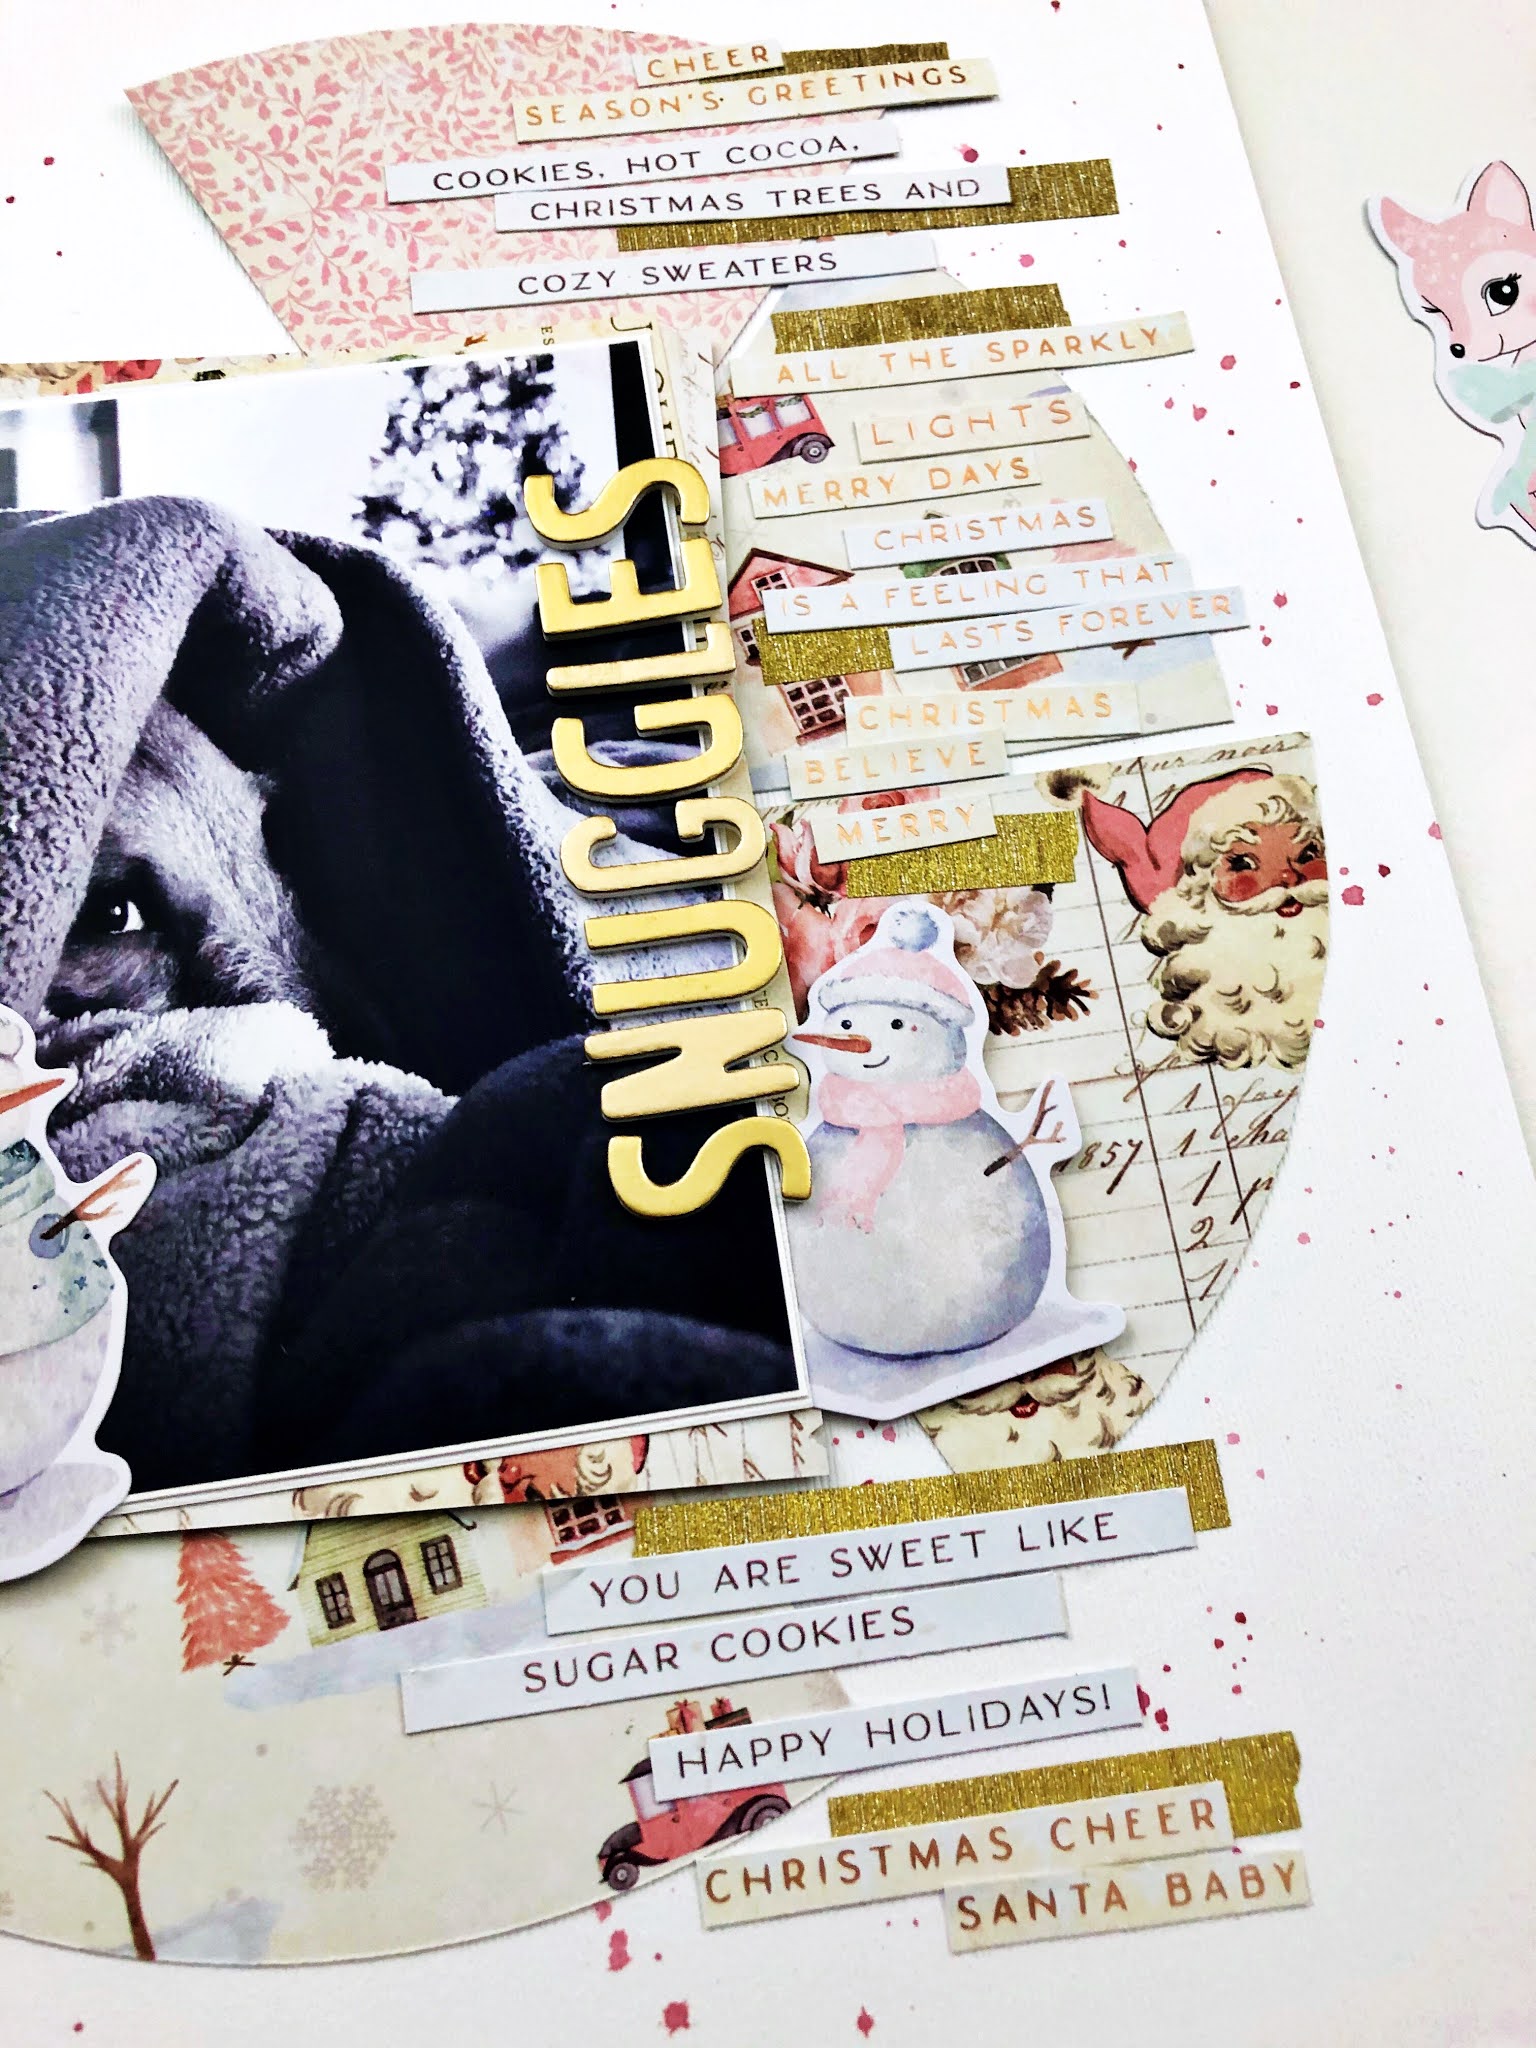
I didn't have too much left of the kit to play with but that's no problem! I ripped the scraps of pattern paper into 12 inch long strips and layered these messily along the bottom. Keeping the design to about a 1/4 or less of the page as an anchor for my photo. 

I didn't want so much white space to show on my background though so used a Kaisercraft Snowflake stamp) from a past Scrap Shotz kit) and some Tim Holtz Distress Inks in Frayed Burlap and Victorian Velvet to stamp the background. I focused on stamping about the same width of the page as my layered pattern papers. I still wanted some white space but too, too much. 

Hmm, I felt like I still needed a little pop of something - so reached into my stash of alphas and found these great gold words to scatter among the snowflakes. As if they were part of the background; like a snowflake and gold pattern paper!


Instead of using one 4x6 of this photo, I decided to print it 4 times in 2x3 and repeat the same image across the page like a film strip. To add a little something, I grabbed a small scrap of gold glitter paper and popped up one of the photos - the one there with the 'hello' and florals - as a sort of focal point. 


From there I added a few .. ok a lot .. of the Picket Fence, Moonshine Sequins for a little texture and shine. And voila! I love how this layout turned out. 

If you are playing with Prima Marketing Inc, Sugar Cookies we would love to see. Tag us on social media so we can ooh and ahh. 


Monday, January 4, 2021

The Cutest Sugar Cookies

The Prima Marketing Inc., Sugar Cookies Christmas Collection Scrap Shotz sent me to play with this month continues to be the prettiest thing on my scrapbook desk! 

The pinks and florals and crystals and retro pink Santa are so, so pretty. Last week I shared two 12x12 layouts that focused on really showcasing the ‘pretty’ of this collection (take a peek) and this week I am all about the ‘cute‘ of the collection - and that includes using photos of my little land shark Bella. 

For my first layout today I created a design to showcase the texture goodies - the ‘Say It With Crystals’ from Prima in the collection and the Picket Fence Moonshine Sequins that were included in my Scrap Shotz goodies. 


Using a piece of 12x12 Bazzill Cardstock in Avalanche, I rubbed some Tim Holtz, Distress Ink in Victorian Velvet through a Vicki Boutin stencil to create an anchor on the page for my photo cluster and the texture. I also added a few Kaisercraft snowflake stamps in Distress Ink Evergreen Bough (stamped off once before using on my page) and Frayed Burlap. Focusing the colour into a sort of diamond shape so a little would show all around the cluster.  


Then I took my photos and some of the Prima Ephemera to create layers - just tucking and adding till it looked busy - and added a gold title from my stash. Once all in place, I added confetti of sequins and crystals all over the coloured background area. And yes, I adhered each sequin individually - a labour of love! 


I finished this one off with some splatters of the Vintage Velvet (smoosh some of the stamp pad onto a piece of plastic or your stamp block, add a spritz of water and then flick the mixture with a paintbrush on to the page) and some white acrylic paint (same approach). 

Little Tip: cover your photo with a scrap piece of paper so you don’t get splatters all over it. Or sometimes I like to make the scrap piece just slightly smaller than the photo, so a few splatters land on just the photo edges. Looks especially good with winter photos and white splatters. 

For my second layout today I wanted to play with all the words! Inspired by the few phrase pieces in the Prima Ephemera pack, I decided to create more by cutting up some of the cut apart pieces and pattern paper. Then I created a long cascade of Christmas-y words down the side of the page. 


Behind the photo and words I needed a little something more - so created this pattern paper circle. I cut a circle from a scrap piece of paper and sliced it up into random pie shapes. Then I used those as a template to cut the actual pieces from the pattern paper. This is a great way to showcase more than one pattern. 


I finished this one off with a few splatters of the Vintage Velvet and a couple of short pieces of gold washi tape from Vicki Boutin, Storyteller collection to anchor a few of the word phrases. A tucked-in cute snowman to the left and right and voila! 

I am getting down to only wee bits left in my kit but think I have enough goodies for one more project - stay tuned! I have something in the works on my scrappy desk right now...


Thursday, December 31, 2020

The Prettiest Sugar Cookies

I am wrapping up my 2020 December scrapbooking with the prettiest Christmas collection I have ever had the pleasure to get these scrappy hands on. No jokes folks! Scrap Shotz sent me the Prima Marketing Inc, Sugar Cookie Christmas Collection and it is as pretty as it gets - all pinks and crystals and paper florals and touches of gold and just so, so pretty. 

So pretty, in fact, I completely forgot to pause and film an unboxing for you all - apologies! I sat down with a warm beverage and got right to playing with all the beautiful bits and pieces.


For my first layout, I started with a white background which I fancied up with some Tim Holtz, Distress Inks in Frayed Burlap and Victorian Velvet and snowflake stamps. The Snowflake stamp is from the Kaiser Craft, Let it Snow Collection Scrap Shotz sent me last year to play with! Sometimes I stamped fresh from a re-inking and other times I stamped 2 or three times without re-inking to give a little dimension and different shades of colour. 


I ripped the Sugar Sweet Christmas pattern paper from the collection to create a pattern across the middle of my page and tucked in some ripped vellum and cardstock (Bazzil in the colour Fawn) in behind. This design idea gives the eye an anchor for my photo and all the embellishments. 


From there it was all the fun of embellishing using the collection goodies - paper florals, ephemera tucked in and around the photo. Then I used the collection's "Say it in Crystals" and some Moonshine sequins from Picket Fence Studios (included in my package fro Scrap Shotz) to create a confetti look wherever I stamped the snowflakes. I wanted it to look like it was snowing pretty down the page! 


For my second layout, I wanted to focus on the pattern paper of the collection. Splitting my page in two I selected a more neutral pattern for the bottom half and then used 4 different patterns to create an angled design for the top half. I really like how this design showcases 5 of the patters without looking too busy and leaves me lots of pattern paper left over for other layouts too. 


With the middle of my page as my focal point, I added a few layers of tissue paper from my stash (tissue really softens busy patterns behind it and feels Christmas-y to me). I used 2 photos this time and lots of ephemera. Simple cluster and tuck and layer and tilt here and there method. The Santas were so pretty they had to be included and of course who can resist adding some Primar paper florals. The final touch was a few of those "Say it in Crystals" in and about the layering. 

A couple of touches I kept consistent across both layouts: 

  • white splatters to give the impression of falling snow. I have simple bright white Acrylic paint that I add a spritz of water too and then just splatter all messy like. Use a wee baby paintbrush for whispy snow or a bigger paintbrush (maybe the width of a fingernail, for a blizzard. 
  • chose photos that looked good in black and white or were quite dark - something about the simple colour of the photos and that gorgeous pink of the Prima collection makes me happy. 
  • used a gold title, from Heid Swapp, from my stash. I love that the titles are simple, have a  feminine that matches the collection and plays on the sparkle of the Prima crystals and florals too
I am off to make more layouts with this pretty collection. Scrapbooking and binge-watching Big Bang Theory are my New Year Plans. I would say Happy New Year to you all but rather let's go with Happy Goodbye 2020. wink, wink

Cheers!  


Thursday, February 27, 2020

January Prima Marketing Scrapshotz Kit - Pt 2


This photo is a blast from the past! I have to smile looking at my kids at this age. Because it's kind of an old photo, I had no problem giving it a vintage feel with this gorgeous paper line from Prima Marketing. The "Darcelle" line has some lovely tones of burgundy and the blooms included in the kit are really beautiful.
Here is a boyish page with the same line. This paper is filled with numbers and file drawers, so a school photo is just right for it. The kit thickers have just the right amount of glitter and have a great classic font.

And now for a few cards! There is plenty of variety in tones and moods created from scraps and sentiments from the chipboard and paper.
That's a wrap for my January kit projects! Thanks for stopping by. If you have any questions about any of this, please leave a comment and I will get back to you!


Tuesday, February 25, 2020

January 2020 Scrapshotz Kit - Darcelle

Whenever you have Prima Marketing papers to work with, you have to expect lots of blooms. This "Darcelle" paper collection is no exception. I chose to create my first layout with this kit for my granddaughter's school photo, so the flowers fit and were gorgeous on it. I fussy cut the top corner spray and the bottom blooms from the second sheet of the same paper and mounted these on foam. I used some of the ephemera pieces and cut out some of the quote panels from another sheet. I mounted some of these on foam and turned up the edges on others.
Here is another photo that shows some of the variety of layers and textures.

For my second layout, I wanted to showcase the versatility of the line by creating a more masculine layout, this one for my oldest grandson. 
Once again, I used foam squares and a little distressing to get the dimension I wanted. There are so many great quotes in this kit, the hardest part was choosing which to use.
 I have some more projects coming up with this beautiful kit, so look for that in the next couple of days. 

Thanks for stopping by!


Friday, February 14, 2020

Your Potential Is Endless: January Scrapbook Kit

Hello Friends!

Happy Valentines Day!

Rosie back to share a few more January kit projects, this time I have a few cards but will start things with this home decor piece that will hang in my craft room:


I first sprayed this Tim Holtz Etcetera tag with Distress Ink spray but it is not terribly opaque so it did not cover very well so I went to plan B and applied Vicki Boutin white gesso to the thick board and let dry.
Once dry, I mixed together Distress Ink Blueprint Sketch paint and Ranger Black Tie paint and added a couple of coats over the gessoed surface. 
You can see a few flecks of copper foil, I grabbed a scrap of copper foil from my stash and laid it over some areas that had not completely dried and rubbed the foil over them:

I used a Heartfelt Creations die from my stash to die cut the flowers from patterned paper, then shaped with the McGill Flower shaping tool:


The magenta bloom is from the kit itself.

I die cut the bottom left corner with a TH Sizzix alterations die, then trimmed a white butterfly die cut from my stash, backed the openings with kit pattern paper then applied Copper Penny Nuvo Crystal Drops over the die cut.


To put it all together, I began with the bottom layer, the bottom left hand side die cut, then the butterfly cut file, followed by kit chipboard pieces, a quote cut from one of the kit papers and then the flowers. The die cut flower centers are embellished with a kit gem which has been covered with Copper Penny Nuvo Crystal Drops.


One of the best parts of a kit is how everything coordinates so well together.


I cut various papers in squares and one rectangle, layering them over each other and popping up two of the layers with foam adhesive. The sentiment, from the kit stickers is also adhered with foam tape.

Lastly, I embellished with some kit puffy accents (heart, butterfly and dot).


The bottom half of this card is two die cuts cut with a Tim Holtz Alterations die from my stash. I bordered the top with a strip of Tim Holtz metallic card stock.


I finished it off with a few of the kit puffy stickers.

These next two cards feature the super versatile Circular Grid Mama Elephant die. It is perfect for the cute Mama Elephant Little Agenda stamps and works just as well for these thank you cards.

I die cut two pieces of pattern paper, keeping the circles to use randomly on the cards.

I inked a white card stock card front with Distress Oxide Victorian Velvet, Seedless Preserves and a bit of Dusty Concord.

I popped up a couple of the circles leftover from the die cut cover die with foam adhesive, added a kit chipboard sticker and the sentiment from the kit stickers, finishing off with a kit gem.


This card front was inked with Distress Oxide Victorian Velvet and a light hand of Dusty Concord and Blueprint Sketch. I then misted with water, picking up the water with a paper towel to create the "distressed" effect.


Again I popped up the circles with foam adhesive and cut the sentiment out of one of the kit journal cards, cutting notches on both sides to create a banner. A single kit gem adds a bit of extra sparkle to the card.

I hope you've enjoyed my kit projects, thanks for stopping in and don't forget to check out the other posts on the blog, lots of great inspiration from the team :)

Happy Crafting!


Thursday, February 6, 2020

January 2020 Kit: A Sketch Layout and Beautiful Journey

Hello!

Rosie back, with a couple more kit projects featuring the latest Scrap Shotz kit: Darcelle by Prima Marketing.


This layout is based on this Creative Scrapbooker Magazine sketch:


I love a grid design so this was a fun sketch to work with. I started by choosing 5 photos from a day trip we took to Lake Louise, AB and trimmed them down to 3"x3". I then cut seven 3.5"x3.5" photo mats and matted the photos, a journal block and a journal card with a quote included in the kit.


Here's a close up of the top right side of the layout and below is a close up of the bottom right with the journal block.


I have embellished the layout with chipboard pieces from the kit along with blooms from the kit.


Here you can see the journal card with the quote "in between goals is a thing called life, that has to be lived and enjoyed.".


The black glitter Thickers in the kit were perfect for the title and I added some gems and enamel dots to embellish the title area as well.


This large floral arrangement is fussy cut from the "Everything is Figureoutable" sheet. I added the off white bloom included in the kit. I love how this wintery layout came together thanks to this awesome sketch.

Next up is a project inspired by a fabulous Nathalie Desousa  layout in the Winter 2019 edition of Scrapbook and Cards Today.


I loved the angles on the inspiration layout and mimicked them here but in a vertical orientation as opposed to the horizontal orientation in the inspiration layout.

I hand cut the waves in the various kit papers and layered them over each other along the top right and mid-bottom left.


I matted the photo on patterned paper, card stock, then patterned paper again and placed it at the top right spanning the angled "borders".

I fussy cut blooms from the "Born to Make History" paper and placed them around the photo mat along with chipboard pieces and some of the kit stickers as well.

I created the title with the 'beautiful' puffy word stickers and a chipboard piece.

I've created 3 layouts so far and have five 12x12 sheets and two 12x12 sheets with only a 3.5"x3.5" square cut out of them. Lots of product for more projects so I'll be back to share those later this month.

Stay tuned to the blog as the team have LOADS of inspiration to share with you!

Happy Crafting!