Showing posts with label scrap shotz design team. Show all posts

Friday, February 14, 2020

Your Potential Is Endless: January Scrapbook Kit

Hello Friends!

Happy Valentines Day!

Rosie back to share a few more January kit projects, this time I have a few cards but will start things with this home decor piece that will hang in my craft room:


I first sprayed this Tim Holtz Etcetera tag with Distress Ink spray but it is not terribly opaque so it did not cover very well so I went to plan B and applied Vicki Boutin white gesso to the thick board and let dry.
Once dry, I mixed together Distress Ink Blueprint Sketch paint and Ranger Black Tie paint and added a couple of coats over the gessoed surface. 
You can see a few flecks of copper foil, I grabbed a scrap of copper foil from my stash and laid it over some areas that had not completely dried and rubbed the foil over them:

I used a Heartfelt Creations die from my stash to die cut the flowers from patterned paper, then shaped with the McGill Flower shaping tool:


The magenta bloom is from the kit itself.

I die cut the bottom left corner with a TH Sizzix alterations die, then trimmed a white butterfly die cut from my stash, backed the openings with kit pattern paper then applied Copper Penny Nuvo Crystal Drops over the die cut.


To put it all together, I began with the bottom layer, the bottom left hand side die cut, then the butterfly cut file, followed by kit chipboard pieces, a quote cut from one of the kit papers and then the flowers. The die cut flower centers are embellished with a kit gem which has been covered with Copper Penny Nuvo Crystal Drops.


One of the best parts of a kit is how everything coordinates so well together.


I cut various papers in squares and one rectangle, layering them over each other and popping up two of the layers with foam adhesive. The sentiment, from the kit stickers is also adhered with foam tape.

Lastly, I embellished with some kit puffy accents (heart, butterfly and dot).


The bottom half of this card is two die cuts cut with a Tim Holtz Alterations die from my stash. I bordered the top with a strip of Tim Holtz metallic card stock.


I finished it off with a few of the kit puffy stickers.

These next two cards feature the super versatile Circular Grid Mama Elephant die. It is perfect for the cute Mama Elephant Little Agenda stamps and works just as well for these thank you cards.

I die cut two pieces of pattern paper, keeping the circles to use randomly on the cards.

I inked a white card stock card front with Distress Oxide Victorian Velvet, Seedless Preserves and a bit of Dusty Concord.

I popped up a couple of the circles leftover from the die cut cover die with foam adhesive, added a kit chipboard sticker and the sentiment from the kit stickers, finishing off with a kit gem.


This card front was inked with Distress Oxide Victorian Velvet and a light hand of Dusty Concord and Blueprint Sketch. I then misted with water, picking up the water with a paper towel to create the "distressed" effect.


Again I popped up the circles with foam adhesive and cut the sentiment out of one of the kit journal cards, cutting notches on both sides to create a banner. A single kit gem adds a bit of extra sparkle to the card.

I hope you've enjoyed my kit projects, thanks for stopping in and don't forget to check out the other posts on the blog, lots of great inspiration from the team :)

Happy Crafting!


Wednesday, November 27, 2019

Fluffy Friends Holiday & Pine Clippings

Hello Scrap Shotz Friends!

Rosie here to share the first couple of holiday cards using Taylored Expressions products.  

I've used the Fluffy Friends stamp set:


I stamped and die cut a bunch of images all at the same time, you can see by the stamp graphic above that this bear is actually sitting on a sled. I wanted to have him ride the die cut sled so I trimmed the sled portion off. All the images are coloured with Copic markers and I added shading to the sled with an E30 copic marker as well.

I inked the background with yellow, orange, red and navy dye inks from my stash with Taylored Expressions blender brushes.

I then adhered a white glitter card stock die cut hill from my stash, placing the sled on the downhill :).


I added the presents and birdie from the stamp set. The bear was holding a black string in the stamp so I added gold thread attached to the runners to cover that up. The sentiment is from the TE Simple Strips-Christmas stamp set. This coordinates with the Simple Strips die, and gives you 18 Christmas themed sentiments cut in a banner, perfectly sized for each sentiment. Pretty Pink Posh confetti adds some shine as a final touch.

Next up is the Pine Clippings die:


I created a frame around the centre inked portion of the card with silver card stock Pine Clippings die cuts. The centre was inked with Distress Oxide inks in Cracked Pistachio, Mowed Lawn and Lucky Clover. I then inked outside the centre portion with Evergreen Bough and brushed Perfect Pearls Perfect Pearl across the entire surface.

I then embossed the panel with the We R Memory Keepers Gemstone embossing folder. I stamped the Christmas Simple Strips on red card stock with embossing ink and heat embossed with white embossing powder, then cut with the coordinating die.


I finished the card off with Nuvo Glitter Drops in Ruby Slippers.

I'll be back in a few days with a couple more cards.

Thanks for stopping by!


Wednesday, September 25, 2019

Scrap Shotz Blog Hop


Welcome to our new look and Creative Team Blog Hop! 

Not only do we have a new logo, we also have a new website. If you haven’t yet shopped the new site you can head over by clicking HERE.

The team is sharing projects inspired by the brand new Scrap Shotz logo:


Prizes

To celebrate our new look, Scrap Shotz is giving away a $25 gift certificate to 1 lucky winner! Please leave a comment on any of the blogs by October 2, 2019.

Every comment you make will earn you an entry so comment on all 6 blogs for a 6 chances to win!

Blog Hop

Hop along to the Creative Team blogs to see how everyone was inspired by the new look.

Your first stop will be the very talented Carolyn Fraser-Johnson. Below is a complete list of the Scrap Shotz Creative team.

Scrap Shotz Blog←you are here


Wednesday, April 17, 2019

Mama Elephant Creative Cuts & More

Hello!

As promised, I am back with more Mama Elephant projects.

First up is this card using the Mama Elephant Offset Rainbow Creative Cuts:

I cut the rainbows and clouds from white card stock. The rainbows are coloured with Copic Markers in rainbow order-ROYGBIV, that's red, orange, yellow, green, blue, indigo and violet.
The clouds are inked with Tumbled Glass Distress Oxide ink and the sentiment from the Flying With Friends stamp set is stamped on the cloud in black ink. I popped up an image also from the Flying With Friends stamp that has been coloured again with Copic Markers and die cut with the matching Creative Cuts.


Here's a close up look at the rainbow, I also added a glitter layer with a Wink of Stella clear glitter marker.


I arranged all the die cuts and glued on a white card stock panel which has been embossed with the Cuttlebug Swiss Dots embossing folder.

This second card uses the Mama Elephant Circular Grid Creative Cuts.


I die cut 2 frames, one from plain card stock and the second from this coloured card stock in my stash.

I placed the plain die cut over a piece of copic friendly card stock and traced the circles with a pencil so I should know where to stamp the images.


I then stamped images from a variety of Mama Elephant stamps, Little Chickie Agenda, Little Monkey Agenda and Birthday Monkeys. I coloured them with copic markers and drew in a "high wire" for the 2 monkeys to hang from their tails. The mouse with an orange ballon and red ballon were stamped and die cut with the Flying With Friends stamp and creative cuts.

Next I adhered the die cut panel with liquid adhesive, stamped and heat embossed the sentiment with Versafine Onyx black ink and clear embossing powder. I finished off the card with a few Studio Katia sequins.

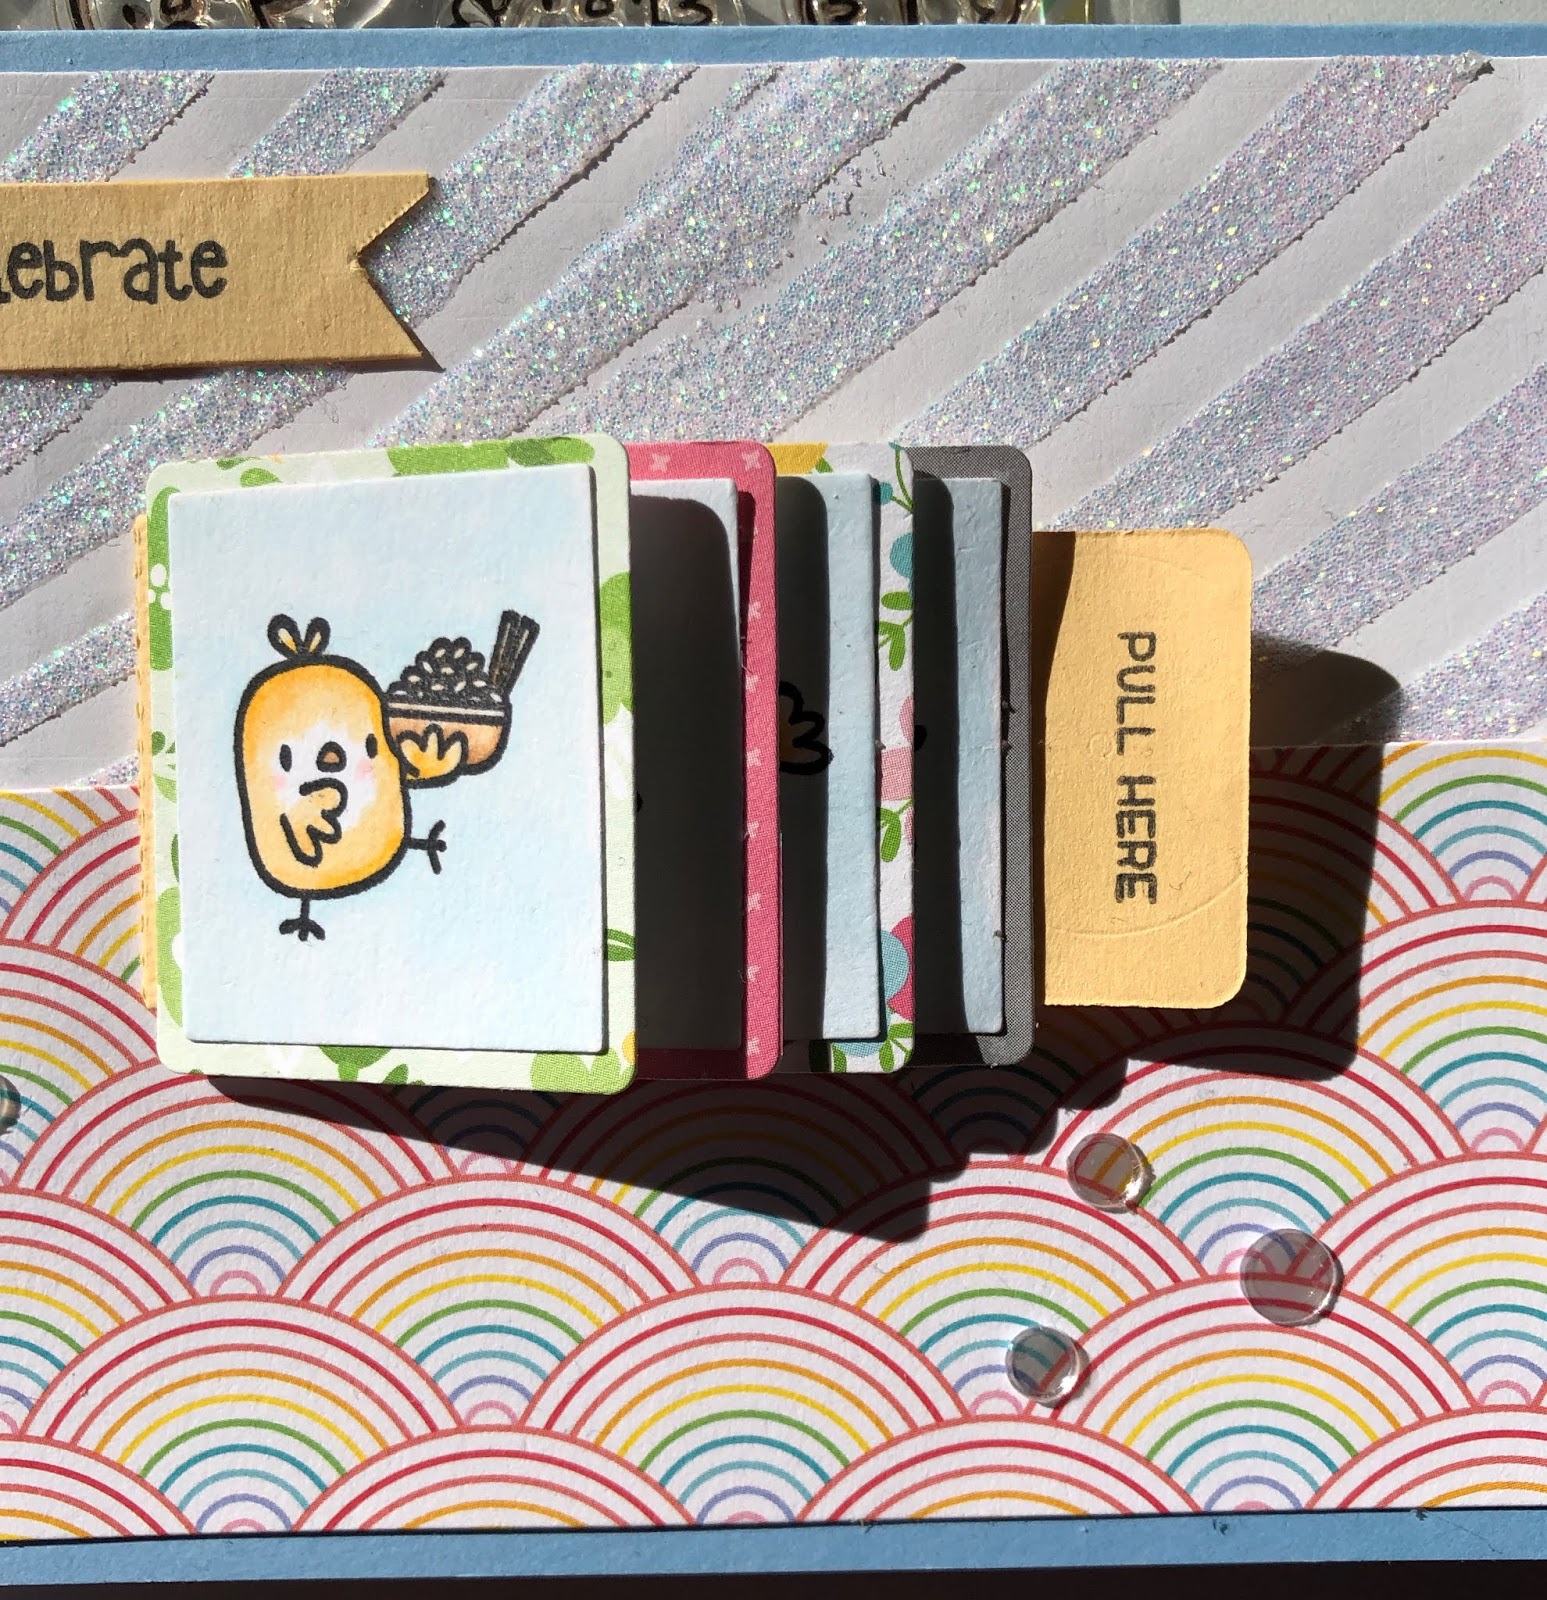
My final card uses the Mama Elephant Flip Slider Creative Cuts and the Mama Elephant Little Chickie Agenda stamp set.

Here's a closer look at the die itself:

The solid die is the slider portion and the small and large rectangles are what flip when you pull the tab.

I cut the slider portion from yellow card stock, the large rectangles (4) from the Lawn Fawn 6x6 Spring Fling paper pad and the smaller rectangles (4) from copic friendly card stock
I then stamped images from the Little Chickie Agenda stamp set:
This stamp is not in the store, there is 1 available that's been used for this blog post so contact Sandy directly to order a set in for you or inquire about purchasing the set used for the blog post.

Various images were then stamped on the white card stock with copic friendly ink, I've used Gina K Amalgam black ink which is copic, watercolour and coloured pencil w/gamsol friendly!

After colouring the images with Copic Markers  I layered them over the patterned paper rectangles and then assembled the flip slider. I hope to get a video done soon of how to put the slider together, I watched a few YouTube videos to understand it and it's quite easy once you get it done the first time.


After assembling the flip slider I set it aside and worked on the card front. I applied Nuvo Glimmer Paste in Moonstone through the Altenew 6x6 Molded Lines stencil and set aside to dry. 

The "Pull Here" is from an older Lawn Fawn stamp set called "Push Here". I stamped it and 'celebrate' in black ink on a hand cut banner and adhered with liquid adhesive after the paste dried.

I cut a portion from the Lawn Fawn 12x12 Unicorn Mane paper in the Really Rainbow Scallops paper pack and placed it on the lower portion of the glimmered white card front. I then adhered the flip slider with foam adhesive to make it easier to grasp the pull tab and embellished with  Pretty Pink Posh clear confetti.


Here's a last look at the flip slider card and a couple of links to YouTube videos walking you through putting it together:

Mama Elephant Flip Slider Jennifer McGuire, scroll to 10:30 of the video for excellent instructions to put this together.


I hope you've enjoyed these projects and make sure you come back tomorrow to check out more Scrap Shotz monthly kit projects!

Thanks for stopping by!


Tuesday, February 12, 2019

Love Monkey | Sunny Studio

Hello!

Rosie here to share my first round of projects for 2019. 

I am creating with the super cute Sunny Studio Love Monkey stamp and die:


Let's start with this card that uses all 3 of these products:

I stamped, die cut and Copic coloured these images, also adding some highlights with a white gel pen.

I then die cut a 4 1/4" x 5 1/2" grey card front with the Staggered Circles die, stamped the sentiments in Lawn Fawn Yeti ink and heat embossed with clear embossing powder.
The sunshine-y background is yellow card stock embossed with the Sunny Studio Sunburst Embossing Folder.

This next card also uses the Sunburst embossing folder, I inked the folder with Distress Oxide Mustard Seed added white card stock and ran it through my Big Shot.


The centre "sun" is the perfect spot for a shaker and the best place for the sentiment so I stamped the sentiment in Memento black ink. The Sizzix Dimensional Dome houses the sequins and the cute Copic colored Love Monkey's accent the sunburst card front.


Thanks so very much for stopping by and taking a look!


Wednesday, January 23, 2019

Meet the New Scrap Shotz Designers

Hello and Happy January!

We recently held a call for Canadian designers to join the Scrap Shotz team for the latest design term.

It was wonderful to see so many talented Canadian paper crafters, it was a tough decision!

Let's meet the newest members of the Scrap Shotz team:

Brande Davision

Hello, Hello! Name is Brande Davison. I live in beautiful (albeit largely rainy) Vancouver, BC with my hubby and our wee Jack Russell named Bella Bean Pup Pup. I started scrapbooking when I was 19 at a Creative Memories party my amazing step-mom hosted and I haven’t looked back. Fast forward 20 years and I feel like I finally found ‘my style’ (loads of journalling, lots of layers, and a touch of creative mess). I am so blessed to have a life that allows me to scrapbook, even a little, every day. Find me on Instagram @brandedavison or @scrapstorian (a scrapbook blog I host with my sister Shar and our scrapbooking bestie Cheryl). I cannot wait to start creating with Scrap Shotz and getting to know you all!

Carolyn Johnson

Hello! My name is Carolyn Johnson and I live in Winnipeg, Canada. I am very excited to design for a Canadian scrapbooking store! I'm a teacher by day and a scrap-a-holic by night. I have an 8-year-old daughter named Cosette who is the focus of my scrapbook but occasionally my husband and I make an appearance. I began scrapbooking in 2011 as a way to give myself a break during a very stressful year. I quickly became hooked and now I make layouts any chance I can get. I love making cute, funny and pretty pages and experimenting with a variety of styles and products. Thank-you Scrap Shotz for this opportunity!

Lorraine Melin


Lorraine Melin is a scrapbooker and card maker living in rural Alberta with her husband, Art. She started scrapbooking in 2002 as a creative way to display and preserve the many photos she took of her 2 children, Beau and Sarah. A couple of classes at a local scrapbook store and she found her passion in all aspects of papercrafting. Her work has been published a few times in Creative Scrapbooker magazine, with her first layout in the Spring 2008 issue. There were some whoop-whoops that day!
Working full time as a bookkeeper for an insurance agency, she finds time between her grandchildren’s sporting events (hockey and baseball, mostly) to scrapbook and make cards. Her other interests include travel, fishing, leisure time at the cabin and watching Blue Jays baseball.

Welcome to the team designers, we are looking forward to your projects!

They will be sharing their talents with us all starting this February.

Thursday, December 13, 2018

Scrap Shotz Design Team Call


We are looking for 2-4 experienced and diverse designers to work with both our monthly scrapbook kit and store products. If you are a creative individual, able to work under tight deadlines and have a strong social media presence, then we want to meet you!

Design Team Responsibilities

1.    6 month term beginning January 15, 2019through to June 15, 2019
2.    Create a minimum of 3-5 projects with either monthly kit or store products as assigned by Scrap Shotz.
3.    Two blog posts must be created per month according to the scheduled due date. One post showcasing photos, tips and techniques. The second post, a step-by-step photo tutorial or process video illustrating the project.
4.    Actively promote Scrap Shotz through all social media including Facebook, Instagram and updated personal blog.

To Apply:

Please submit the following to scrapshotz.dtcalls@gmail.com

1.    Vitals: Name, address, phone number, email address
2.    Social Media ID: Blog URL, Facebook Name, Instagram Name, links to online galleries. Significant social media presence and following is a huge asset.
3.    Photos of 3-5 recently created projects that clearly showcase your style.
4.    Please share your past and current design teams as well as your current commitments.
5.    Tell us how you would promote our kit club and online store through social media.
6.    In the subject line, please include “YourNAME-Designer

Monthly Compensation (approx.$50-$75 retail value)

1.    One Scrap Shotz primary monthly kit plus selected kit add-ons OR equivalent store product.
2.    Online store discount on other purchases.

Applications due by midnight MST (Mountain Standard Time) December 30, 2018. Due to shipping and time constraints call is open to Canadian designers only.

DT invitations will be extended January 2, 2019 with acceptances due by January 5, 2019.

We appreciate the time and attention taken by all applicants in their submissions-best wishes to everyone!