Monday, August 14, 2023

Scrapbook Layouts with Simple Stories Trail Mix!

Hello friends! Karla back today with four fun layouts using the awesome Simple Stories Trail Mix collection!! This is a wonderful summertime, adventure collection, which could be used into the Fall! This first layout we made Live on Facebook, but I've added an edited video below which you can view on YouTube! Be sure to scroll down to see three more projects!! Seriously I just couldn't stop!


I used the Creative Scrapbooker July sketch as a starting point for this layout, but flipped the orientation. I added in Distress Oxide Inks and a Vicki Boutin World Traveler Stencil from her Where To Next Collection.


There are so many fun elements in this collection - I used the Decorative Brads, Patches Bits and Pieces, Chipboard Stickers, Foam Stickers and the 12 x 12 Collection Pack, which also includes stickers. I also pulled in some of the Fall Color Vibe papers from the 6x8 paper pad. There are lots of fun papers available in the Color Vibe Line! 


I added on The Robin's Nest Dew Drops and some hemp twine for my cut apart tag and then journaled on the tag and around my photos.


Next, I created a layout using the August sketch from the Creative Scrapbooker VIP Group. I added in some stenciling again with the Distress Oxide Inks. The colours just happen to go perfectly with our Summer Colour Palette Challenge in the Scrap Shotz Papercrafting Facebook Group! You have until the end of the month to add a project for a chance to win! Check out the Album with details HERE!


I added the Decorative Brads and used various pieces from the collection to add a few clusters of embellishments.


I created my title using the Foam Stickers, Patches Bits and Pieces and a sticker from the collection pack!


I added a few Oxide Ink splatters with the Tim Holtz Splatter Brush, which always gives a cool effect!


Thirdly, I created a layout documenting our travels out to the mountains.


I used one of the 4x4 cut apart cards and those pretty Color Vibe papers and created a grid design with strips of patterned paper.


This cute camper is so fun!! I added in a cluster of embellishments and those lovely The Robin's Nest Dew Drops!


Lastly, I used the beautiful trails and trees paper and the August sketch from the Creative Scrapbooker Sketchy Challenge FB Group! 


The cut apart tags are great for journaling on, making tag booklets or just as decorative elements.


I added a foam sticker title, a cluster of embellishements and matted my photo with some of the Color Vibe Fall paper. 


Thanks so much for stopping by! I love how these all turned out! And, I'll be back on Thursday with FOUR more layouts with this collection!! 

PS. Don't forget to stop by the Scrap Shotz Facebook Page at 1 pm MT on Thursday for a fun LIVE Demo - every week!! 


Tuesday, August 1, 2023

Simple Stories Retro Summer Layouts

Hello everyone! I have some super fun layouts to share with you today using the Simple Stories "Retro Summer" collection. This kit was so easy to work with and I only had the 12 x 12 Collection Kit. There are so many elements that can be cut apart to make embellishments, the kit can go a long way. If you have any pictures of swimming or cold drinks, this is the kit for you!


The first layout uses this sunshine paper. I debated adding some stitching to the sun rays but decided to do something different and make dots with Liquid Pearls and Nuvo Drops from previous kits. Much faster than stitching! 


The kit has cut apart cards and cut apart tags which I used for the background layers. The sticker sheet in the kit has all the embellishments. The final touch was a title made from some older Amy Tangerine Thickers.


The second layout uses all those Pandemic ice cream pictures (since that was one of the only things you could do). The background is one piece of paper but I chose to make the ice cream dripping off the top stand out by lining it with some yellow and white twine. I also used some Studio Katia Polymer Clay Rainbow Dots from a previous kit to cover the round sprinkles. I can't believe how the colours matched perfectly. They added a nice three dimensional element to the page. 


The rest of the layout uses a cut apart card for the journaling and stickers from the kit for embellishments.


The final layout again uses one piece of paper for the background. I decided to jazz it up by gluing sequins around the pool to make it look like stone. 


The rest of the layout is made with layers of papers and stickers from the kit. 

There you have it! I hope you get a chance to play with this fabulous collection!

Friday, June 30, 2023

Simple Stories Boho Sunshine Layouts and a Card

Wow, it is July already! It is so nice to be scrapping again. I'm excited to show you the Simple Stories Boho Sunshine Collection. It is cute and playful and perfect for scrapping pictures of my 11-year-old.


My first layout has a background made from distress inks that were applied with a dry sponge. The butterflies were fussy cut and glued to their corresponding colour. 


The black lines were drawn by hand. The embellishments all came from the cardstock sticker sheet in the main kit or the bits and pieces die cuts floral pack. 


My next layout uses two pieces of paper. I cut a square out of the center of one paper and set it off-center. Then I backed the frame with the second paper. The picture is surrounded by papers that were leftover from the frame backing. I used a chain stitch to sew around the frame using white embroidery thread. 


The title and butterfly are pieces of chipboard. The flowers and hearts are from the bits and pieces pack. The subtitle is a cardstock sticker and the clay circle embellishments are from Studio Katia from an older kit. I used an older blue Stickles paint for the centers of the flowers. 


This collection has some premade frames that make it easy to highlight a picture. I liked how this frame matched the paper. There are also some cut-apart cards in the paper pack which are perfect for journaling. 


My final layout was fun to make. The paper kit has one sheet with tags on both sides. I cut them all apart and then chose the ones that looked best horizontally. I printed my pictures using the collage feature in Picasa. It allowed me to print 4 pictures on one 4x6 print. I backed them with some yellow paper. Then I used the bits and pieces, chipboard and cardstock stickers to embellish and found some string in my stash. 


The final touch was to doodle around the tags with a black pen.


I also had the chance to make a card. They are not something I usually make but I had a wedding shower to attend. I used a piece of Bazzill cardstock from a previous kit. The embellishments are from the bits and pieces pack and cardstock sticker. The title was cut out from a paper in the kit. I used thread to sew the letters to the rainbow. It was a little tricky to try to get the letters to hang with just the right amount Finally, I used some Nuvo drops to highlight the center.

I hope this offered you some inspiration to get crafty with the Boho Sunshine Collection. 

Friday, June 9, 2023

Alex Syberia Designs...Fabulous Florals!

 Hello!

Rosie back again with more Alex Syberia Designs projects, this time, featuring florals!


This large bloom from the Hello Lovely stamp set is the perfect size to fill an A2 card front. I stamped this on Altenew watercolour paper with clear embossing ink and then heat set with Altenew Rose Gold Crisp Embossing Powder.

It's coloured with Distress Watercolour Pencils and I added some extra details/shading with Prismacolor Pencils. The panel is die cut with the Stampendous Deckle Cutting dies (this is not in the store but can be special ordered) and the sentiment is also heat embossed with Rose Gold embossing powder. A few Studio Katia Iridescent Bubbles finish off this card.

Life Is Good is another gorgeous floral stamp from this designer.


I used the ink smooshing technique to create the background with Altenew Just Green, Lagoon, Maple Yellow and Galactic Stream Crisp Dye inks, then run through my Big Shot with the Honey Bee Rainbow A2 Pierced Cover Plate. 

The large floral image from Life Is Good was stamped on copic friendly cardstock, coloured with Copic markers, fussy cut and popped up on the background with foam adhesive tape. I treated the black card stock with the Taylored Expressions-Anti Static Powder Tool which is one of the best anti-static tools on the market in my opinion, then stamped the sentiment in clear embossing ink, coated with white embossing powder and set with heat tool.

Now let's take a look at one of the stand alone die sets from Alex Syberia Designs, Fantasy Flowers! If you were at the Great Canadian Scrapbook Carnival in Edmonton you may have created one of these cards in one of the Scrap Shotz Make & Takes.


These layers are super easy to layer and I die cut the layers from Memory Box 6x6 Ocean Blue Paper Pad which contains 4 each of 12 shades so it's perfect to use for these types of layering dies!

The background is created with Simon Hurley Tropical Tango Lunar Paste and the Alex Syberia Pureland Fan stencil. After adhering the layers together I've embellished the stamens with a gel pen from the Sakura-Gelly Roll Classic Pen Set.

Sentiment is from the Pinkfresh Studio Sentiments 5 pack of 43 sentiments which has multiple birthday, thank you and encouragement (just to name a few) sentiments in gold or silver foil. A few Pinkfresh Studio Silver Matte Pearls complete this card.

I made this second version of the card with yellow blooms using Memory Box Sunny Orange 6x6 paper to die cut blooms and Studio Katia Gold Sparkle Crystals.


I have one more card created with the Petit Periwinkles Stand alone Die Set but I can't find it to photograph so make sure you're following use on Instagram as I'll post it there when I locate it!

Thanks for stopping in!

Tuesday, June 6, 2023

Alex Syberia Designs! Cute Critters!

 Hello Scrap Shotz Friends!

Rosie here, sharing a few projects with a brand new to us product line, Alex Syberia Designs!

You'll find cute critters, lovely florals, stand alone die sets and hot foil plates in this product line!

Check out the entire line the store HERE!

First up, Giraffe-ic stamps and dies...


I've done a bunch of masking and stamping to create this fun scene for these cute giraffe friends and then coloured with Copic markers.

You like giraffes but you LOVE birds? Let's check out these feathery friends, Paradise Birds!


These fine friends are Copic coloured and visting on a background created with Lunar Pastes and the Pureland Fan stencil from Alex Syberia. The sentiment is from the Life is Good stamp set.


I used the Altenew Stampwheel to stamp this wreath of palm fronds and to also stamp a mirror image of the toucan bird that I've Copic coloured so this couple could face each other as they celebrate their anniversary!


I stamped, coloured and die cut these images from Paradise birds and created a shaker thank you card. I applied Clear Skies Lunar Paste through the Simon Hurley 6x6 Tiny Circles stencil and adhered the images with liquid adhesive as well as foam adhesive to pop some of them up.


The background shines with the combo Shooting Star Lunar Paste and the AS Pureland Fan stencil. These images are all Copic coloured as well as die cut with the coordinating Paradise Birds dies.

I'll be back later to share some of the fabulous florals from Alex Syberia Designs!

Thanks for stopping by!

Friday, May 5, 2023

49 and Market Card Set

 Mother's Day is almost here, and I wanted to share a card set that I made for my Mother-In-Law to celebrate the day. She loves my cards and always is so thankful when she has a stash to choose from. I used the 6x8 Tranquility Collection pack that is here in the store, as well as the Plum Grove 6x8 Collection.

With very little effort, (and the laser cut elements,) these cards were quick to create and are beautiful. A bit or ribbon or twine, some bling embellishments, and you're done!


I want to wish all the Moms a very Happy Mother's Day! 


Monday, May 1, 2023

49 and Market - Plum Grove Layouts


Once again, I'm working with the Plum Grove Collection from 49 and Market. I love the richness of the colors and the outstanding quality of the paper. For this first layout, I added more flowers to the background with a bouquet of ephemera and put some laser cut stems over my photo mat, framing the photo. I used a bunch of the chipboard words, stacking them close together so that they appear to be a single element. The thankful words are all added with rub ons and the postcard journaling spot blends in enough to not throw off the balance.
 

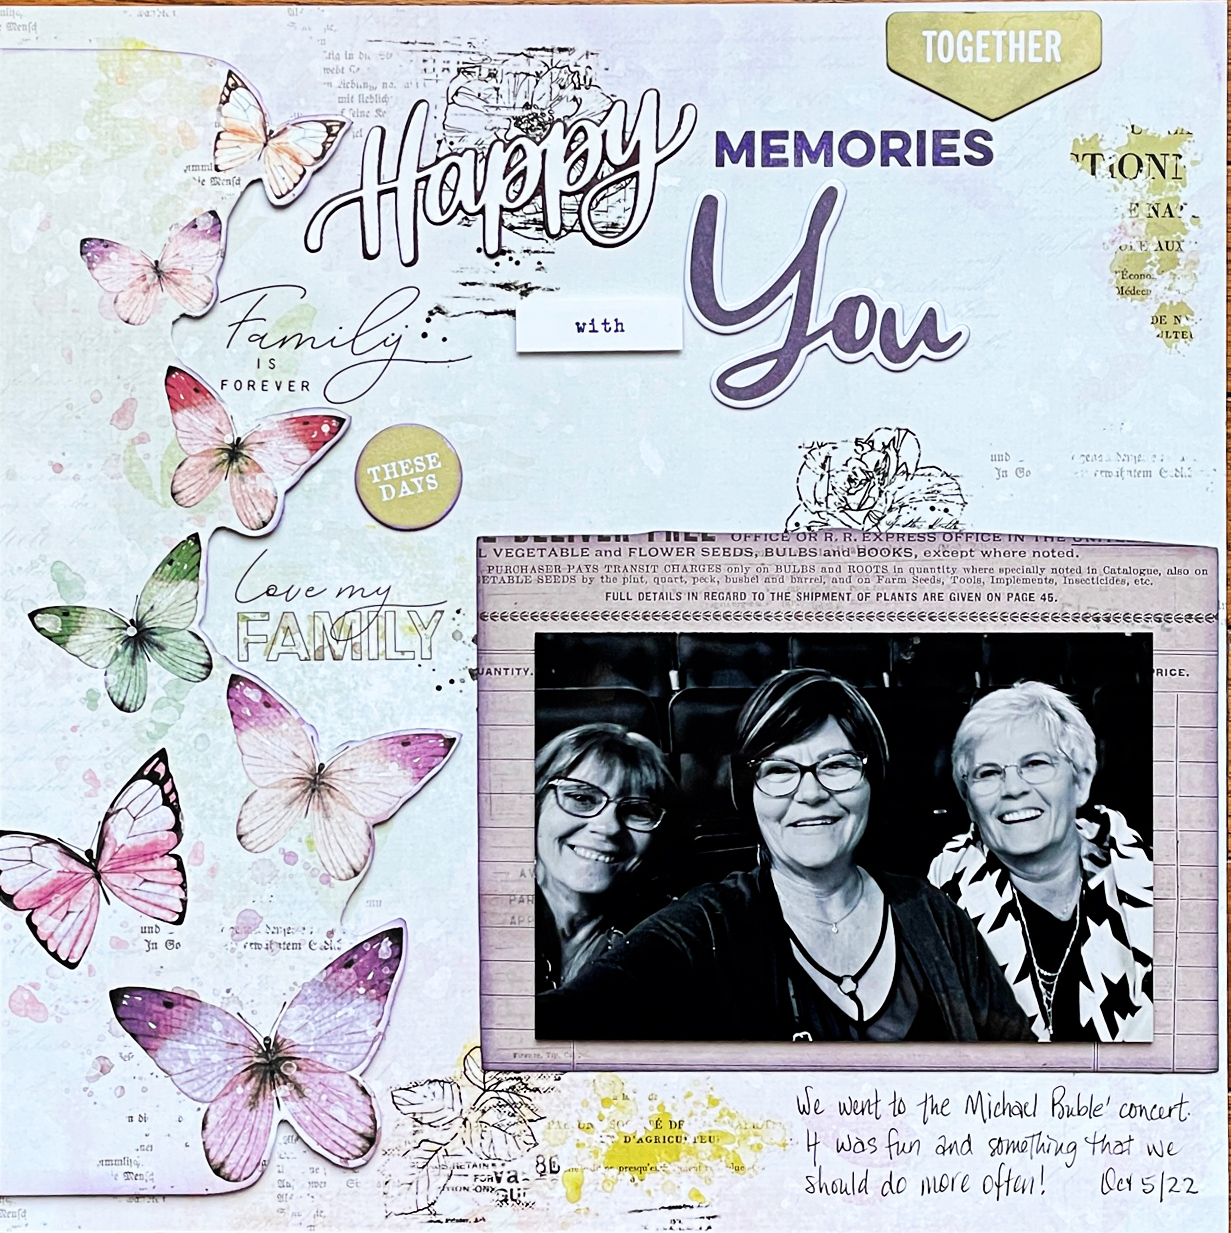
This photo is of my sisters and I at a concert. I printed it in black and white so that it would be suited to any color combination I wanted to use. I cut out the butterfly border from another patterned paper sheet and mounted it on foam to give it dimension. I used a Happy die cut, purple Doodlebug Alphabet Soup Alphas and the "You" from the ARToptions Plum Grove Chipboard Word set. I used some rubons to add phrases, outline flowers and grunge paint to the background. The photo mat is an ephemera piece from the Plum Grove Ephemera Bit package.

Thanks for stopping by! I hope you're having a great spring week!