Friday, May 18, 2018

Simple Stories| Bloom

Hello!

Have you been enjoying new DT member Gloria's projects? I know I sure have! Scroll down to check them out if you haven't had a chance to see them yet 😊.

Rosie here sharing some layouts created with the lovely Simple Stories Bloom Collection kit, Bits and Pieces and Chipboard.


Layout was inspired by this layout found on Pinterest which I used like a sketch. If you're not a Pinner you can also subscribe to your favourite manufacturer's blogs for ideas on how to use their products.
  Use your choice of patterned paper as the base and then mat a variety of papers from the collection on black card stock. Prior to adhering the matted papers and photo I splattered the paper with Heidi Swapp Color Shine spritz.

Here's a closer look at the paper blocks. The collection kit also includes a sticker sheet which the flower cluster and clipboard came from.


I accented the flower centres with Studio Katia onyx crystals. 


The chipboard tassel banner fit this space just perfectly.

Next up is another layout inspired by this one created by Kristine Davidson for Simple Stories.


This layout came together so quickly and it's because of the inspiration layout! Collection kits are fabulous because everything works together!
I began this layout by choosing the patterned papers, ensuring I left white space just like the inspiration layout.
As with my first layout, I splattered Black Velvet Heidi Swapp Color Shine sprite on the base prior to adhering the photos and accents.


I layered stickers over the die cut typewriter which is also layered over the Hello die cut.


Here's a look at the photo which was matted on black and then white card stock. Bloom stickers and die cuts "frame" the photo and Pretty Pink Posh confetti and Studio Katia Onyx gems embellish the flower centers.

This final layout was based on the Creative Scrapbooker Magazine May sketch:


I kept the photo layout the same as the sketch replacing the long or tall photo with a journal card. The  Bloom collection kit has 2 papers with Project Life type cut aparts. 
Various papers were cut into 2"x 2" squares, then cut in half diagonally. I then placed a selection along the top of the page and pieced 3 squares down the lower right side of the page.


You can see a bit of the triangle border above this photo. I added stickers from the collection sticker sheet and embellished the centers with Studio Katia onyx and sparkling crystals (these may not be listed individually in the store, email sandy@scrapshotz.com to inquire).


I trimmed down this 5"x7" card to more closely mirror the sketch. I have matted it and layered it over   the paper pieced squares. Crystals embellish these floral centers as well.


Bloom collection chipboard, stickers and die cuts create this "title" area similar to the sketch.


Lastly, rather than splattering mist or spray, I chose to randomly adhere onyx and clear crystals.

Thank you for stopping by and taking a look! I would love to hear your thoughts on this post so feel free to leave a comment. 
😊😊😊

SaveSave

Wednesday, May 16, 2018

Product Reveal - Mama Elephant 2

Hello everyone! Gloria here, Today I want to share with you a card and a pair of tag set using Dragon wishes stamp set from Mama Elephant and Knock on Wood 6x6 inch petite paper pack by Lawn Fawn. These stamps were super popular at our last event so if you can't find them in the store, please email your request to order to sandy@scrapshotz.com.

The first project using masking technique.
Here is my first card :


For create this card, first I die cut a circle on a post-it paper and covered the cut paper on a center of the 4x5.25 inch white card stock. And blended the paper panel with Distress Oxide inks using mini blending tools. 


I added water splashes to the blended panel for creating a sun texture.


Stamped the message on the center of blended panel. Stamped the dragon images on a white card stock, coloured with Copic markers and fussy cut them.


I stamped some small images on the white circle and coloured with Copic markers.


Mounted all elements as shown a top-folded card white card base using adhesive foam tape and foam dots.


I made a pair of tag set.
Here is my second project :


First, I die cut the tags with Knock on Wood card stock by Lawn Fawn.


I stamped the messages on the white card stock and cut them. And then stamped dragon images on the white card stock, colored with Copic markers and fussy cut them.


I stamped small images on the cut tags using Memento black inks.


Adhere all elements using double-sided tape and glue pen.


I hope you enjoy your stay and get some inspiration.
Thank you so much for stopping by and have a wonderful day!
Happy crafting!

Monday, May 14, 2018

Product Reveal - Mama elephant

Hello everyone!

Gloria here, today I want to share with you my projects using Birthday Monkeys stamp , Dragon wishes stamp set from Mama elephant and Knock on Wood 6x6 inch petite paper pack from Lawn Fawn. These stamps were super popular at our last event so if you can't find them in the store, please email your request to order to sandy@scrapshotz.com.

First project is a layout based on the Creative Scrapbooker Magazine May sketch.
Here is the sketch :


Here is my take on the sketch :

I started stamping the cute cat and monkey images on the watercolour paper using tattered rose Distress ink because of no-line coloring. I colored the stamped image with watercolours and fussy cut them.


I die cut the title using Knock on wood paper. 


The Dragon wishes set from Mama elephant has wonderful message stamps so I stamped some message using Memento tuxedo black ink.

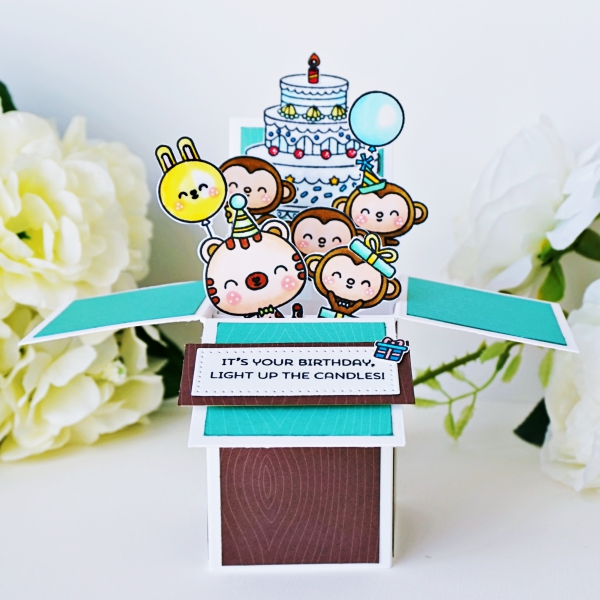
My second project is a pop up box card.
Here is what I came up with :


To create this card First, I created the box. I Searched Box in a card template and scored all lines the cut some lines with white card stock. I used this tutorial for making box.


I cut the knock on wood papers for the card background.
I stamped the cute images on the white card stock , colored with Copic markers.


Added some dots with white gel pen on the cheeks. And added glossy accents for balloons.


Here is the last project today.
It is a random stamping background card.


Random stamping is one of my favourite technique. 
I randomly stamped the cute image on the white card stock using grey colour ink.


I stamped the Dragon wishes message stamp as shown by bending it with embossing ink, and white heat embossed it.


I used different height of adhesive foam dots.


I hope you enjoy the post today.
Thank you so much for stopping by and have a wonderful day!
Happy crafting!


Thursday, May 10, 2018

NSD Wrap Up

Hello Scrap Shotz Friends!

I hope everyone was able to enjoy {inter} National Scrapbook Day this past weekend. Scrap Shotz hosted our annual NSD crop in Calgary, kicking it off with the pop up shop Friday evening. There was a lineup 30 minutes prior to opening the doors and the shoppers put a noticeable dent in the product available.

Saturday brought 12 hours of cropping and Virginia inspired many with her beautiful make and takes.   It was a wonderful day spent chatting, eating and laughing with new and old friends. Thank you to everyone who attended the shopping event, Nicole Wright's canvas class and the crop!

This doesn't seem like a proper post without actually sharing a project so here's a card that I created as a sample for the Crop and Create event Scrap Shotz attended.


This card was created using the MFT All Smiles stamp set by myself, DT member Rosie. Here is how it was created:

"This set is comprised of the large smile stamp and various sentiments to pair it with. A stamp positioning tool came in hand for this as I placed a piece colour card stock in my Misti tool, arranged the various sentiment stamps to my liking, stamped with embossing ink and then heat set with white embossing powder. I did this twice as I needed to fill in some areas. I then inked the panel in rainbow order with Distress Inks. The smile was stamped on vellum paper with Versafine onyx ink and heat set with clear embossing powder. I colored the back of the vellum with copic markers similar in color to the inks. The vellum panel is then adhered to the inked background with the Lawn Fawn fundamentals Glue tube. Place the glue behind the black sentiment so it doesn't show through the vellum."

I will be back later this week to share some more samples and very, very soon we'll be seeing fabulous work from our new DT members!


Monday, May 7, 2018

Product Reveal: Alcohol Inks

What's old is new again and that's what alcohol inks are for me! For the following pictures, I have used the Ranger alcohol inks and Tim Holtz blending solution. Let me share a few fun experiments with you!

Below, I was learning how the inks moved on the Yupo paper - can you tell I loved it? Every background is unique and filled with texture. I will be experimenting with texture even more this week (stay tuned!) Layered on top of the alcohol ink background is a Penny Black Christmas die.


Next I wanted to challenge myself to use colours I would not normally use: green, orange and yellow. Well, can I just say how much I love this color combo :-) I could not resist using the inlaid and stacked die cut technique with the Altenew half tone Hello die.


Lastly, I wanted to try adding texture to the alcohol ink background. For this background, I added some of the Ranger metallic mixatives and gently splashed some blending solution on the background. When it dried, I added some Pretty Pink Posh gems.

When I looked at the background, it reminded me of the ocean. Hence, the super cute mermaid by Honeybee! The mermaid is heavily coated in clear Wink of Stella. In real life, this mermaid has layers and layers of glitter!


A close up of the alcohol ink background...


I hope I have inspired you to try your alcohol inks. Watch next week for some more fun techniques to try.


Friday, May 4, 2018

Scrap Shotz May Kit and {inter}NSD!

Hello Scrap Shotz Friends!

The May Scrap Shotz kit is now available for order in the store right HERE. This months kit features a lovely neutral color palette with Kaisercraft's Pen and Ink line.


We are toning it down this month with the rich colors from Kaisercraft Pen and Ink. Includes 9 PP, 1 die cut paper, 12x12 stickers sheet, ephemera pack. Then we are complementing with enamel accents, ideaology hearts ( that can be colored!), butterflies, a chipboard tag and an alpha. 8 matching cardstock as always! Lots of great add ons! Single kits will be available after May 21st, if available, for 40.95.


There are a number of great add ons to choose from, click HERE and scroll down until you reach the May 18Kit Add On's. All add ons are exclusive to kit subscribers until May 21 when any remaining add ons will be released for general sale.


We are feverishly preparing for our Friday, May 4th Pop Up Shop at the Scenic Acres Community Centre in Calgary, AB. 

We'll be open from 4pm-8pm and along with shopping, we are also offering this Spring Canvas Class by Nicole Wright:


If you are in the Calgary area, you still have time to book a place in the class, click link below:

May also welcomes our new Design Team members, Gloria Lee, Laura Gilhuly and Karla Yungwirth! We are looking forward to being inspired by their projects this month and until their project reveals, we invite you to visit their blogs via their links on the right hand sidebar.

Thanks for stopping by, I will be back with a few projects I shared at the recent Calgary Crop and Create event.

😀😊😀

Tuesday, May 1, 2018

A Big Thank You!


We have so enjoyed working with Design Team members Cathy and Sylvie, unfortunately they've reached the end of their term.

Thank you Cathy and Sylvie for sharing your creativity and inspiring everyone with your wonderful projects!