Tuesday, March 19, 2019

Simple Stories Album & Layout Kits!

Hello friends! It's Karla back today to share some of the fantastic Simple Stories kits available at the Scrap Shotz store. These kits are full of fantastic papers, ephemera, stickers and come complete with full instructions so you can put them together in just a couple hours. We had a lot of fun assembling the Say Cheese 4 Binder Kit and the Spring Farmhouse four page layout kit at the last pop up shop, but if you weren't able to make it you can still pick these awesome kits up along with the Vintage Traveler binder and the adorable Little Princess Brag Book!

Here's a closer look at two of these kits to give you an idea of what a fantastic finished product you'll be able to complete - First, the Say Cheese 4 Binder Kit. This is a wonderful album that you'll be able to keep lots of photos and journaling in to document all your magical memories! You can click below to watch the video or click HERE.


And, next I'm sharing a video HERE to show you exactly what you'll be able to complete with the Spring Farmhouse four page layout kit. There is room for lots of pictures here and you are left with lots of sweet ephemera diecuts to create even more after.

Be sure to head over to the Scrap Shotz store to check out these lovely kits and have fun documenting your memories! 


Simple Vintage Travelers Notebook

The March Kit is everything this wanderlust scrapbooking soul could ask for!

Wow. The kit features the Simple Stories, Simple Vintage Traveler collection which is full of amazing travel themed goodness. From geo tags to luggage tags, airplanes to hot air balloons - this kit is fabulous. Check it out!


I received a few of the Kit Add On items in my kit this month. All are available on Scrap Shotz online store if you want to add a few of these to your kit too.

I have been waiting for the perfect kit, collection, inspiration to document my 196 mile (299 kilometer) solo hike from end to end of the Pembrokeshire Coastal Path in Wales in 2008. As soon as I unpacked the March kit I knew I found it. Travelers Notebook (TN) project here I come!

I literally grabbed some of my favourite adhesives, my little scrapbooking stapler and my self-inking date stamp and sat down and just started making. With a kit that inspires me so much and where everything coordinates so fabulously I was able to knock out 6 pages and the cover of my TN in just over an hour. Don't you love when you are in your creative groove?


Have you ever created a Travelers Notebook before? I discovered this project size just last summer and I love it. It feels like a perfect companion to my traditional 12x12 scrapbooks. I use the larger size for the more artsy side of scrapbooking and the TN size for journalling.

Here are few tips I have picked up in just this short time - happy to share them with you here and would love to hear any tips you have!

  1. You do not need special TN supplies. I use all the same supplies I use for scrapbooking - like my March kit - it just goes so much farther using it on the smaller format. Love that!  
  2. Work from a kit. Everything matches. You can literally grab any item and it will work. 
  3. In the smaller "book" style format it looks great when there is a continuity of design from first to last page and working from a kit makes this super easy. 
  4. Add a few similar embellishments to each page to help the design style continue from start to finish. I like to add a few random tiny staples, and a few stamps from my date stamp. I think these embellies also gives it that "traveler" look. 
  5. Journal! Worried about how your writing looks - get over it (I say that with love!). A Travelers Notebook is meant to look a little messy and traveled. If your writing is also a little messy, like mine, all the better - that is what this format is about! 
  6. Add some journal pen stitching around the edges of each page to help give it that travel, messy look and you might be surprised at how this will also make it easier to journal. 
  7. If, like me, you plan on filling your pages with all kinds of dimensional embellishments (chipboard, foam dots, flair) consider taking a few of the center pages out to make more room in the book AND then use those pages you took out to back your photos!  

I am off to keep on creating! More pages to come in my next post and I will definitely post a flip through video of the completed project too. 

Thanks for stopping by. 


Friday, March 15, 2019

Lawn Fawn| Spring Release Pt.2

Hello Everyone!

Rosie back with another bunch of Lawn Fawn projects using the latest Lawn Fawn release.

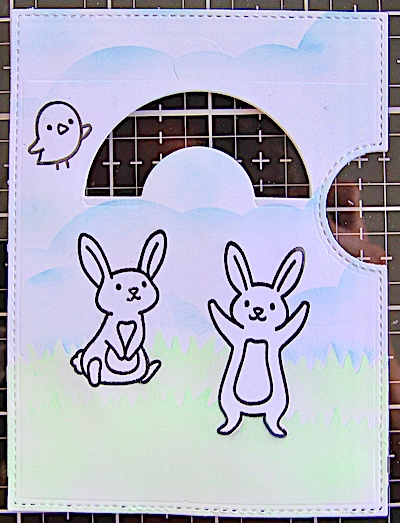
First up is a reveal wheel card. There are a number of new reveal wheel products:


There are 2 different sets of stencils, the set pictured here matches the Patch Add on, heart in the reveal wheel square add on, and the Easter egg reveal wheel add on.

You can see all the reveal wheel products HERE.


This was a fun card to make and I am going to walk you through my process.

Die cut all the reveal wheel pieces, the window is cut with the Semicircle die add on.

I then stamped one bunny(on the left side) from the Butterfly Kisses stamp set and the second bunny from the Eggstra Amazing Easter set. I also stamped these images on Post It tape and fussy cut to make masks. 
The birdie is from the Open Me set, I opted not to stamp and cute a mask for the bird.

I knew I wanted to ink the background so I also die cut masks from 2" Post It tape with the Honey Bee Stamps Cloud Border die and the grass is die cut from the Lawn Fawn Shadow Box Card Park Add On.


The clouds are inked with Distress Oxide Tumbled Glass ink. I used a very light hand when inking for a nice, soft look. I made sure to avoid inking the bird as I plan to colour it with copic markers later.

I used the negative portion of the grass mask to ink the grassy hills. The die not the same width as the panel so after inking the first portion, I shifted the mask doing my best to line up the blades of grass.
The grass is inked with Distress Oxide in Cracked Pistachio and then set aside to dry.
Once I was sure the panel was dry I moved on to setting the reveal wheel. Sorry I did not take photos of this process. You will take the small circle die cut and attach it to the back of the large wheel with a mini brad. Add small foam squares to the small circle ensuring they do not touch the brad. This will be adhered to the back panel once you line up the wheel with the window on the front panel. Remove the liner paper from squares. Using the embossed lines on the wheel, move the wheel until you can see the embossed lines in the arc then shift slightly up, next move until you see the emboss lines in the notch and shift slightly in. Now line up with the base and push down securing the wheel to the base. 
You can now open brad and remove wheel to complete stamping on it.


Here is where the template would be super handy but I didn't have it. With the template you would place it on the wheel, holding them together with a post it and then stamp through your window. I very, very carefully used my front panel :).


Now it's time to colour the images, I began with the bird and bunnies, I always set aside any copic friendly ink stamped images for a little bit to ensure the ink is dry before colouring. Most times I stamp the images a day or to before I plan to use them.


I also coloured the Easter eggs I stamped on the reveal wheel with copic markers. You can now pop the reveal back on to the base and apply foam adhesive all over the base, ensuring it does not touch the wheel, remove the liner paper, line up the edges and press down. Then it's on to completing the card front.
I chose the green florals paper from the Spring Fling 6x6 Paper Pad, trimmed to 4" x 5 1/4" and adhered to to the card base. 
The reveal wheel "sandwich" is then attached to the card with foam tape and card done!

Lawn Fawn has some very cute "treat box" dies, I've used the Butterfly Treat Box die set:


I die cut the base from a piece of 12x12 Unicorn Mane Really Rainbow Scallops, blooms from the 6x6 Spring Fling paper pad.


Super easy to put together, you fit a couple of Hershey Kisses inside.


I'm a big fan of the Simply Celebrate stamps so was happy to add the Simply Celebrate Spring set to my collection. I coloured this with Copic markers and die cut with the matching die. I then attached the hats with foam adhesive to a piece of card stock I dry embossed with an Altenew stencil. 

I book ended the top and bottom with a piece of blue from the 6x6 Really Rainbow Scallops paper pad.

 The sentiment is from the Simply Sentiments set and I added a scored line under the sentiment to tie it all together.

This final project also used the Simply Celebrate Spring set:


I stamped the butterflies then used a partial die cut technique to remove just the bottom portion around the butterflies.

I coloured the images Copic markers, cut a square of the floral paper from the 6x6 Spring Fling paper pad and rounded the corners. I then inked the white card stock lightly with Distress Oxide Squeezed Lemonade ink so you see just a hint of yellow peeking out from under the floral. The sentiment banner is die cut with the large banner die in the Lawn Fawn Fancy Folded banners set. I then stamped and heat embossed the sentiment from the Lawn Fawn Reveal Wheel Spring Sentiments.

Thanks so much for the taking the time to stop by! 


Wednesday, March 13, 2019

Lawn Fawn Spring Release| Part 1

Hello Scrap Shotz Friends!

The latest Lawn Fawn release is full of cute critters and one very innovative die. Rosie here, I am so excited to have the opportunity to create with some of them this month.

I kept this one simple stamping and die cutting the sign and birdie from the Open Me set. The flower is from the Butterfly Kisses set and tulip from the Oh Gnome! set. All images are coloured with Copic markers.

The wow factor comes when you open the card, I've adhered a shadow box cut from the Shadow box die set:


The Copic coloured birds are from the Open Me set. The trees, grassy hills, patterned paper bird and squirrel are die cut with the Shadow Box Card Park Add On. I've added shading to the squirrel with copic markers. The sentiment is from the Wavy Sayings set.


The star of this card is the Magic Picture Changer die which is very easy to use. Lawn Fawn always does great videos walking you through how to use their new dies, here's a link to the Magic Picture Changer Video.
The turtles and band-aid are from the Get Well Before 'n Afters set. I stamped the images on the front panel, colored with copic markers, then masked the images to ink the background with Distress Oxides in Lucky Clover and Stormy Sky.
 In addition to stamping the turtle on the second layer, I also stamped the rainbow image from the Rain or Shine Before 'n Afters set. Again I copic colored, masked all images and inked the background with Distress Oxide in Cracked Pistachio and Tumbled Glass. The sentiment is from the Wavy Sayings set.
This die is so much fun!


Here's another version using the Year 9 (taco) stamp:


I'll be back Friday with more Lawn Fawn projects, thanks for stopping by!


Monday, March 11, 2019

March Kit & New in the Store

Hello Friends!

The March kit has finally arrived after an extended stay in customs ;). It features the beautiful Simple Stories Vintage Traveler line:

You'll receive 12 patterned papers, 2 12x12 sticker sheets, 8 card stock, chipboard, ephemera, 1 roll of Washi tape, Thickers and a half pack of chipboard frames.

There are also a number of great add ons:


And much more, there are a total of 9 add ons for this kit!

The team will be sharing a closer look at the kit later this week.

Lots of new items in the store as well!

Vicki Boutin Kaleidoscope
These Mixed Media background pages are super cool, all the work is done for you!
Kaleidoscope Stencils


Simple Stories Binder Kits