Monday, October 30, 2017

December Daily Mini Album with Lawn Fawn

Hi there!

This is my fifth year doing a version of a December Daily album.  Obviously, December is a busy time, so to make things simple I usually make my own mini album ahead of time.  The Perfectly Plaid 6x6 paper pack from Lawn Fawn is perfect for a mini album.


To start the album, cut the following pieces of heavy cardstock:

1 - 12" x 6"
3 - 12" x 5.75"
2 - 5.5" x 5.5"pł

Score the 12 x 6 piece at 3" and 2.5" from each end.


Adhere the two 5" x 5" pieces of cardstock to the outer flaps of the 12" x 6" cardstock making sure to centre the piece with an even border around it. This will be the cover.


Score the three 12" x 5.75" pieces at 3" inches from each end. Adhere the three scored and folded pieces together to make a paper chain.


Adhere the centre portion of the paper chain to the centre of the cover. Be sure to use very strong adhesive to do this step (I used wet glue) since this is the part that is the support for the book pages.

You can leave the book like this and it will give you 11 pages (not counting the covers). But, I do all 31 days of December, so I needed more pages. I cut and scored a two more 12" x 5.75" pieces and adhered them to the ends of the paper chain. I cut and folded three 5" x 10" pieces and adhered them to the centre of each panel to make flip up pages. I added more pieces and flip cards to the album until I had 31 pages.

Now that the album is finished, I wall papered every page with the Lawn Fawn paper.

For the cover, I embossed and watercoloured  the poinsettia stamp from The Ton. The pine branches and snowflakes are cut from a Kaisercraft die from my stash. The scalloped circle was cut from with my Silhouette. Swing Thickers from the September Kit  and some alphas from my stash make up the title. The dots are from Liquid Pearls in Gold.

The only page completed in the album is the dedication page. I keep all my Christmas/December Daily supplies in a pizza box and try to use any products that will work for my needs. Here, I used an old Elle Studio journaling card, some more Lawn Fawn paper cut with a Fiskars punch and the number one die cut from an old Spellbinders tag die.  The rest of the pages will be completed as the month progresses.


I have prepared a short video showing how the album looks with all the pages expanded.


I'm pretty happy with this album and can't wait for December to get started!

Thanks for looking!


Friday, October 27, 2017

My Favorite Things: Grateful Stamp

Hello! It's Julia here today and I'm sharing 3 cards and a tag I made using products

First up are 2 cards I made featuring this gorgeous stamp from My Favorite Things.

I started by choosing 2 - 4x6 journaling elements from the Simple Stories Collection Kit. These are perfect for making a quick card. I then used my Tim Holtz Stamping Platform to stamp my image. I wanted to do some layered stamping and the stamp platform made this so easy to get the look I wanted.
 On this card  I first stamped with Cracked Pistachio Distress Oxide ( I spritzed my inked stamp with water before stamping). I cleaned my stamp and let my stamped image dry before stamping it again with Walnut Stain Distress Oxide. I added the coordinating stickers and mounted on my white cardstock base to finish.

On this card, I used the same technique but used  Candied Apple & Black Soot Distress Oxides for the layered stamping. On this card I used the branch stamp from the MFT stamp set and stamped it in Peeled Paint and Fired Brick Distress Oxides before fussy cutting and adhering to my card under the Heart sticker.  

It's never too early to get Christmas cards and tags started - 

I created this tag using a piece of pattern paper from the Simple Stories Cabin Fever Collection. I used Distress Grit-Paste to create my snow with a palette knife and stencil. Next I took the bear, snowman and Snow Days element from the Carta Bella Cabin Fever Chipboard stickers sheet to create my scene. 

The chipboard stcikers from the Carta Bella Cabin Fever collection were just so dang cute that I decided to use up as many of the small ones as I could. The Mosaic die from Tim Holtz/Stampers Anonymous was perfect to create the background for this next card. I added and stamped crazy dog and  assembled my card. This card is too chunky to mail but it be great for a hostess gift this upcoming holiday season.

Thanks for joining me today and I hope you have been inspired by the design team this month.


Products Used:

 
Simple Stories: Cabin Fever Collection Kit
Carta Bella: Cabin Fever Chipboard Stickers


Wednesday, October 25, 2017

Concord and 9th: Many Thanks Turnabout Stamp

Wow wow wow....Concord and 9th continues to hit it out of the park with their innovative stamps and dies! In particular, I am smitten with their turnabout stamp series. (Selfish plug on my part :-) you can see samples of their turnabout stamps on my instagram feed @virginiawong12)

Today is all about showcasing the Many Thanks turnabout stamp. If you have not used a turnabout stamp, you are in for a treat. In addition, this fabulous stamp has fabulous fonts which always makes me gushy inside and the individual stamps are super versatile as well.

For my first card, I chose traditional Christmas colors of red, green and gold. This was paired with an extra green embossed Wreath image also from Concord and 9th Magnolia wreath stamp and die set. Golden berries were added to the wreath with Nuvo drops.


So then I decided to have some fun with the backgrounds. It's nice to add a smile to the card recipient so I added the adorable panda bears from My Favorite Things to the turnabout background. The front panel was created using the individual stamps also included. 


To mix up the colors, I created an autumnal feel for the thank you card by stamping in orange, green, purple and black. It was the perfect backdrop for the Altenew Smile More and Hug Me stamp and die set.


And my last card is a contemporary Christmas card (I have plans to make a few for the Caring Hearts Drive 2017). For the background, I used the traditional colours but turned the turnabout 3 times, leaving some white space to balance the stamped and heat embossed Magnolia wreath. That yeti is a favorite of mine. While it does not photograph well, he is covered in sparkles. The Honeybee stamp and die has been embossed with antique gold twice. The inside sentiment reads, "it's Christmas!"


Thanks for dropping by and I hope I've given you inspiration to craft!

-Virginia

Monday, October 23, 2017

The Ton Stamps - Peony Cluster Mini and Cozy Poinsettia

Hi there!

This month I got to play with stamps and die sets from The Ton.  This is a "new to me" stamp line, but I'm thinking there will be more added to my collection very soon.  The designs are so versatile and the detail is incredible.


I started with a simple card design using the Peony Cluster Mini.


After heat embossing with gold, I used some pink water colour to colour my image.  I'm quite the novice at water colouring, so I find embossing the image first is quite forgiving.

The flowers were then cut with the available die and using foam tape, mounted it on a nest of pink twine. All of that was then placed on top of the strip of pink cardstock which had been stamped repeatedly with the sentiment. To finish it off, I added some strips of washi tape, some rhinestones, and rounded the corners of the card.

Now that my creative muscles were flexed, I set out to play with the Cozy Poinsettia stamp.


The gold embossing and the water colours were still on my desk, so I used those supplies again.  This time, instead of using regular foam adhesive, I used the die to cut out some fun foam.  The larger image was quite warped (even though I had used water colour paper), and gluing the image to the fun foam keeps it nice and flat.  I think it will hold up better in the mail, as well.

I mounted the image on a piece of white cardstock and a piece of patterned paper from the Perfectly Plaid 6x6 pad by Lawn Fawn.  I embellished it with a small strip of washi at the top and some Nuvo Crystal Drops in Pale Gold.

The creative juices were flowing now, so I pulled out my Copics and started colouring.


Again, I'm no expert in Copic colouring and I only have a few markers.  I started by stamping the image with Black Archival Ink. The markers were R05, R27, R89, G24, G17, and YR09.  Then, Stickles were added to the centers.

Using an A2 sized card, I cut approximate,2 3/4 inches off the front of the card base and replaced it with a piece of Hot Off the Press Acetate. To cover the seam, I placed some washi tape. I stamped the sentiment on top of the acetate with Staz On Ink. 

Whew!  Lots of words to explain three pretty simple cards.  But, I just love how they turned out.

Thanks for looking and for any products not linked, please be sure to check out the store.


Friday, October 20, 2017

Cabin Fever 12x12 Layout

Hi! It's Julia here today to share a layout I made using the Simple Stories Cabin Fever Paper Pack & My Favorite Things Die-Namics Stitched Clouds.

The finished layout -

Here is a quick step-by-step: 
Step 1: Inked the edge of a sheet of pattern paper with Forest Moss Distress Ink
Step 2: Spritzed Ground Espresso Distress Marker

Step 3: Drew some loose lines around the edge with my XS Pitt Pen
Step 4: Repeated steps 1-3 with another piece of pattern paper trimmed to 9x9

The Stitched Cloud die cuts worked so well with my photos.

The small stickers that came with the pattern paper pack made great embellishments.


Thanks so much for joining me today! Be sure to check out the Scrap Shotz store for the products used in this projects and so many more great things!


Products used:

Simple Stories Cabin Fever Pack
My Favorite Things Die-namics Stitched Clouds
Distress Ink - Forest Moss, Walnut Stain
Distress Marker - Ground Espresso

Wednesday, October 18, 2017

Concord and 9th Magnolia Wreath Stamp and Die Set

Have you seen the gorgeous Concord and 9th Magnolia Wreath Stamp and Die Set? It's gorgeous and uber versatile. When I purchase a stamp set, I brainstorm as many different ways I can to use the set, especially if the set is "themed" or "seasonal."

At first glance, you may think this set is for the holidays given that many cardmakers are busy making Christmas cards, myself included. Let me show you how I created some fun projects .... and I'm only scratching the surface of my idea list. (I will have more to share on my Instagram feed!)

Below I have a couple of autumnal cards to say thanks for sharing their recent Thanksgiving with my family. I played with my inks, taking advantage of the Hero Arts ombre Butter to Orange dye ink pad. I masked off the darkest colour as I knew I would be adding gold embossing to the base wreath image.


To the top layer of leaves I added Lawn Fawn Cranberry and Lobster dye ink colours to the edges using the "rock and roll" method. What I love about this technique is that each stamped image is unique - no set of leaves are the same as is the current season.


Then I adhered the leaves, added some Nuvo tonic drops for berries and a distress oxide stamped sentiment.

Next I created a couple of contemporary toned Christmas cards using the Distress Oxide inks in Peeled Paint and Lucky Clover. For each I stamped the second layer with VersaMark ink and embossed using some embossing powder to capture the light and sparkle of snow. Again, I used a Distress Oxide Vintage Photo stamped sentiment and finished it with some Jilly Bean twine.

The first card I kept simple and will be mass producing these for the Caring Hearts Drive.


For the second card, I add some Nuvo glitter drops in Rhubarb for the berries. Originally I had stamped the berries on the wreath but with the embossing it was too faint for my liking. And I finished it with a Distress Oxide Candied Apple stamped sentiment.


And a close up of the embossing and berries.


For my last project, I dolled up mini take out cartons with my autumnal coloured and embossed wreath. Each container will contain some apple crisp piping hot from the oven tonight to my friends.


I hope I've inspired you with these projects. There are several more projects brewing in my head which I am excited to share. These cards can be seen in person this weekend at the Scrap Shotz Fall crop.

-Virginia

Monday, October 16, 2017

New Watercolor Fall Page Kit!

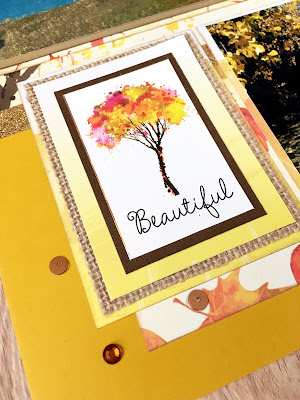
Hello! It's Karla here today with the newest Scrap Shotz Page Kit - Watercolor Fall! Your Fall photos are going to look fabulous on these pages - and the best part - they'll be in your album in no time flat!! That's the beauty of these kits - the measuring, sketch, instructions and supplies are all included, so you can get your favourite photos showcased. Here's a look at the pages you'll be able to make:


The papers and stickers included in the kit are absolutely gorgeous! You'll even have a few extra supplies left over to create some cards if you want. You could even use this kit to document your Thanksgiving, which would be lovely!

The pretty diecut leaves and shiny sequins and gems add texture and glimmer.

I really love the gold glitter paper banners - so pretty!

A burlap layer and some twine are perfect for adding a natural element to the pages.

This sticker is so gorgeous - and you get a whole sheet of designs to use!

The leaves and paper layers add lovely dimension, and the instructions are detailed and tell you exactly where to place your elements!

We even have a video for you to follow along as you make your pages! You can watch HERE or click the video below:


These supplies are included in your kit:
-8 ½ x 11” Kraft Cardstock
-Four 12x12 pieces of patterned paper and a Coordinating Sticker Sheet
-Three 12x12 pieces of cardstock – orange, yellow & brown
- Gold glitter paper strip and Burlap piece
-Diecuts including: 5 leaves, 2 gold glitter banners, journaling label
-Embellishment bag also including: sequins, gems, twine, manila tag
-Completed Layout photo, Sketch, Paper Cutting Directions and Complete Detailed Instructions

You only need your adhesives, ink to sponge on paper edges if desired and I find it helpful to use a grid ruler for positioning.

Thanks so much for stopping by! Be sure to check out the Scrap Shotz Store to find this exclusive, limited edition kit and keep your eyes open for more to come!


Friday, October 13, 2017

October Kit Projects...Take Two

Happy Friday the 13th everyone!! Cathy here with some more projects using the gorgeous Scrap Shotz October Kit, featuring the Beautiful line from Simple Stories! The October Kit is available now and there are add ons to go with it!

I love home decor, especially anything I can put on a wall or display on a shelf. I did this frame up using one of the cut apart sheets from the 12X12 paper pack. There are so many to choose from, but the best part is, you can change up the center card message whenever you like. I did this one using a vertical card but you can also do a horizontal version.


I found this great frame at the thrift store for $1.50 and thought it would be perfect, already had a mat inside it too. I did not like the colour so a bit Dylusions White and Dylusions Black Paint and I have a frame I like.

I layered a 4X6 card on a piece of the patterned paper from the kit so it fit in the center of the mat. I fussy cut some of the flowers out and edged them in black ink. I also edged the frame in black to pull it together. You could use any colour for that part. Added gold hearts to the corners and some of the clear word stickers on the side.

For the flower in the foreground I cut all the petals and edge them in black as well.

More fussy cut flowers attached to the mat around the center card.
I did leave the frame just painted and edged in Distress Ink in Black Soot, that way I can just change out the mat board inside to what ever design and colour I would like.


And for my last project this month I did a 5X5 card and a regular size card. The cut aparts from the Beautiful line are so great for cards. And I love the positive words and encouragement.

The embellishments that come with this kit are so amazing. They all go together so well and there are so many options with this line. This is a 5X5 card and I used one of the cut aparts and just trimmed it down and layered in on squares cut from the paper.

The balloons are in the sticker book and are so adorable and the little tiny bow is one of the stickers too.

This little circle is from the chipboard set and is layered on a cut out piece of matching paper.

My second card is a regular size one. 

I used a striped pattern on the bottom layering piece and then used the matching washi tape to add stripes.

I fussy cut the feathers out of one of the cards and tucked them in behind the sentiment. And added the little bow on the top feather.
The matching floral washi tape is gorgeous. Used it for the background and cut a small banner out of it for the top corner.

Two different circle stickers added to the corner, and you can pop these up too if you want.

Yes the gold does shine that wonderfully!!

Hope you have all had a great week and enjoyed seeing the incredible projects this week from Katelyn and Rosie!! Coming up next week, the Design Team will be showing you projects featuring items available from Scrap Shotz! Stay tuned!