Monday, November 18, 2024

Paige Evans - Adventurous

Hello! Have you had a chance to check out the Adventurous Collection from Paige Evans in the Scrap Shotz shop? Such fun! 

This collection is full of the colour and whimsy that Paige Evans is so great at - no one does patterns like Paige does. While this might be a ‘travel collection’ it is perfect for so much more. The embellishments, sentiments and patterns are also perfect for those everyday adventures in our lives. 

Cut Apart Tags


For my first layout, I reached for the pattern paper with the cut apart tags to create one of my go-to designs. I love how the tags give you a great way to showcase so many of a collection’s patterns and colours, and each tag is like a little anchor so I can load up on embellishments! 

I started with the grid pattern paper (great way to make sure your tags line up straight) and added 8 tags from the cut apart in a grid. Outlining each tag with a white journaling pen and splattering it all with white paint. 


I printed 4 of my photos in 2x3 and, after adding  a couple of layers of pattern paper behind each, dropped them onto each of the top layers of tags. Then I printed the photo of me and the hubby in 3x4 as my feature. This one I backed with a few pattern papers and placed it horizontal on the bottom row of tags. 


I finished the page off tucking in a bunch of the Cardboard Stickers, and Puffy Thickers. The title is from the collection’s Puffy Phrase Stickers. I love using a combo of different fonts. 


Another Grid Go-To 

For my next layout I leaned into another of my go-to designs. With Paige Evans collections you want to show off as many patterns as possible and this one does the trick. 


I started with a dark woodgrain from my stash and splattered it with slightly watered down white acrylic paint. Setting that aside to dry, I grabbed 3 different patterns and cut them down to about 9 by 7 (enough width and height to frame 4 3x4 picture or journal cards). I outlined each layer in white journal pen and then dropped them middle of my background with a different tilt to each to show off each pattern. 


From there, I printed 3 3x4 photos and backed each with a few more patterns (which I also outlined in a white journal pen). I left the 4th spot without a photo and just a pattern paper in 3x4 so I would have a place to anchor some embellishments from  the Cardboard Stickers, and Puffy Thickers and the title from collection’s Puffy Phrase Stickers


Piece It Together 

For my third project with the Adventurous collection, I reached for all the embellishments and papers featuring that fantastic green and blue! 


I love creating a background using fun angled pieces - like a puzzle. The trick for me is to create a puzzle pattern where each piece fits perfectly and then slice a thin amount of each side so the white background shows through. Really make the colours pop! I added a few splatters with white paint and outlined each piece in white journalling pen as well.  


Once I had my background prepped, I dropped a couple photos in the middle (each backed with a few pattern papers first. I played for a bit with some other green and blue embellishes until I landed on these fun tags from the cut apart patterned papers. 

The title is from the collection’s Puffy Phrase Stickers and I tucked in a few of the  Puffy Thickers in as well.  

Such a fun collection - off to play some more! 


Tuesday, October 29, 2024

Halloween and Christmas Cards Facebook Live Demos

 Hello! Card-making season is well underway for the Scrap Shotz team! Rosie and Karla have shared some great techniques in their Facebook Live Demos that include Altenew, Tim Holtz, the Betterpress System, and stamping.

Rosie created these amazing Christmas Cards with the Altenew Regal Wreath Registration Press Plates! You can find all the details in the replay below:


In last week's Live Karla created the coolest Halloween card using Tim Holtz Stampers Anonymous Halloween Stamps, Distress Glaze, Lawn Fawn dies, Lindy's Gang Magicals Powders, and Vicki Boutin Black Foundations Paper. Watch her put it all together on the Live replay!


There is a new Live Demo every Thursday so be sure to mark your calendars and head to the Scrap Shotz Facebook Page so you don't miss any of the tips and tricks and products Karla and Rosie share. Leave a comment during the Live or within 24 hours of the replay being posted to have your name entered into our weekly draw for a Scrap Shotz Prize!!! (* Canadian Residents Only*). Thanks for stopping by 😊

Tuesday, October 22, 2024

49 and Market Rust and Revs


Do you have some of the 49 & Market, Rust and Revs goodies on your scrappy desk from the Scrap Shotz shop? I do and am loving it - such a great collection to document workshop, race car, mechanic shop, home renovations and more. 

Here are a few of my layouts so far. 

Inspired by a Die Cut


As I flipped through the Laser Cut Outs I immediately loved this old timey truck and was so excited to have the perfect jumping off point to document a photo of my grandpa’s old truck. I have so many memories of his truck - including riding in the back down the gravel road in the country [ It was a different time! Pre-seat belts and sun screen ;) ]

I started with the wood grain 12x12 pattern and added some white splatters (by adding a little water to a dollop of white acrylic paint and a cheap paint brush to flick the paint onto the page). Then I printed my photo in black and white at 4x6 and backed it with a few layers of the coordinating pattern papers.

After dropping those down, I had added my truck die cut and then just flipped through the Laser Die Cuts and Die Cute Elements to tuck and layer them all around the photo. A few Rub Ons on the top left and lower right finished off the page. 


 Come on! Isn’t that truck adorable?

Embrace the Pattern Paper 

The 12x12 papers with the collection include a combination of full patterns, like wood grain or plaid, and a number of what I would call pre-designed pages. Pages that have a combination of patterns, some images of the die cuts and generally look like the start of a layout - a great jumping off point. 

The squares of journalling lines and map patterns on the polka dot background here are the pattern paper - not me. I used this area to anchor my photo and all the embellishments. 


I added some additional pattern papers behind my photo for some texture and depth, and the frame die cut to draw the eye. From there, I piled on the Laser Cut and Die Cut Elements behind, beside and in front of the photo. I wanted it to look like a busy, messy mechanic shop so just kept layering on the goodies! 

Think Outside the Box 


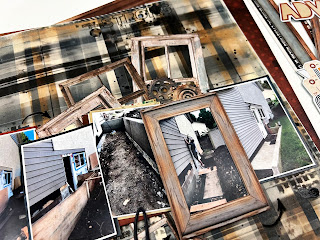
When I see grungy plaid pattern, I think home renovations. While this collection might be more about mechanic things it works for so many other memories. We bought a fixer upper a few years ago so there are a lot of home renovations and any excuse to get photos of these memories on a layout works for me! 

I find for home renovation the photos are not great but the story is - it’s fun to look back and remember what that wall or room looked like. So I went with a number of small 2x3 photos to show the progress of turning an outer wall into a new entry for the mom-in-law suite. I used a frame die cut to highlight my favourite photo of the bunch. 


The die cuts include a bunch of old timey window frames - how perfect - so I used those as embellishments by cascading a few messily down the page behind my highlighted photo. A bunch of the cogs in the Laser Cut Outs and Die Cuts and some word phrases finished off the embellishing around the photos. 


I finished off the page with some Rub Ons clusters on the bottom and top of the page and black splatters (same approach here as the white splatters, a little water with some black acrylic paint and flicked on the page with a paint brush). 

If you are playing with the Rust and Revs we would love to see! Join us over on the Scrap Shotz Facebook Group and post up your creations so we can swoon! 


Wednesday, October 9, 2024

Spellbinders, Vicki Boutin, and so Much More in our Facebook Live Demos!

 Hello! We are all rested and recouperated from the amazing Scrapaganza 2024 Weekend in Calgary. We had such a great time hanging out with you all, thank you for joining us!!! 

Karla and Rosie have been sharing so many great things in their Thursday Facebook Live Demos and we don't want you to miss a thing, so here is a recap of the last few Lives. 

Karla shares a gorgeous layout using 3Quarter Designs Snowflake Season in this Live:


Have you ever wondered what comes in the Spellbinders Handmade Holidays Christmas Kit? Rosie takes you through the contents in this Facebook Live:


And last week Karla shared another super fun and cute layout using products from Vicki Boutin's Bold & Bright Collection, with an exclusive sneek peak of the NEW Scrap Shotz Classic Christmas Mini Album kit featuring Simply Stated Designs!!! 😍


Stop by the Scrap Shotz Facebook Page every Thursday for a new Live Demo with Karla and Rosie to see fun new products and learn all the tips and tricks of the trade. Leave a comment during the live, or on the replay, within 24 hours of it being posted to have your name entered into the weekly draw as well. (*Canadian Residents Only*) We love to hear your ideas and requests, so please let us know if there is a demo you would really like to see. Thanks for stopping by!

Tuesday, September 10, 2024

Thursday Facebook Lives Catch Up!!!


 Hello!!! We have had a great summer of Facebook Live Demos over on our Facebook Page, did you watch them all? Here are the last few for you to catch up on :) We've got everything from Gel Printing to Lawn Fawn's newest releases, along with tons of tips, tricks, and advice to inspire every papercrafter.


Click on each Live above to watch the demos, or head over to the Facebook Page for all of the Lives. Be sure to pop back in every Thursday for the newest Facebook Demo Live. Leave a comment during the live or within 24 hours of it being posted to have your name entered into a draw to win a fun Scrap Shotz prize (*Canadian residents only*). Is there a product or technique you'd like to learn more about, please let us know, we would love to have your requests!!! See you on Thursday :)

Friday, August 30, 2024

49 and Market - Summer Layouts with the Willow Collection

 Hello! I have been back in the scrapbook room now that the summer baseball season has come to a close! I've been using the 49 and Market Willow collection. I'm a big fan of anything green so this was right up my alley!


The greens in this line are perfect for photos taken in the great outdoors. These fishing photos were mounted and popped up on some ephemera layers. The title was created from one of the Vicki Boutin Mixed Media Chipboard Titles. My friend Stacy was doing a demo at the Edmonton Creative Scrapbook Carnival, and challenged me to use it on a layout. This was a perfect place to put it. She did a bit of stamping on it and colored it with distress ink before adding a couple of layers of embossing powder. It's big and bold and I love it!


When we were fishing in Northern Saskatchewan in 2020, this beautiful moth was in our cabin. I had not scrapbooked these photos yet, and this paper was the perfect excuse to get them into the album! I cut out the outer border so that I could use the inside to mount the photos. I like to stretch my patterned paper this way, and you know it's going to be a perfect match. 

Lastly, I created cards, using the ephemera, frames and sentiments from Pinkfresh Studios Foiled Sentiment Pack and from Memory Box Foiled circles. I embellished with pieces from the 49 and Market Laser Cut Elements. These are so perfectly cut out!


Thanks for stopping by! I hope you will check out this great line at Scrapshotz. Links above will take you to the Scrapshotz online store!


Saturday, August 10, 2024

Simple Stories Simple Vintage Meadow Flowers Layouts & Video!

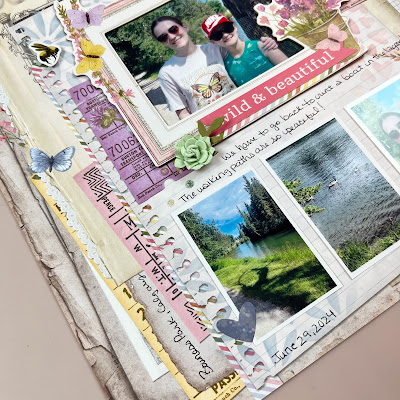
 Hello friends! Karla back today to share the layouts I created in one of the Scrap Shotz' Thursday Live Demos using the beautiful Simple Stories Simple Vintage Meadow Flowers collection. This collection is so lovely for spring or summer with its soft colours and vintage feel, and could work for so many different occasions! You can follow along to see the process to create these layouts, which came together quickly and easily HERE!


I used two 12x12 backgrounds from the collection pack that had preprinted layers already, creating a quick and easy layout base.


I used the chipboard frames for my focal photos, sizing my pictures using my Canon Selphy.


There are so many beautiful stickers on the 12x12 sticker sheet included in the collection pack,plus lots of pretty ephemera and chipboard elements to add dimension.


I used Vicki Boutin stencils and Distress Oxide ink to add some subtle areas of stenciling, using coordinating colours.

\

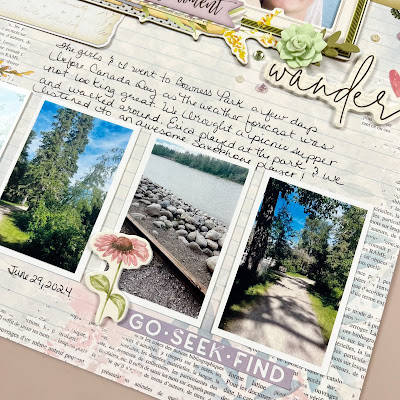
I used the preprinted lines on the background paper to write my journaling directly on the background.


This paper was perfect for our trip to a local park for a nature hike and picnic on Canada Day!


I added some of the foam stickers, pretty 49 & Market flowers and various gems to finish it off!


Be sure to head over to the shop to check out Simple Vintage Meadow Flowers! Happy crafting friends!


Friday, July 26, 2024

Facebook Live July 25! Altenew Simple Colouring and Layering Stencils!

Hello Scrap Shotz Friends!

Rosie here and this past week I was live with a crafty demo showcasing the Altenew Dreamy Daylilies 3D Embossing Folder & Simple Colouring Stencil and Mega Blossom Layering Stencil!

View the video HERE!


I inked the flat side of the embossing folder (side with name of folder printed on it) with Sunray Crisp Dye Ink and then run through my die cut machine with white cardstock. I repeated this 3x to achieve the warm yellow background on this card front. I taped the cardstock to the folder to ensure it didn't shift during the re-inking process.

Next, I coloured the petals and leaves with the coordinating Simple Colouring Stencil using Tickle Pink, Tangerine Dream and Lettuce Celebrate Fresh Dye Inks. These are from the Summer Sunrise and Ocean Dreams Fresh Dye Ink cubes.

The sentiment is gold hot foiled with the Altenew Essential Sentiments Hot Foil Plate and die cut with the coordinating Essential Sentiments Die. The foiled sentiment is also inked with Tangerine Dream Fresh Dye Ink and then adhered with Altenew Instant Dimension Foam Tape. The card is embellished with a handful of Altenew Satin Gold Sequins.


This card front is first embossed with the folder including with a Spellbinders Platinum 6 machine purchase and then inked with the Altenew Mega Blossom Layering Stencil.

The last layer is inked with Tangerine Dream Fresh Dye Ink and then layered with Nuvo Moonstone Glimmer Paste.


You can see the paste layer in this photo, I finished off the card with a hot foiled sentiment and some Satin Gold Sequins.

BONUS CARD!!!!

In the live I gave of teaser of the card I would create with the Floral Radiance Layering Stencil. Here is the completed project!


The stenciling is done on coloured cardstock to begin and ink colours are from the Altenew Summer Sunrise and Ocean Dreams Fresh Dye Ink sets.

The final layer is inked with Altenew Clear Embossing Ink and coated with Altenew Antique Silver Crisp Embossing Powder and heat set.


Sentiment is again popped up with Altenew Instant Dimension Foam Tape and is from the Essential Sentiments Hot Foil Plate and Die Set which you can special order!

Thanks for stopping in!


Monday, July 22, 2024

Thursday Facebook Live Demo: Simple Stories Simple Vintage Meadow Flowers


Hello Scrappy Friends :) I hope you are all doing well. Did you catch Karla's Facebook Live last week? She shared the gorgeous Simple Stories Simple Vintage Meadow Flowers collection. Click the video below to see how beautiful this collection is and create a layout with Karla!

You can join Karla and Rosie every Thursday Live on the Scrap Shotz Facebook Page, for really fun demos full of their favourite tips and tricks for scrapbookers, cardmakers, and papercrafters alike. Come craft and chat with them for a great afternoon, and be sure to leave a comment so we can include your name in the weekly draw *Open to Canadian residents Only*. Is there a specific product or tool you are curious about, please let us know so we can add it to the list of demos to share!!! See you next week.