OK I gotta say... I was getting kind of worried looking at the gallery this week! Everyone must be busy with the end of school and the warm weather because I started thinking noone was scrapping! LOL
But not to worry... there were still some gorgeous creations to choose from!
This is my pick of the week...done by Tanya with the SSZ June kit
I just love how she captured the personality of her little one, and documented a very important childhood phase!
Thanks for dropping by!
Monday, June 29, 2009
Friday, June 26, 2009
Creating a Photo Collage in Photoshop
I'm sure there are several ways to do this but this is what I do and what I have found works best and easiest for me. I've never done a PS tutorial before so I hope my instructions make sense and it's easy to follow. I use Photoshop CS and have never used PSE so I'm hoping you will still be able to figure out these instructions for PSE or any other versions of PS.
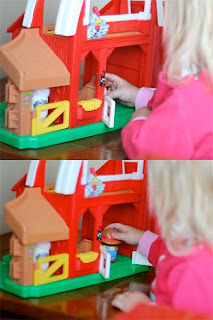
For this example, I am going to create a 4"x6" collage using 2 horizontal photos like this:
1. Open a new document (File -> New). A window will open that will give you a chance to create the size of photo collage that you want. For this example, I'm going to start with a 4"x6" canvas. So beside the width column, there will be a drop down box where you can choose inches. It may come up as inches or pixels or cm, etc. For this sample, we will use inches. Type 4 under the width and 6 under the height.
Make sure the resolution is set to 300 pixels/inch and the colour mode is RGB 8 bit. It doesn't matter what the background colour is as we will be covering it up but mine is usually white.
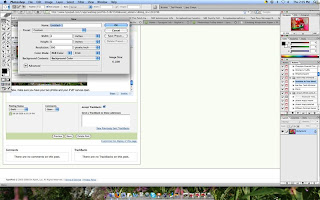
(click for larger view)
2. Click OK and you will see your canvas show up.
3. Open the photos you want to use. I opened 2 horizontal photos.
4. Do any colour adjustments to your photos that you want right now (turn them to black & white, sepia, boost the colour, etc.)
5. On the left hand side of your screen, there is a toolbar with a whole bunch of tools on it. Select the crop tool (it looks like a tilted diamond with a line through it). At the top of the screen, you will see some boxes appear.
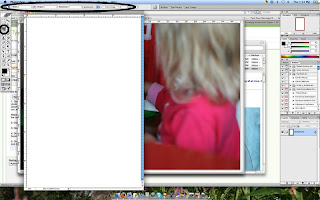
One says "width", one says "height" and one says "resolution". Since we are using 2 horizontal photos, we will be cropping them to 4"x3" so enter 4 as your width, 3 as your height and 300 pixels/inch as your resolution. This sets your crop tool to only crop photos to that size and resolution.
You could easily create a 4"x6' photo collage with four photos and have them all as different sizes, you just have to do the math to figure out what sizes you want them to be and what will fit on the canvas size you select.
So now that you've got your crop tool selected and set to the size you want, select one of your photos.
Click, hold and drag your mouse across the photo. You will see a box appear as you drag that is set to the proportion size you set earlier. Drag your mouse across the photo until you have the portion of the photo you want selected.
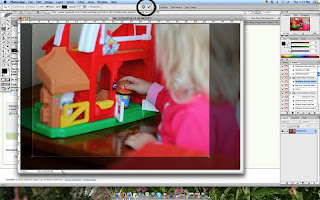
(click for larger view)
Once you let go of your mouse, the box will stay and you can set your mouse inside of the box to move it to whatever portion of the photo you want. Once you know what part of the photo you want to crop, on the top bar of your screen you will see a checkmark (and a circle with a line through it). If you are happy with the crop, select the checkmark (or double click your mouse or hit enter). If you are unhappy with the crop, select the circle with the line through it and re-crop your photo.
Repeat the above step for your second photo.
Now you want to move these two photos to your 4"x6" canvas.
Once again on the side toolbar, select the move tool. It looks like four arrows pointing in different directions.
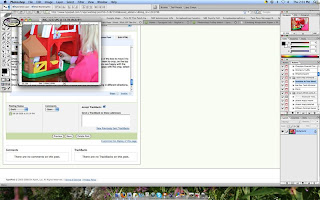
Now, make sure you have your two photos and your 4"x6" canvas open.
Move your canvas over to the side a bit so that you can see part of the photo and your canvas at the same time.
Click on one of the cropped photos and hold. Drag it over to the canvas. Do the same for the other photo as well.
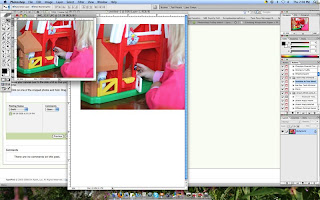
Now, here's a little trick I learned that has helped me immensely with creating perfectly lined up collages.
Under the View menu on the toolbar, go to "show" and select "grid". This creates a grid over your photos.
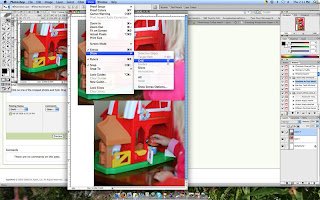
Again, go to the View menu but this time select "snap to" and "guides". This makes it so that when you select your photos to drag them, they will automatically 'snap' to the grid lines, which make it easy to perfectly line up your photos. Sometimes it looks like your photos are perfectly lined up but when you get them printed, there is a tiny white space between the photos and it's not a perfectly lined-up collage. The "snap to grid" tool eliminates this happening.
Continue to drag your photos (by selecting the different layers in your layers palette on the bottom right hand side) until they are lined up exactly where you want them.
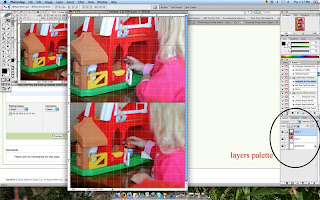
Now you can turn the grid off by going back to the View menu, "show" and clicking on "grid" again.
If you think you might want to make changes to this canvas in the future, you will want to save your canvas now. It will be saved as a .psd file with each layer open so that you can edit it again if you want.
However, before printed, you will need to flatten your image, so under the Layer menu, click on "flatten image". Now you can go ahead and save this as a .jpeg image for printing.
When you go to close your photos, make sure you DO NOT save them as you have adjusted the dimensions of your photos and you still want to save the photo as it was originally.
You can easily create collages of other sizes by following the same steps but using different dimensions. I frequently do this with 8"x10" photos as well as it saves a lot of money when printing photos.
I hope this tutorial was helpful. Please let me know if you have any questions or need help figuring things out.
There are so many great tutorials online that you can easily find by googling. I highly recommend checking out Jessica Sprague's Photoshop Friday Tutorials. They are full of fabulous, easy-to-understand information.
Monday, June 22, 2009
Spotted in the Gallery!
Thursday, June 18, 2009
Summer Lovin'
In just 48 hours, summer will officially arrive! Yee-haw! And you know what that means, right? More flexible schedules, margaritas at 500 pm, heat, sunshine, margaritas at 700 pm (!) - just plain ol' summer lovin'!
If you are like me, you want to scrap even though the lawn chaise is calling your name but you don't want to spend hours inside working on your projects. But a girl's gotta get her fix? So what is she going to do? Well, to make the most of my time scrapping and be outside replenishing my Vitamin D stores, I turn to sketches. Uh huh...fast, efficient and beautiful!
Here are a few of my favorite sketch sites:
Pagemaps
Got Sketch?
Inspired Blueprints
My Sketch World
Little Book of Sketches
What is so great about these sites is that there is something for everyone - they have sketches for layouts and cards...and some have sketches for tags, mini books and more! So these are a few of my favorites; care to share yours?
With sketches, please don't feel pressured to replicate the sketch exactly. Consider the sketch a jumping off point. Take ideas from the sketch and make it your own. Combine elements from several sketches. If you have more or less photos than the original sketch, it doesn't matter. If the card sketch is rectangular and you want to make a square card, go for it! There is no Sketch Police waiting in the background! Feel free to make it your own!
Here is a layout that I did for Valerie Salmon - it has many elements of the original sketch but there are also parts of the layout that were done just for me! And best of all, this layout was created in under an hour! Why? Because the hard part was already done for me!
So you see, it IS possible to have it ALL! :-)
Psst...if you haven't started your Father's Day present yet, don't worry...just pick a sketch and go for it! That's what I am doing! LOL
Tuesday, June 16, 2009
Spotted in the Gallery!
Ok I know I'm late... just thought we'd clear that up right away! LOL This thing called real life sure gets in the way of all my scrappy plans sometimes! So this week I'd like to share one of the FIVE fabulous layouts that were created out of my "Five products Five Scrappers" challenge!
Five secret scrappers were sent an envie filled with five identical products (or groups of product) and told to create a layout while adding ANY of their own products in order to do so. The results werer amazing! You can see all the layouts in the thread HERE
But this is one that I'll share... Rebecca created this one with the products I sent... be sure to check them all out... and maybe throw your name in the hat to play next time!
Wednesday, June 10, 2009
It's quickly approaching!
Do you find that we all talk a lot about Mother's Day more so than Father's Day? Mabye it's just me but I think that's the case sometimes. (sorry dads).
Anyways, the day to celebrate our Dad's is coming up quickly and I'm excited because I get to be with my dad on Father's Day and I haven't had that opportunity in a long time (because we lived far away).
What are some of the things that you like to do with your dad? What are your favorite memories? Do you have similiar qualities/characteristics? Do you live close to one another or far apart? Do you have a great relationship or a not-so-great one?
These are all questions that you could incorporate into journaling for a layout about your dad. Don't you think that would be a great idea?? :) I sure do! In fact, I'm going to do this sometime very soon.
But for now I want to share with you a little something I made for my dear hubby from his children (and me. :)). It's an album that I made from scratch.
- Cut up chipboard,
- covered it with paper,
- adhered photos to some pieces of cardstock (for added support)
- bound it all together with my Bind-it-All
I hope that you are able to spend a wonderful day with your Dad this coming Father's Day amking memories that you last you for years to come.
Sunday, June 7, 2009
Spotted in the Gallery!!!
Great news! Scrapshotz has introduced a new card crew! We had a great bunch of challenges and some fabulous cards from the last crew (thanks again girls!) and we're expecting great things from the new group!
If this is any indication of the great things to come you better get ready to be dazzled! Carolyn came up with this challenge, and created this gorgeous card for inspiration! Make sure you check out her challenge this week!
Thursday, June 4, 2009
I'm Jess for the Day!!
I am pretty pumped today...do ya want to know why? If you've been following this blog you know that basically each Monday Jess gets to pick her favourite layouts or cards from the ever so inspiring SSZ gallery. Well, today she's agreed to let me do it! It took a bit of bribing...okay, a lot of bribing...but I eventually was able to snag the job for a one time deal! Yay me!!
As many of you are aware, SSZ had a fabulous 'Industry Insider' crop on the weekend. The gallery was completely flooded with jaw-dropping creations. There are like 12 pages of beautiful work. Now I didn't say this job would be easy, but I've picked a few of my favourites.
This card from Lorraine is just stunning! The masking and fiber work are gorgeous.
I love all the intricate cutting around the photo of Theresa's layout (kiwicanuck) and what a sweet photo.
Serena grouped her elements in such an interesting way in her layout and I love how she included so many different metals.
There were so many awesome projects to pick from and I'm sure the gallery will continue to be loaded with more amazing layouts and cards from the crop challenges. If you didn't get a chance to join us on the weekend or your time was limited, you can find all the challenges from the design team and our guest card crew here.
Thanks Jess for letting me 'step in your shoes' today!!
Subscribe to:
Posts (Atom)