Friday, March 15, 2019

Lawn Fawn| Spring Release Pt.2

Hello Everyone!

Rosie back with another bunch of Lawn Fawn projects using the latest Lawn Fawn release.

First up is a reveal wheel card. There are a number of new reveal wheel products:


There are 2 different sets of stencils, the set pictured here matches the Patch Add on, heart in the reveal wheel square add on, and the Easter egg reveal wheel add on.

You can see all the reveal wheel products HERE.


This was a fun card to make and I am going to walk you through my process.

Die cut all the reveal wheel pieces, the window is cut with the Semicircle die add on.

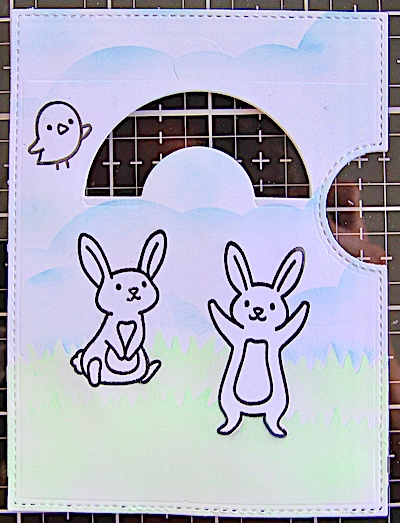
I then stamped one bunny(on the left side) from the Butterfly Kisses stamp set and the second bunny from the Eggstra Amazing Easter set. I also stamped these images on Post It tape and fussy cut to make masks. 
The birdie is from the Open Me set, I opted not to stamp and cute a mask for the bird.

I knew I wanted to ink the background so I also die cut masks from 2" Post It tape with the Honey Bee Stamps Cloud Border die and the grass is die cut from the Lawn Fawn Shadow Box Card Park Add On.


The clouds are inked with Distress Oxide Tumbled Glass ink. I used a very light hand when inking for a nice, soft look. I made sure to avoid inking the bird as I plan to colour it with copic markers later.

I used the negative portion of the grass mask to ink the grassy hills. The die not the same width as the panel so after inking the first portion, I shifted the mask doing my best to line up the blades of grass.
The grass is inked with Distress Oxide in Cracked Pistachio and then set aside to dry.
Once I was sure the panel was dry I moved on to setting the reveal wheel. Sorry I did not take photos of this process. You will take the small circle die cut and attach it to the back of the large wheel with a mini brad. Add small foam squares to the small circle ensuring they do not touch the brad. This will be adhered to the back panel once you line up the wheel with the window on the front panel. Remove the liner paper from squares. Using the embossed lines on the wheel, move the wheel until you can see the embossed lines in the arc then shift slightly up, next move until you see the emboss lines in the notch and shift slightly in. Now line up with the base and push down securing the wheel to the base. 
You can now open brad and remove wheel to complete stamping on it.


Here is where the template would be super handy but I didn't have it. With the template you would place it on the wheel, holding them together with a post it and then stamp through your window. I very, very carefully used my front panel :).


Now it's time to colour the images, I began with the bird and bunnies, I always set aside any copic friendly ink stamped images for a little bit to ensure the ink is dry before colouring. Most times I stamp the images a day or to before I plan to use them.


I also coloured the Easter eggs I stamped on the reveal wheel with copic markers. You can now pop the reveal back on to the base and apply foam adhesive all over the base, ensuring it does not touch the wheel, remove the liner paper, line up the edges and press down. Then it's on to completing the card front.
I chose the green florals paper from the Spring Fling 6x6 Paper Pad, trimmed to 4" x 5 1/4" and adhered to to the card base. 
The reveal wheel "sandwich" is then attached to the card with foam tape and card done!

Lawn Fawn has some very cute "treat box" dies, I've used the Butterfly Treat Box die set:


I die cut the base from a piece of 12x12 Unicorn Mane Really Rainbow Scallops, blooms from the 6x6 Spring Fling paper pad.


Super easy to put together, you fit a couple of Hershey Kisses inside.


I'm a big fan of the Simply Celebrate stamps so was happy to add the Simply Celebrate Spring set to my collection. I coloured this with Copic markers and die cut with the matching die. I then attached the hats with foam adhesive to a piece of card stock I dry embossed with an Altenew stencil. 

I book ended the top and bottom with a piece of blue from the 6x6 Really Rainbow Scallops paper pad.

 The sentiment is from the Simply Sentiments set and I added a scored line under the sentiment to tie it all together.

This final project also used the Simply Celebrate Spring set:


I stamped the butterflies then used a partial die cut technique to remove just the bottom portion around the butterflies.

I coloured the images Copic markers, cut a square of the floral paper from the 6x6 Spring Fling paper pad and rounded the corners. I then inked the white card stock lightly with Distress Oxide Squeezed Lemonade ink so you see just a hint of yellow peeking out from under the floral. The sentiment banner is die cut with the large banner die in the Lawn Fawn Fancy Folded banners set. I then stamped and heat embossed the sentiment from the Lawn Fawn Reveal Wheel Spring Sentiments.

Thanks so much for the taking the time to stop by! 


Wednesday, March 13, 2019

Lawn Fawn Spring Release| Part 1

Hello Scrap Shotz Friends!

The latest Lawn Fawn release is full of cute critters and one very innovative die. Rosie here, I am so excited to have the opportunity to create with some of them this month.

I kept this one simple stamping and die cutting the sign and birdie from the Open Me set. The flower is from the Butterfly Kisses set and tulip from the Oh Gnome! set. All images are coloured with Copic markers.

The wow factor comes when you open the card, I've adhered a shadow box cut from the Shadow box die set:


The Copic coloured birds are from the Open Me set. The trees, grassy hills, patterned paper bird and squirrel are die cut with the Shadow Box Card Park Add On. I've added shading to the squirrel with copic markers. The sentiment is from the Wavy Sayings set.


The star of this card is the Magic Picture Changer die which is very easy to use. Lawn Fawn always does great videos walking you through how to use their new dies, here's a link to the Magic Picture Changer Video.
The turtles and band-aid are from the Get Well Before 'n Afters set. I stamped the images on the front panel, colored with copic markers, then masked the images to ink the background with Distress Oxides in Lucky Clover and Stormy Sky.
 In addition to stamping the turtle on the second layer, I also stamped the rainbow image from the Rain or Shine Before 'n Afters set. Again I copic colored, masked all images and inked the background with Distress Oxide in Cracked Pistachio and Tumbled Glass. The sentiment is from the Wavy Sayings set.
This die is so much fun!


Here's another version using the Year 9 (taco) stamp:


I'll be back Friday with more Lawn Fawn projects, thanks for stopping by!


Monday, March 11, 2019

March Kit & New in the Store

Hello Friends!

The March kit has finally arrived after an extended stay in customs ;). It features the beautiful Simple Stories Vintage Traveler line:

You'll receive 12 patterned papers, 2 12x12 sticker sheets, 8 card stock, chipboard, ephemera, 1 roll of Washi tape, Thickers and a half pack of chipboard frames.

There are also a number of great add ons:


And much more, there are a total of 9 add ons for this kit!

The team will be sharing a closer look at the kit later this week.

Lots of new items in the store as well!

Vicki Boutin Kaleidoscope
These Mixed Media background pages are super cool, all the work is done for you!
Kaleidoscope Stencils


Simple Stories Binder Kits


Thursday, February 28, 2019

More Gerda Steiner!

Hello!

I've been busy with these adorable stamps from Gerda Steiner. This Go Wild! set has the cutest little images of animals.


I die cut leaves with the MFT Leafy Greenery dies in shades of green and adhered them to a green frame mounted on a white card base. I colored the giraffes with Copics in some fun colors and had them sticking their heads out of the jungle with foam squares. The sentiment is cut out with a Hero Arts Antique Frame die.

The second card today is created using the Gerda Steiner Owl Rather Be With You set, also available at the Scrapshotz store. I love this little owl and his expressions! I wanted to change his moods, so gave him some different accessories for these next cards. The first is a Graduation Card.
I cut out an oval from kraft cardstock that I had put through the Big Shot in a Tim Holtz Sizzix 3D Texture Fades - Lumber embossing folder that I got at Scrapshotz. I cut out the owl with his co-ordinating die (available here!) and added a graduation cap embellishment from my stash. The sentiment is cut with a SU die from gold foil cardstock.

The next owl is all set for a birthday. I gave him a party hat from the Tim Holtz Crazy things stamp set and die cut it with the Sizzix die. The background is an older stamp, SU Happy Birthday Greetings.
I mounted him on foam squares and gave his party hat some dimension with spots of Ranger Glossy Accents. I also accented the owl's eyes in all my images with tiny dots of Nuvo Crystal Drops - Ebony Black, available in 2 handy sizes at Scrapshotz. I love the way that small detail brings his face to life.
My last card for today is created with another owl and a stamp/die from the Crazy things set. I used the embossed Lumber panel left over from my earlier card, and stamped the sentiment from the Hero Arts Clear Poly stamp set - To Seize or Not to Seize, available at Scrapshotz. Cheeky and fun!
The ribbon bow was created using the Bow Easy, that can be purchased through Scrapshotz. Like almost anything, just ask and Sandy will order it in for you.

So those are my cards for this week. Thanks for stopping by and I hope that your day is good.

Lorraine


Monday, February 25, 2019

Go Wild! by Gerda Steiner Designs


Hello, fellow paper crafters!!
My name is Lorraine and I am super excited to be back on the Scrapshotz Design Team after a 2-year hiatus. I am pleased to report that I am feeling great and back to creating daily!
Today I want to share with you a couple of cards that I created with the Gerda Steiner Designs - Go Wild! Stamp Set, available at Scrapshotz. The possibilities with these cute images are unlimited!

For the first card, I stamped the images on Prism Bazzill cardstock and colored them with Copic markers. I cut them all out with the coordinating dies, cutting out 2 extra jeeps while I was at it. I layered two die cuts of the jeep and glued them together, then layered the characters inside. The last jeep die cut was adhered to the back of the layers to give it stability.
I die cut a simple layer of light brown textured Bazzill with an oval window inside for my card base. I keep a supply of panels on hand that I have created with various inks. This one is made with Oxide inks and sprayed with water that had some perfect pearls in it, but the shimmer is subtle and hard to see. I mounted my panel with dimensional tape and cut the oxide inked panel to fit inside the oval. My jeep and characters were mounted on top with foam squares where needed and the sentiment was stamped on vellum then adhered to the top of the oval. The enamel dots disguise the glue holding it in place.

My second card using this set is simple. I colored 3 elephants and an explorer on Prism cardstock with Copic markers and cut them out with their dies. I cut out a border of tall grass and a simple frame, then layered my elephants behind them both, stamped the sentiment on top, and mounted the explorer with foam squares. A trio of enamel dots complete the card. The explorer is going to be surprised when he’s run over by the herd! The anticipation of the impending disaster gives this card some action and excitement.
I’m going to continue working with this set and will share more cards in the coming days. I can’t think of a better way to spend a week of subarctic weather than in my craft room.
Happy crafting!
Lorraine
