Tuesday, December 15, 2015

Favorite Finds: Altenew Vintage Roses Stamp and Dies

Every year I am amazed at the innovative and beautiful products that the papercrafting industry designs. This year, I am in LOVE with layered stamps. (Pssst! I cannot get enough of the layered stamps.)

One company that stands out to me for its beautiful layered stamp sets is Altenew. Wow, their stamps are simple but complex; sounds like an oxymoron doesn't it?!!! What I am trying to say is that the images are simple in and of itself  but with the layering of the stamps, every image is stunning, dimensional and complex. 

Take a look at the cards below using the Vintage Roses and die set. You can create 5 different roses of varying sizes, each with 3 or 4 layers of stamping. As well, there 8 different layered leaves that complement the roses, each with 2 or 3 layers of stamping. It is the layered stamping that yields rich realistic stamped images. 

Also, I used the Altenew ink groupings to stamp the images below. What I adore about Altenew's ink sets is that all the colours coordinate perfectly with each other. 
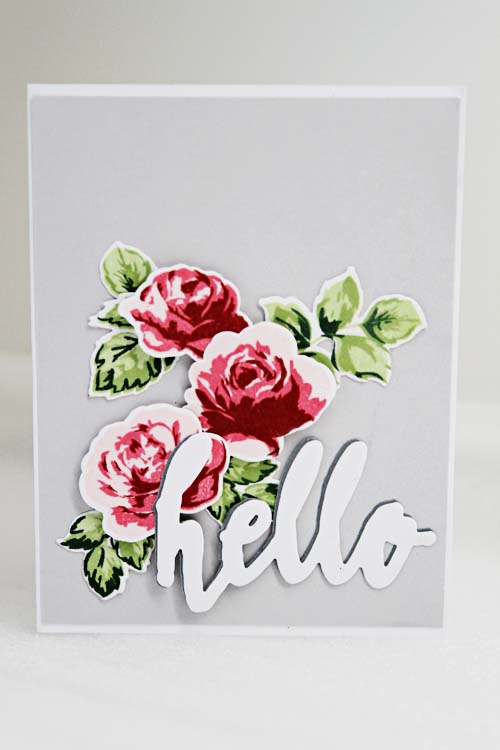

Supplies:  Altenew (Vintage Roses stamp and die set; Halftone Hello stamp and die set; inks); SEI (cardstock and pattern paper)


Supplies: Altenew (Vintage Roses stamp set; inks); Wplus9 (Thank you stamp set); Staples (cardstock)

Monday, December 14, 2015

We're Back....Just in Time for Christmas

Well, hello...it has been a long while since I have posted on the blog. Scrap Shotz has been busy. They presided at the Canadian Scrapbook Carnival held at Spruce Meadows and the hosted their fall crop. In preparation of the Carnival and the crop, I had the opportunity to put some new products through its paces. I'd like to share those projects with you over the next month.

First up, the Minc by Heidi Swapp. That benign rectanglar box makes oh such beautiful things!


I'd like to share with you how I use the Minc. Firstly, the Minc is a laminator. Just pop into your local stationary store and purchase laminating sheets. Place your item between the sheets and insert into the Minc. You may have to adjust the heat so try a tester first.

Secondly, create beautiful tags, pattern paper and accents or your cards and layouts using Heidi Swapp's pre-made tags, labels, paper and accents. Just add the foil of your choice and insert into the Minc. In seconds you will create beauty! The "Smile" accent is a pre-made Heidi Swapp accent.


Next, you can foil your stamps. What??? Yes, you can foil your stamps. I have found bold strong outlined stamps work best. Heat emboss Ranger Sticky Embossing Powder onto an image stamped with the  Ranger Emboss It pad. Once it cools, add foil and insert through the Minc machine and beauty will appear!

Lastly, I use the Minc machine almost exclusively with my dies. Here I create a paper sandwich of cardstock and Stick It. (Stick It is my double sided adhesive of choice with dies.) Die cut an image. Remove the release paper from the Stick It. Add foil and insert through the Minc machine and again beauty will appear!


The Seasons Greetings die by Quietfire and Elizabeth Craft is easily cut and foiled to create that fabulous card!

I hope the Minc is on your Christmas list this year!


Monday, July 20, 2015

Fabulous Find: Spellbinders Shapeabilities In'spire Die Cowboy Stomp


Yeehaw!!! If you are looking to add a western flair to your layouts and cards look no more! The Spellbinders Shapeabilities In'spire Die Cowboy Stomp is a beautiful intricate die that adds pizzazz to any project. Check out the card by Rosie N. combined with the Heartfelt Creations flowers.


Beautigul - thanks Rosie!

Tuesday, June 16, 2015

Fabulous Find: Wendy Vecchi/Studio 490 and DreamWeaver Translucent Embossing Paste

This powerhouse embossing paste has changed my view of embossing. I adore a tone on tone look and I also love a full embossed background to layer accents on. Well, this can be achieved in minutes with the Wendy Vecchi/Studio 490 and/or DreamWeaver Translucent Embossing Paste.

Let me tell you a bit about my experience with this embossing paste. Firstly, it is easy to apply - just use a palette knife and spread a thin coat through a stencil of your choice. I let it air dry for about 5 minutes and then heat the embossing paste. Unlike the Viva Ferro paste, the translucent embossing paste feels somewhat rubbery after being heated and is quite flexible. It also cleans up wonderfully with warm water - no soap for this girl! Then a few passes through my Vagabond with the Wplus9 Happy Trio die and another finished card.


If you would like to take your translucent embossing paste to the next level, sprinkle embossing powder over the translucent embossing paste that you have applied through your stencil. Then heat and add your accents. Here I used the Wplus9 Hand Lettered Hello die, available directly from Sandy.


A quick word...you can skip the silver embossing powder - translucent embossing paste combo by using Wendy Vecchi Silver Embossing Paste, also available directly from Sandy. (Psst...it also comes in Gold Embossing Paste too!)


Monday, June 15, 2015

Fabulous Finds: Elizabeth Craft Design Stickers, Glitter Ritz, Embossing Folders and Copics

Elizabeth Craft Designs has a diverse line of stickers. When I say stickers, I mean beautiful intricate designs that become show pieces for cards, art journals and layouts. See these stunning samples made by Carolyn W. against dry embossed backdrops. These cards showcase the sticker, ultra fine glitter and copics technique.

For our first card, the Darice Assorted Stars Embossing Folder is used to create the card background.


The Darice Floral Butterfly Embossing Folder is showcased on this card along with the Elizabeth Craft Butterfly Label 1 Stickers.


Flowers Label 1 in Black by Elizabeth Craft Designs is showcased on this card.


It may seem early for Christmas but it isn't! Christmas supplies sell out fast. This versatile sticker by Elizabeth Craft Designs shown below is called Birds and Branches. It can be used for Christmas but also as an all occasion or sympathy card.


Don't forget that most Elizabeth Craft Designs stickers can be used twice as much as regular stickers. Why? Because you use the positive AND the negative of the sticker! I personally love them.


Friday, June 12, 2015

Fabulous Fundamental: Watercolours

The look of watercolours is all the rage now...and I understand why! There is a softness that prevails but at the same time, there is intricate texture. I idolize Amy Tan because she makes the watercolour technique look so easy, casual yet at the same time, elegant.

You can achieve the watercolour look in a variety of ways. Connie V. (from our card swap) used watercolours and a Julie Nuttig stamp - you can order it directly through Sandy.

Editted: February 7, 2016: Connie V.'s card image is currently out for publication. (Yeah Connie!)

Don't you love how Lorraine M. achieved this look with Tim Holtz distress inks?


And for the card below, I stamped with my Faber-Castell gelato to achieve the soft watery look of watercolours.


Have I inspired you to dabble with the watercolour look?


Tuesday, June 9, 2015

Fabulous Inspiration: Happy Birthday Cards

I am very sorry it has taken me so long to post cards from Scrap Shotz's recent card swap; however, better late than never!

Whenever I receive cards from the Card Swap, I am wowed by the creativity and then consumed with inspiration. I hope you will feel as energized as I was by these cards!

(Ladies! Sorry if I have the wrong artist for each card - drop me a note and let me know, ok?)

From Connie V. The multi-hued chevron background and the watercoloured look makes this a rather spunky contemporary card!


Ellen Y. made this masculine card. The blue jean blues hint at familiarity, comfort and love for sure but that pop of red really captures the recipient's eye! Love this card!


This card by Rosie N. showcases the My Favorite Things - Die-namics Peek a Boo Squared die. At first glance, you might overlook this uber versatile die but look how Rosie made this die into a shaker card? It is an exciting card for a birthday Boy or Girl!


This card is so simple yet oh so stunning. Using the negative of the star border die to show a bold green makes this card a show stopper! Awesome job Tammy L.!


And this is my card, very much inspired by a Pinterest image I saw. I love the look of gold and silver together and dug into my Teresa Collins sequins from a recent Scrap Shotz monthly kit as well as some star shaped glitter. As well, I have serious love for the Wplus9 Happy Trio dies!


I hope this blog post inspired you to create too - let me know!
