Wednesday, March 26, 2014

Fabulous Find: Elizabeth Craft and Karen Burniston Accordian Dies


Recently Elizabeth Craft and Karen Burniston joined forces to create the uber amazing accordian dies. It really was a match made in Heaven. The dies come in shapes such as the circle, fancy label and oval shape. They are thin, yes thin and are easily stored in a box. These dies are very versatile - you can make cards, mini albums and even banners with the dies. I will show you a few samples over the next few days on the different ways you can use these wonderful dies.

Check out this card by Lorraine from her March reveal which showcases the March 2014 Scrap Shotz monthly kit as well as the Elizabeth Craft and Karen Burniston Accordian Circle die.


Supplies:  Bazzill cardstock; Teresa Collins (pattern paper); Elizabeth Craft/Karen Burniston Accordian Circle Die

Isn't Lorraine's card gorgeous? I have the same die and I could not resist making this Minion card that I saw on Pinterest. It is perfect for an upcoming birthday party that my daughter is attending with a Minion theme!!!!
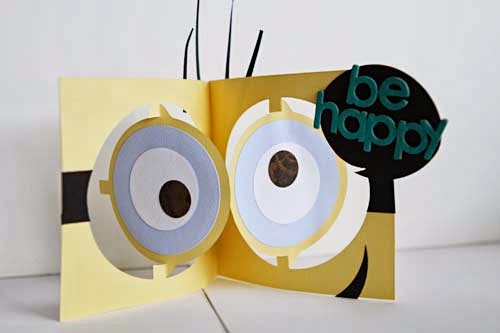


Supplies:  Bazzill cardstock; Elizabeth Craft/Karen Burniston Accordian Circle Die; Spellbinders (circle die); Prima (alphas); Claudine Helmutt (acrylic paint)


Now let me show you Rosie's jaw dropping card using the Elizabeth Craft/Karen Burniston Accordian Oval Die.


Supplies:  Bazzill cardstock; Elizabeth Craft (word and image stickers); Copics

See that "filigree" on the card front? That too is from Elizabeth Craft and is called the Oval Flourish Frame Edge Die Set. And guess what? The die can be adapted to die cut the filigree for the Accordian Circle die too! I know I just had to have it...and so I have it on order right now. It takes your card from beautiful to Wowzers. Just let Sandy know if you would like your own die. 

What cool projects have you tackled with the Elizabeth Craft/Karen Burniston accordian dies?


Tuesday, March 18, 2014

Fabulous Fundamental: Speaking Sequin-tially!!!

As mentioned in this post, I have more to talk about sequins, one of my new favorite accents! The different sizes, colours and sheem make these little gems so versatile.

Rosie created a unique photo frame and border on the layout below. She used Glossy Accents to glue the sequins to the layout. I love the look - it very much draws the viewers eye to the focal photo.


Supplies:  Teresa Collins Memorabilia (pattern paper, chipboard, enamel dots, sticky note, sequins) showcased in the Scrap Shotz Summer 2013 monthly kit

On Rosie's card below, she die cut the "Celebrate" word using this Die-versions Edge die which I will show more samples of in the future too! In the negative space, Rosie adhered sequins to the backing cardstock with Glossy Accents to create a stunning and sparkling card sentiment.


Supplies:  Teresa Collins Memorabilia (pattern paper, sequins) as showcased in the Scrap Shotz Summer 2013 monthly kit; Die-Version Edge Die (Celebrate); Elizabeth Craft Designs (Starform border stickers); Bling on a Roll

Have I inspired you to use your sequins???


Thursday, March 13, 2014

Fabulous Find: Cheery Lynn Chicken Wire Dies

One of the hottest trends now is the look of chicken wire. Being a farm girl, I have always loved the versatility of the chicken wire design. It is angular and circular all at once and works on almost every project and event.

Here is my take on the Cheery Lynn Chicken Wire die. The first is a sympathy card for a dear friend.


Supplies:  Bazzill cardstock, Cheery Lynn dies (chrysanthemum flower, chicken wire), bronze leaves (source unknown); Queen and Company (brads); Memento Ink, Tattered Angels (mist)


Supplies:  Bazzill cardstock; Prima (pattern paper, flowers); Dieversions (oh thank you die); bronze leaves (source unknown); Queen and Company (brads); Cheery Lynn (chicken wire die)

Do you like the chicken wire trend? How have you used chicken wire on your projects? I would love to hear :-)


Tuesday, March 11, 2014

Fabulous Fundamental: Using Sequins

If you have peeked into the March Scrap Shotz Monthly kit, you would have found the Teresa Collins package of sequins. When I first saw the sequins, I was intrigued by the awesome colours and the different sizes and sheen of them. I love the sequins - there just seems to be no end on what you can use them for.

I'd like to share one use: use them in a Shaker Card. Here is mine below...


Supplies:  Bazzill (cardstock); BoBunny (pattern paper); Teresa Collins (sequins); glitter (source unknown); Taylored Expressions (layered banners); stamped sentiment (source unknown)

Inside my star-shaped shaker "box" are sequins and some random star shaped glitter from my daughter's craft box.  You could have also highlighted the polka-dotted motif of the pattern paper by adhering some the sequins but I am going to save that for another post on sequins soon!

The layered sentiment was created using the Taylored Expressions banner die. They are available by order from Sandy. (Like the sequins I have another post scheduled on how to use the layered banner dies from Taylored expressions.)

Thanks for dropping by - I would love to hear how you are using your sequins too!

Friday, February 14, 2014

Happy Valentines Day!


Happy Valentines Day! From everyone here at Scrap Shotz, we are thrilled to make your friendship and hope your day is filled with love, friendship and smiles!

If you are a last minute type of person, here are a couple of easy Valentines that can be completed in under 30 minutes! (Trust me, I did both of these in 30 minutes!)

For the first one, I placed a layered heart on top of a loop of ribbon on a matted piece of pattern paper.  My stamped sentiment was placed on the card and voila I was done!


Here I folded an origami heart, glued in on my cardstock base and stamped my sentiment! Easy peasy!


Can you share your Valentine cards with me?

Thursday, February 13, 2014

Fabulous Find: Sizzix Frame-lits


Have you seen these amazing Frame-lit dies by Sizzix???

You may have seen some Christmas cards I made using the die. The centrepiece varies in shapes like squares, a full circle or even an oval. What makes the Frame-lits SO awesome is with one set of dies you create the cardstock background that is pre-scored AND then you use the remaining dies to cut the coordinating pattern paper pieces with a consistent 0.25" border. It even comes with dies to die cut the accent pieces on the swivel pieces. What used to take me hours and hours to cut, assemble and accent now literally takes me minutes to make.


What I have done here is turned the Frame-lit die on its side, using the mountain and valley folds. On the swivel pieces, I put my sentiment "I *heart* U" - below is a front view.


Here is a top view of the card - there is lots of room to write your thoughts to your special someone too.


I hope you will agree with me that the Frame-lit dies are wonderful versatile and easy to use.


Wednesday, February 12, 2014

Fast and Fabulous: Valentines for Everyone

Valentines Day is just 2 days away - have you made your Valentines? I completely forgot about my daughter's party so she and I whipped up 30 of the Valentines cards below.


In 30 minutes, my daughter and I grabbed my pink and red offcuts and used my wonderful Big Shot to die cut some hearts with my Spellbinders die. Then we used all the left over strips of paper to stamp "Happy Valentines." Probably her favorite part was stapling the sentiment to the heart with my Tim Holtz stapler and gluing it to the card front. Then I corner rounded the edges on one side. We are now taping a heart shaped lollipop to the card. It has been a fun project!

What do you think?
