Thursday, December 31, 2020

The Prettiest Sugar Cookies

I am wrapping up my 2020 December scrapbooking with the prettiest Christmas collection I have ever had the pleasure to get these scrappy hands on. No jokes folks! Scrap Shotz sent me the Prima Marketing Inc, Sugar Cookie Christmas Collection and it is as pretty as it gets - all pinks and crystals and paper florals and touches of gold and just so, so pretty. 

So pretty, in fact, I completely forgot to pause and film an unboxing for you all - apologies! I sat down with a warm beverage and got right to playing with all the beautiful bits and pieces.


For my first layout, I started with a white background which I fancied up with some Tim Holtz, Distress Inks in Frayed Burlap and Victorian Velvet and snowflake stamps. The Snowflake stamp is from the Kaiser Craft, Let it Snow Collection Scrap Shotz sent me last year to play with! Sometimes I stamped fresh from a re-inking and other times I stamped 2 or three times without re-inking to give a little dimension and different shades of colour. 


I ripped the Sugar Sweet Christmas pattern paper from the collection to create a pattern across the middle of my page and tucked in some ripped vellum and cardstock (Bazzil in the colour Fawn) in behind. This design idea gives the eye an anchor for my photo and all the embellishments. 


From there it was all the fun of embellishing using the collection goodies - paper florals, ephemera tucked in and around the photo. Then I used the collection's "Say it in Crystals" and some Moonshine sequins from Picket Fence Studios (included in my package fro Scrap Shotz) to create a confetti look wherever I stamped the snowflakes. I wanted it to look like it was snowing pretty down the page! 


For my second layout, I wanted to focus on the pattern paper of the collection. Splitting my page in two I selected a more neutral pattern for the bottom half and then used 4 different patterns to create an angled design for the top half. I really like how this design showcases 5 of the patters without looking too busy and leaves me lots of pattern paper left over for other layouts too. 


With the middle of my page as my focal point, I added a few layers of tissue paper from my stash (tissue really softens busy patterns behind it and feels Christmas-y to me). I used 2 photos this time and lots of ephemera. Simple cluster and tuck and layer and tilt here and there method. The Santas were so pretty they had to be included and of course who can resist adding some Primar paper florals. The final touch was a few of those "Say it in Crystals" in and about the layering. 

A couple of touches I kept consistent across both layouts: 

  • white splatters to give the impression of falling snow. I have simple bright white Acrylic paint that I add a spritz of water too and then just splatter all messy like. Use a wee baby paintbrush for whispy snow or a bigger paintbrush (maybe the width of a fingernail, for a blizzard. 
  • chose photos that looked good in black and white or were quite dark - something about the simple colour of the photos and that gorgeous pink of the Prima collection makes me happy. 
  • used a gold title, from Heid Swapp, from my stash. I love that the titles are simple, have a  feminine that matches the collection and plays on the sparkle of the Prima crystals and florals too
I am off to make more layouts with this pretty collection. Scrapbooking and binge-watching Big Bang Theory are my New Year Plans. I would say Happy New Year to you all but rather let's go with Happy Goodbye 2020. wink, wink

Cheers!  


Tuesday, December 29, 2020

Storyteller Layout

 I hope everyone is enjoying a lovely, scrappy holiday season. I used the November Kit to make this Vicki Boutin Storyteller Kit layout. The colours drew me to these pictures of my daughter in her first musical production. 


I really wanted to use the stencils in the kit so I chose this dark blue paper for the background and used white modeling paste with the stencil. This makes the design pop and I find the paste is thicker than paint so it doesn't ooze under the stencil. I mix paint into the modeling paste when I don't want to use the white colour. 
The title is made with the Bazzill yellow cardstock in the kit. The word 'fish' is made with the cardboard behind the stencils! I chose fonts I liked and cut out the words using my Silhouette Cameo.
The secondary title uses the Thickers in the kit. The stars are from the puffy sticker pack. I splattered some white gesso around the stars. I always mix some water into the gesso before splattering so it flies off the brush better. 
I captioned the pictures using the Thicker stickers. The writing uses a white pen.
The cute little camera is from the Puffy Stickers pack. 
That's all for now! Have a great week!

Friday, December 25, 2020

Happy Holidays


Wishing everyone a Happy Holiday season!

Best wishes from Sandy and the team!

Tuesday, December 22, 2020

Storyteller - A Touch of Mixed Media


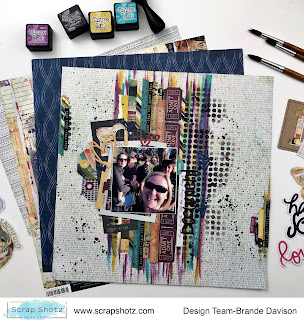
The November Kit was all the things Vicki Boutin, Storyteller and wow is it a beauty. The messy but beautiful, grunge but classy, vintage but fresh look of Vicki's collection never disappoint - and this collection has purple, a unicorn colour in scrapbooking, so I was particularly excited! 

From my kit, so far I have made a Tag Mini Album and now I am venturing into 12x12 layouts (my go-to format) to capture some hiking memories from the summer with the fam-jam.  


I was inspired by the messy lines of some of the patterns in the Storyteller collection so decided to give it a try myself. Not to cover the page, but as a sort of anchor to all the branding strips, washi and bits of paper I thought would look neat all layered together as a horizontal stripe just off center on the page. 

This looks fancier (but in a messy way) than it is - I simply found 3 Distress Inks that matched the collection and dragged the edge of the stamp pad down the page all .. wait for it .. messy like! I didn't wait for the inks to dry as I wanted a little bit of a blend which gave me that touch of green there - perfect for hiking photos! The Distress Ink colours are Peacock Feathers, Seedless Preserve, and Fossilized Amber (my fav!). 


Then, one colour at a time, I rubbed a bit of off each stamp pad onto an acrylic stamp block and adding a spritz of water I used my paint brush to add some splatters of the same colours all around the page. I like using my stamp block for this because it wipes off so easily. 

To finish off the mixed media, I used a simple Tim Holtz repeated circles stencil, Distress Ink in Black Soot and a blending brush / dobber thing to add some random circles on the left and right of the stripes. Just enough that some would show from behind all the embellishments. Although looking at my page now I see you cant see any I added on the left - oh well! 

On the home stretch now, it was all about picking various bits and pieces from the stickers, the chipboards, scraps from past pages, branding strips (the pretty side) and other bits to create a messy layered cluster over the stripes. 


I could not resist adding way too many hearts just above the photo - haven't seen the family in a long while now thanks to COVID-19 so I poured some heart love onto my page for them! (PS is there ever too many hearts on a page? I think not!)


The final touch for me was some random Tim Holt Tiny Attacher Staples and a bit of Nuvo Crystal Dots in black watered down just slightly (again using my acrylic stamp block) and splattered on the page as a final messy and shiny touch. Tip - cover your photo with a scrap piece of paper and be sure to wash your brush right away or it wont be a brush any longer when you splatter with Nuvo.  


Thanks for swinging by! If you try your hand at a 'touch of mixed media' or are playing with the Storyteller collection we would love to see - tag us on Facebook and Instagram! 


Friday, December 18, 2020

Vicki Boutin Storyteller Kit

 Hello scrappy friends. I'm so excited to show you the Vicki Boutin Storyteller mini album and a fun layout. This collection is like mixed media for those of us who struggle with mixed media. Half the work is done for you! These items were all in the November Kit. First up is the scrapbook layout.


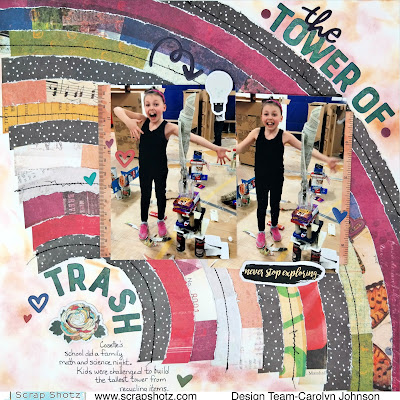
I cut out all the layers of the rainbow paper and distressed their edges. Some of them I flipped over so you see the darker paper on the back. I ran it under my sewing machine to make it look more messy. 


The title is cut out from one of the papers. 

The background is made from random patches of distress inks. The remainder of the layout comes from the thicker stickers and phrases puffy stickers

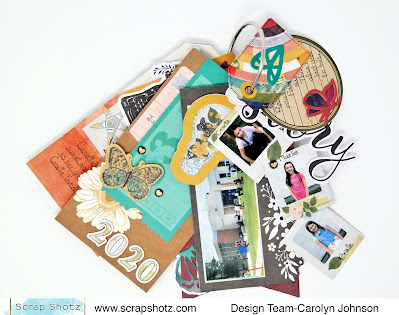
The mini-album comes as a kit. I used all the pieces and added a few more of my own. I couldn't believe how well my pictures fit onto the different components - I just wish I had a few more from this event! I decided to document my daughter's drive-by grade 4 farewell. Here are two views of what the album looks like altogether. 


These are the smaller components that are all pre-made except for the tag on the right.


Here are the components where I added pictures.


Here are the backs of the previous components that I made. I didn't want to look at cardboard when the elements were flipped over. 


This is my favourite piece where I layered paper, thickers and puffy stickers.


This is the back of the previous component.


These are the elements where I did my journaling. The typewriter opens to blank page. 


That's all for now! Have a wonderful holiday season and I'll be back with more after the holidays.

Sunday, December 13, 2020

Echo Park - Let's Lumberjack

I am sharing a layout created with the patterns and buffalo plaid from the Echo Park "Let's Lumberjack" collection.

 
The red and black in the collection was perfect for these family photos. The plaid gives the layout a great fall "sweater weather" feel. I cut the title from patterned paper with the Pinkfresh Adore Alpha set. If you are looking for a particular item like this, Sandy will do her best to source it for you. The embellishments were die cut from scraps and accented with a white Gelly Roll pen. I used foam tape under some of the photos and did some creative gluing to give the accents a bit of dimension.

Thanks for looking in! Have a great week!

Friday, December 11, 2020

All Kinds Of Crafty Fun!!

 Hello friends! Karla back today with an assortment of crafty projects using lots of goodies from the Scrap Shotz Store! If you got to check out the Scrap Shotz Facebook Live video yesterday, you will have seen these up close!! First up I'm sharing the brand new We R Memory Keepers Explosion Board. This is soooo cool and really well designed. I love those exploding boxes you see decorated with photos or just fun ephemera, and this makes it super quick and easy to create one or many in lots of different sizes using papers from 6x6 to 12x12. Why yes, this would be a great way to use up those pretty pieces of paper we've been hoarding - or maybe that's just me! 😉 


The Explosion Board creates boxes in different sizes and styles, some with pockets, some with sides, some with hearts you can create with the included stencils, as well as lids to fit each size. You can layer these as I did below for an exploding box or create fun gift boxes individually! I used some of the fun Simple Stories Winter Cottage products to decorate the insides and lid of this pretty box. It would make a beautiful gift personalized with photos for a special friend or family member! 


Be sure to check out the LIVE video linked below to see how quick and easy it is to add an extra layer into the box and decorate it! I even give you a little peek at each layer!


But wait! There's more!! The Explosion Board also creates gate fold cards and squash cards! I created an adorable little squash card below. It really is the coolest thing! By scoring three pieces of cardstock and attaching them you create a fun card that pops open. You can again add images, stamps, photos and then decorate the front to make a special keepsake card for any occasion!


I used one of the new Mama Elephant Flurry Frame Creative Cuts Dies to cut a pretty pink snowflake out of foil cardstock. The dotted detail is amazing! I layered it on my front cover and then added a foliage sticker from the Winter Cottage Sticker Book, a puffy snowflake from the Puffy Sticker Pack and a chipboard house and heart from the Chipboard Sticker Sheet. Some ribbon sandwiched between the squash card and the covers ties the ends to keep it closed.


Here's a look at the inside of the card when it's fully opened. I used papers and 2x2 square cut-aparts from the Winter Cottage Collection Pack as well as some sentiment stickers from the sticker book.


Lastly, I demoed this adorable card in the Facebook Live (linked below) using the awesome MFT Outside The Box die set and the new Snow Drifts Dienamics. With these sets you can create a box card so quickly! Whomever you give it to is going to be amazed!! I added some of the Winter Cottage paper and Paper Rose Snuggly Christmas paper to decorate the box using the dies included with the main set.


These adorable birds from the MFT Winter Songbird stamps are so perfect to add to a card like this! I really love the included greenery with the set. We actually made this into a winter birthday card in the Live, so be sure to check that out! I used Copic markers to colour in the images and then added detail with a White and Stardust Gelly Roll pens - new in the shop. I used some of the Nuvo Dream Drops to add shimmer to the snow drifts and add iridescent drops to embellish the card! There are many different sentiments included with this set - I know you'll love it!


You can see these projects close up, including a demo on how to make the box card, in the Scrap Shotz Facebook Live video. Click the link or watch below! There are many fun tutorials in our video links on Facebook, so be sure to check them out HERE!


PS, be sure to check out the awesome Simple Stories Winter Farmhouse Bundle featured in the LIVE!! It's awesome!


Thanks so much for stopping by! If you'd like to share what you're working on, we'd love to see you in the Scrap Shotz Paper Crafting Facebook Group! I'll be live again next Thursday, December 17th @ 3 pm MST (my regular time) and then for the weeks of Christmas and New Years I will be on Wednesday, December 23 @ 1 pm MST and Wednesday December 30th @ 1 pm MST. Set your reminders and let's get crafty! Don't forget to check out the Scrap Shotz Store - you can find everything NEW in the store here


Wednesday, December 9, 2020

Creating a December Album with Simple Stories

 Hello friends! Karla back today with a look at my December album using the Winter Cottage collection and the Simple Stories Flipbook from the Scrap Shotz shop! I must admit, I always have great intentions of doing a December album each year, but... well you know... time flies! However, I'm so excited to be on track for really completing it this year! I know several things have to be in place for me to get this done - it needs to be easy, it needs to be fun, I need to have access to photos and time! Well I'm probably going to burn the midnight oil, but that's ok - I'm already so happy this project is coming together! First, I started out by putting together my foundations pages (see the live video link below showing each of those pages!). I chose to use the Simple Stories Flipbook with the awesome divided page protectors that come with it (and I have an extra multipack) and I'm using a collection of items that mix and match perfectly. There are lots of collection packs available and you could easily adapt this to any season!


I have my Canon Selphy printer to quickly and easily print off exactly the photos I need, and I'm able to collage them quickly to the size I need with the Project Life App! I love the assortment of papers and cut apart sheets plus the awesome 12x12 Sticker Sheet that come in the Winter Cottage Collection Pack! I cut apart those lovely 3x4, 4x6 and tag cut aparts to have to add into the pockets, and I still have tons of paper left over!


The Sticker Book has an amazing amount of images, sentiments, tabs and more that I used on my pages and photos. I'll be using some of these in my planner and on scrapbook pages as well! The Cottage Puffy Stickers and Chipboard Stickers are wonderful to embellish along with the coordinating Washi Tape and Foam Stickers. I pulled out some of the Journaling Bits and Pieces diecut ephemera to add some handwritten notes and used some pretty Baker's Twine from the Shop for my tags. 


You can see each page up close and find out how I put together days 1-6 in this video HERE or watch below!


If you missed the FB Live where I put together the foundation pages, you can find that HERE or click the video below. 


Thanks so much for stopping by today! You'll be able to see more of my December pages on Instagram over the next month!! Be sure to check out the fun new products in the Scrap Shotz store and share what you've been working on in our Scrap Shotz Papercrafting Facebook Group!! I'll be LIVE on the FB page on Thursday at 3 pm MST again - so mark your calendars, and have an amazing week.