Wednesday, October 30, 2019

Home Again by Carta Bella - October Scrapshotz Kit

The colours of this kit are amazing. I loved the blue and the minty greens with all the white florals. Comfortable, cozy and homey. On this first layout, I showcased a black and white photo that co-ordinates really well with the patterns. A chipboard banner from the collection and a floral sticker along with a strip of washi balances the page.
This panoramic photo showcases our home and our family at play, I love that we can entertain ourselves at home! The pattern on the background paper is fun and playful and the large van sticker is  popped up and the mini florals are fussy cut and embellished with glossy accents.

To enhance the wooden embellishments, I used a white gel pen to highlight the blooms and a bit of gold Nuvo Midas touch. They took the gel really well and really stand out on my project.
This is the wall hanging that I created with a photo of my granddaughter for my entrance hall. I covered an ecterera tag with patterned paper and double matted the photo on it. The gold thickers and the wooden flowers from the kit are the perfect accent.
This layout was inspired by the Creative Scrapbooker Sketchy Challenge for October 2019. I loved the circular frames on the patterned paper, but some of the sayings weren't what I needed for this page, so I fussy cut some of the blank frames and used them for my journaling. The beautiful solid coloured paper included with the kit was the perfect backdrop. Once again, the gold thickers were great for the title.

Thanks for having a look at my kit projects.

Sunday, October 27, 2019

Simple Stories Country Christmas Binder Kit with Video

Hello! Karla back today with a look at the gorgeous Simple Stories Country Christmas Binder Kit that is now available at Scrap Shotz!! You're going to love this binder whether you are doing a December Daily type album, documenting your holidays or giving it as a gift. You'll receive all the supplies needed to create it and simply use your own adhesives, trimmer and ink for edging if desired.

You can see the video here where you'll get a look at each page!


Thanks so much for stopping by! Be sure to head over to the Scrap Shotz Store to find this beautiful binder kit while supplies last. Have a wonderful weekend friends!


Saturday, October 26, 2019

Simple Stories Holly Jolly Card Kit and Video

Hello friends! Karla back today with a look at the adorable Simple Stories Holly Jolly Card Kit available at the Scrap Shotz Store. This is a wonderful kit to pull out if you're on the road, at a crop, or simply snuggled up at home with some Christmas music on and a favourite drink! The kit makes 8 beautiful cards with all the product supplied to create them - and you'll have some left overs to use on more cards, scrapbook layouts or to decorate your gifts and envelopes - yay!!


You'll get full instructions, papers, stickers and chipboard to create all these!


Here's a look at the video where you can get a closeup look at each of these wonderful cards-


Thanks so much for stopping by! Be sure to head over to the Scrap Shotz store to pick up your kit full of fun - as these will only be available while supplies last. Have an amazing week friends!


Friday, October 25, 2019

Four Carta Bella Christmas Market Scrapbook Layouts

Carolyn back again with some Christmas memories to share. We had a huge snow storm in Winnipeg recently so it really wasn't a stretch to be scrapping Christmas layouts. I was so excited to receive the Carta Bella Christmas Market Collection. It is great for cards and layouts and coordinates with collections from previous years. I decided to start by making some long overdue layouts.

Layout #1 - Christmas Memories

I love how this layout turned out. All the tags are cut out from one of the 12 x 12 papers. At first I wanted the tags to all face outward but then the pictures along the bottom would've been upside down. I decided it was more important that they faced upward. The flowers are fussy cut from another paper in the collection. The final touches are pieces of chipboard and a ribbon from my stash.

Layout #2 - Official Christmas Cookie Taste Tester

I found this cut file in the Silhouette Store. I love big titles that have the font style and sizes already selected. I cut the title out of several different papers and glued it to a plain white paper. The edges I scuffed up and tore to add some more interest. The gingerbread man is cardstock from the June kit. I added some stickers from the Carta Bella kit and enamel dots around the page to finish it off.

Layout #3 - Tree Time

This layout came together one piece at a time. I had no vision beforehand. I chose two pictures that I liked and built the page around them. I liked the paper with the trees on it so I used it on the outside and put a less distracting paper in the middle to build the layout. I found another cut file in the Silhouette Store with the trees that had some snow on them. Decorating the trees was the best part. I used puffy stickers and enamel dots. I cut out some "snow" to match the trees and placed it under my title which I cut from a font I liked. Then I filled in the rest of the page with a variety of pieces from the ephemera pack.

Layout #4 - Snow Much Fun

Here is the sketch:
Image may contain: text
This layout came about because I used the October Creative Scrapbooker Magazine sketch as inspiration. The layout of the circles made me think of the cut file from Just Nick that looks like a frosted windowpane. I used a piece of white Bazzill cardstock from the June kit to cut out the shape. I added some chipboard snowflakes to the centers of the patterns. A variety of cardstock, puffy and chipboard stickers finished it off.

Thanks for stopping by! Have a great weekend!

Thursday, October 24, 2019

Kaisercraft "Let It Snow" Christmas Cards


I picked up a few sheets of this beautiful paper and made an abundance of Christmas cards, with NO STAMPING!  Just a bunch of layers of the beautiful foiled papers with some silver foil cardstock and the sentiments from the All is Calm sheet and from the Cardstock Die Cuts. The only other supplies I added were some ribbon, twine, a few stickles and a lot of foam dots. Here are my cards.


The entire collection is amazing. It sparkles and shines and makes a very elegant Christmas card collection. Get yours at Scrapshotz today! Here's a link for you! Kaisercraft Let It Snow

Thanks for looking. Maybe you'll be getting one of these in the mail!!! πŸŽ„ πŸ€ΆπŸŽ… 


Family Quilt - Carta Bella Title Page

Hello! Brande here showcasing the October Scrapbook Kit inspired by the amazing Carta Bella, Home Again collection.

When this Carta Bella inspired kit showed up on my doorstep this month I knew I finally had the goodies I needed to get to that family heritage album I have been thinking about! I have all these amazing black and white photos of my grandparents from their lives before I was around or even before my father (their son) was around and I had planned to document them all in mini-album - now in progress! 

In my next blog post, I will have lots of album pages to show you but I thought I would reserve this post to show you the title page I made for the album that I am just so excited about... 

When I think of my grandparents I think of quilts, homemade food, the country, nothing too fussy, down to earth, smell of Old Spice and Lavender! So as I started to think about a title page for this album I wondered if I could create something resembling a quilt - and I think it worked! 


I think this title page looks pretty fancy (if I do say so myself), I am here to admit it was so super easy to make! We are talking just 3 steps and some embellishment fun. No joke. 

Step 1: select a bunch of different pattern papers (or scraps) from your kit and cut them into 2x2 squares. You could scale this size up or down if you want smaller or bigger squares and definitely go a little larger if you are working with a 12x12 album. I am working with a 6x8 album so I went with 2x2.


Step 2: create a tight grid on your background paper with the squares. You could do a diagonal design like I did or keep it all absolutely square - both would look amazing. I am awful at getting things in a straight line, so I tend to tilt all things a little to avoid trying. Having said that I still needed a ruler - I drew straight lines on the page at an angle, glued on the squares and then erased the pencil lines you could between see in the grid squares. 


Step 3: sew lines down the square pattern papers to create that grid-like look or what I think looks likes a quilt. We just bought a sewing machine earlier this year, in its absence or if you do not have one - consider creating a delicate dashed line with a journaling pen to mimic the stitching. This honestly looks so great as well! 


Step 4: embellish! I didn't want to take too much away from the quilt design so I kept my embellishments really simple. Some alphas, a couple of stickers and a few enamel dots from the kit - done! 


If you give a quilt design a go on your projects, we would love to see it! Tag us on social media #scrapshotz so we can leave our love for your crafty-ness.

Thanks for stopping by and happy crafting! 


Monday, October 21, 2019

Narly Jelly Christmas Card Fun!

Hello friends! It's Karla back today with two fun Christmas cards using some of the adorable new Lawn Fawn stamp sets, Snow Day Remix Paper Pad and some fabulous Distress Oxide Sprays that I absolutely love!! For these two cards I started out by colouring images from the Winter Narwhal mini stamp set, Ho-Ho-Holidays (presents/sack), Christmas Fishes (jellyfish) along with an older set Simply Celebrate Winter (ornaments and presents in row).


I sprayed some white cardstock with 3 colours from the Summer Distress Oxide Release - Salty Ocean, Blueprint Sketch and Seedless Preserves to coordinate with my coloured images. I love the process of creating these backgrounds - really no two will be the same! I usually mist my paper lightly with water first and then apply two colours, partially dry, spray a third colour on my craft mat, dip, dry, mist with water.... It's not really a science, but more of an experiment! I used a sentiment from the Winter Narwhal stamp set to emboss with Emerald Creek Glacier White Embossing Powder, one of my fav detail white powders!! and popped up some of the images with foam dots for dimension.


Inside, I stamped a sentiment and music notes from the Christmas Fishes stamp set using Tim Holtz Archival Mini Inks.


For the second card I cut another border from the Lawn Fawn Snow Day Remix paper pad using a stitched border die. I popped it up with foam tape around my misted background, which I had added stenciled bubbles to, using a Southern Ridge Trading Company Soda Fizz stencil and my new fav Tonic-Nuvo Moonstone Glitter Glimmer Paste. I love the shimmery, semi-translucent effect you get with this paste πŸ’œ I added some gel pen details to the stamped images and included a word bubble from the older Say What Christmas Critters stamp set. 


I filled Santa's sleigh, from Ho-Ho-Holidays with presents from both that set and the Simply Celebrate Winter set. You can see how easily you can combine your Lawn Fawn stamp sets - they all work together so wonderfully!


I switched up the sentiments on this card, using the Winter Narwhal greeting inside.


Thanks so much for stopping by! Be sure to head over to the Scrap Shotz store to see what fun you can find in the shop!! I hope you have a fabulous week - whether you're starting your Christmas cards yet or not πŸ˜œπŸŽ„πŸŽ…


Thursday, October 17, 2019

Happy October!

Hello Scrap Shotz Friends!

We are now officially half way through October, Halloween is fast approaching with Christmas right on its heels! Our DT member Karla has been sharing some wonderful Halloween projects on her blog in her 13 Days of Halloween series, here's the link if you have not yet seen it :). If you fall in love with something you love please contact Scrap Shotz HERE to let us know what you'd like us to order for you!

I have been playing with a variety of products and I get to share the end results with you here😊.


This card was inspired by the Lawn Fawn Gift Tag Snow Globe die set, it works so beautifully with the smaller Lawn Fawn images from this season and past season stamp sets. This card utilizes the Lawn Fawn Christmas Fishes stamp and die. I used glitter card stock and cherry wood card stock from my stash for the outer globe elements. 

I embossed the white card stock with a WRMK embossing folder and then brushed with Perfect Pearls in perfect pearl to add shine.


Some Studio Katia Clear Drops add more shine to the card.
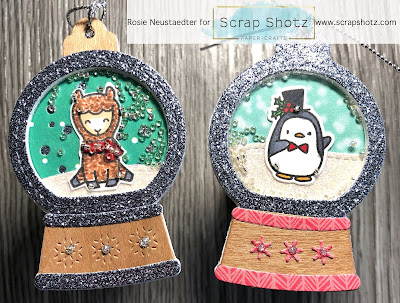
Next are a couple of shaker tags all on their own...


Here I have use the Lawn Fawn Say What? Christmas Critters for the llama and the Mama Elephant Little Penguin Agenda combined with the Lawn Fawn Snow Globe Gift tag die


Here I have created an 'eclipse card'. I began by stamping the Altenew Modern Pointsettia stamp and heat embossing with Silver detail embossing powder.
After letting the embossing cool I die cut 'Merry Christmas' with a Tonic Studios die. I cut 4 more sentiments from navy card stock and then layered them over each other and under the embossed die cut to create the "eclipse" effect.
I added some red glitter with Stickles Christmas Red after adhering the stacked sentiment.


I will be teaching a Christmas Card Class for Scrap Shotz during the Fall Pop Up Shop and Crop, these are the cards you will create:


An easy watercolour card, 2 floating die cut cards and an 'eclipse'card...all for $25, CARD CLASS HERE click the preceding link to purchase your card class.