Friday, September 28, 2018

Owls, Dogs and Unicorns: Gerda Steiner Designs

Hello All!

Brand new in the Scrap Shotz store are Gerda Steiner stamps and I have a few projects to share with you today.


I coloured these cute guys and the tree branches with Copic markers after stamping the images on copic friendly paper with Gina K Amalgam black ink. This ink is great because it stamps dark and crisp and is safe for both alcohol markers and watercoloring. 

Images are die cut with the matching dies which come already cut apart on a magnetic sheet so quick and easy to get started die cutting. I added googly eyes to one of the owls and layered it over foiled card stock. I created this card stock piece with Decofoil Transfer Gel, Concord & 9th Retro Petals Turnabout Stencil and Gina K Fancy Foils.


This bulldog is super cute! I was inspired to colour him with copic markers by this Sandy Allnock card.


I stamped various images from the set randomly in Versamark embossing ink and then heat embossed with white embossing powder. I chose a rainbow colour palette of Distress Oxide inks and inked it in rainbow colour order. I then spritzed the panel with water to get the oxidized effect.


The sentiment is stamped on vellum paper with Versafine Black Onyx ink and then heat embossed with clear embossing powder.

Here's a good look at the star of the show :) !

These stamps are super cute and fun and popular! A number sold out at the Carnival last weekend so if the one you want is currently sold out, just contact Sandy directly to order it in for you.

Thanks for stopping by!


Monday, September 24, 2018

Product Reveal -2

Hello everyone!
Today, I am happy to share my second project reveal posting. 
I made four projects with so adorable stamp and die sets.
I used Winter Skies set from Lawn Fawn and Hippos on Holiday set from Hello Blue Bird.

My First project is random stamping background card.


For my own background, I randomly stamped trees and snowflakes with London Fog color ink from Memento. 


And then I partly coloured them with Copic markers. 


For the bear couple, I coloured with Kuretake watercolours.
I adhere the bears with double-sided foam tape and added sequins from Peacock Feathers Sequin Mix from Neat and Tangled.


My Second Project is A inside shadow box card.
This is cover of the card.


And this is the inside the card.


For create this card, I first made the night sky background.
I blended a white card stock with Chipped sapphire and Seedless preserves Distress ink using mini blending tools.


I choose 8 1/2" x 11" winter theme card stock and cut in half so I have two pieces at 5 1/2" x 8 1/2". I scored the first piece right down the middle and score 4 1/4". And cut off one side 1/2". I scored the second piece at 1/2" and 4 1/4" and 4 3/4" and cut little bit the edge.  Die cut hole using scallop oval die.


Taping and made shadow box and adhere the night sky background.


I adhere the cute animal couple and trees.


And added some snowflakes.


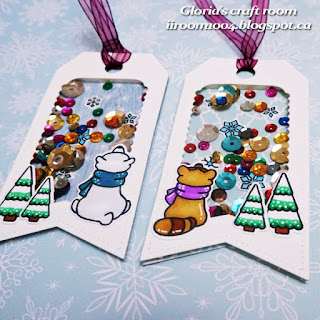
My third projects are shaker tag set.


For the frond part, I die cut with two different size tag set on a white card stock. And I die cut the background papers and acetate. The cut acetate adhere under the white cut tag with double sided tape and adhere under the acetate with double sided foam tape.  


Flip the tag frame over and added sequins on top of the acetate window. I adhere some snowflakes on the background paper and adhere the background paper and the acetate.
  

Today's last project is a beach card using  Hippos on Holiday set.


To create this card, first I made the beach background with Salty ocean , cracked pistachio and fossilized amber Distress oxide inks on a watercolour paper  using mini blending tools. And added some water splatters all over the panel.


I stamped the cute images on a white card stock and die cut the images. I coloured them with Copic markers and added some white dots with white gel pen.


I brushed the hippos with Wink of Stella and added some glossy accents on the beach ball and glass. I mounted all elements as shown a top-folded card base using double - sided tape and foam tape.


Thanks so much for stopping by and have a wonderful day!


Wednesday, September 19, 2018

Product Reveal

Hello everyone!
Today, I happy to share three projects with so adorable stamp and die sets.
I used Whiner Skies set from Lawn Fawn and Hippos on Holiday set from Hello Blue Bird.
Both sets are holiday themes, but one set is the summer season and another set is in the winter theme. 

My First Project is a Pop -up box card.


To create this card First, I created the box. I Searched Box in a card template and scored all lines the cut some lines with light blue card stock. 
I stamped the cute images on the white card stock , colored with Copic markers. And die cut using Hippos on Holiday die set.


My second project is a watercoloring card using Winter Skies stamp set from Lawn Fawn.


One of my favourite technique is 'watercoloring'. Especially, I think watercolouring is a very wonderful material to make a beautiful night sky.


I watercoloured the night scene with Kuretake watercolors.
And then stamped the Santa and snow flakes with embossing ink on the watercoloured panel, and white heat embossed them. I added some white dots with white Gelly Roll pen.


I stamped the bear couple and trees on a watercolor paper, colored with Kuretake watercolors  and die cut the images with Winter Skies die set.

Today's last project is a layout.
I looked for a picture that fit the Hippos on Holiday stamp set.


I stamped the hoppos on Holiday stamp set on a watercolor paper, colored with Kuretake water colors and die cut the Hippos on Holiday die set.


I made this layout using this month Scrap Shotz challenge' sketch.

Here's a look at this month's sketch. 
I think this sketch is so beautiful!
Get a chance to win a gift card by sharing it with us using #sszchallenge on Instagram or sharing on our Facebook page. Check out the full details HERE. I can't wait to see what you come up with!


I hope you enjoy the post today.
Thank you so much for stopping by and have a wonderful day!
Happy crafting! 


Tuesday, September 18, 2018

NEW Product - Kaisercraft Sparkle Collection!

Hi friends! Karla here today to share the amazing Kaisercraft Sparkle collection with you!! This is a beautiful Christmas collection with gorgeous colours and tons of sparkle with a rose gold foil element. You are going to love it!! So, of course, we wanted to give you a close up look at so many wonderful goodies in this collection that will be perfect for all your Christmas crafting needs - scrapbooking, card making, December daily, even planning!! Be sure to scroll down to check out the VIDEO where you can get a good look at all these goodies and decide what you'd like to order - we will have them in the Scrap Shotz Store until they sell out!!


Here's a look at the goodies you'll find in the Scrap Shotz store:
A lovely coordinating Stamp Set
Shine Wood Veneer ready to use as is or to embellish
One of my favs!! A fabulous Sticker Pad with 800 stickers ready to create cards, tags and more!
Shiny Neat & Tangled sequins that coordinate perfectly


Nine gorgeous double sided patterned papers with beautiful rose gold foil:
Front-


Back-
(I love the branding strips!)


A 36 page single sided Paper Pad, which has all the papers you saw above, two of each side!
Coordinating Bazzill Cardstock in Blossom, Raven and White Linen


Here's a look at the VIDEO where you can get a great look at all these beautiful products!


I know you are going to love creating with the Kaisercraft Sparkle collection, so be sure to head over to the Scrap Shotz store to order! Thanks so much for stopping by, and I hope you have a fantastic week!


Monday, September 17, 2018

Gina K Wreath Builder

The GinaK Designs wreath builder templates have been all the rage - I finally had a chance to experience why they are so awesome!

Firstly, these templates help you make a one of a kind wreath quickly and easily. You position your paper which is usually a 3.75” or 4.00” square piece of paper, add the accompanying stamps…or the beauty is you can use any stamp from your stash into the template…and create a stunning wreath. The key is move your paper into the notches of the template with each rotation. (I will be demonstrating the GinaK Designs wreath builder in the booth at the Creative Stitches Carnival on September 21-22, 2018 at Spruce Meadows.)

In the meantime, here are a few fun looks to try.


This card was made with one stamp and with a change of colours would make a Christmas card. The card shown is for a friend that I am so thankful for.


Using the sentiment border and a rainbow of colours, this card took minutes to make - ok it took longer as I opted to emboss the sentiment!


At present I am smitten with ombre looks. The wreath builder template make it easy for me to stamp/blend colours and create an ombre coloured wreath.


The wreath builder works with standard size card fronts too - you need watch the corners but you are good to go!


Thanks for dropping by - I hope to see you at the Creative Stitches Carnival on September 21 - 22, 2018.


Friday, September 14, 2018

September kit project - Beach layout - Laura

Good morning!
I am excited to share my next layout with you using the September Kit featuring the Prima Santorini collection!


 I took this photo at one of our local beaches...Ty was just staring out at the water.

The paper I chose really reminded me of the beach!


I created a couple of clusters using the fabulous flowers from the kit and add on and the chipboard also from the main kit!


Keeping with the beach feel I added some cheese cloth behind the photo


To finish I added a journaling card and chipboard heart

Thanks for stopping by