Pattern Paper and Stamps:
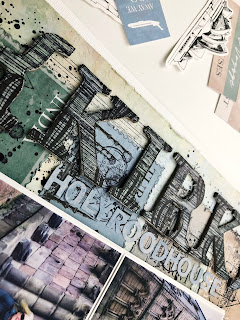
For this layout I customized the chipboard alphas in the word ‘Kirk’ to match using both pattern paper and stamps:
1) covered each letter with the blue air balloon pattern paper of the collection (Flight) using liquid glue
2) flipped them on their face once the glue had dried and cut around each letter with a craft knife. The chipboard gives the pen a place to push up against making this quick work
3) stamped the front of each letter over and over again with this grungy stripe stamp from my stash in Staz On Jet Black
4) using a black journalling pen I messily traced the outline of each letter on the edge of the pattern paper
Stamps and Watercolour Paint:
For my title ‘ROAM’ I used a stamp and some watercolour paints:
1) using the suitcase stamp from the Wild Whisper Designs, Where to Next? set and some Staz On Jet Black to just stamp over and over on the front of each alpha
2) scribbled some Vicki Boutin Art Crayon in blue/grey onto plastic, added some water and after mixing it up with a paint brush used it to paint each letter
Strips of Pattern Paper and Border Stickers:
For this title ‘Wallace’ I focused on the pattern paper and stickers of the Explorer collection:
1) cut thin 1/4 inch strips from my favourite patterns from the papers, branding strips and some of the border stickers from the collection
2) covered each letter with adhesive glue
3) messily laid down the strips of paper and border stickers in no particular order on each letter
4) once the glue dried, I flipped the letters over and used a craft knife to cut around each letter to get rid of the excess bits of paper and sticker bits
Some of my letters got a few random black splatters when I added those to the page - a fun touch!
Stamps and Splatters:
So many possibilities for making these chipboards perfect for your next layout. I should mention I didn’t prepare the letters in anyway with Gesso or anything. Also the chipboard set includes punctuation, arrows and as shown above chevrons too.
Thanks for stopping by!


