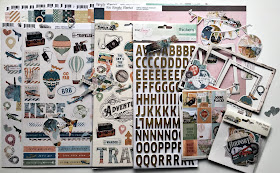
Wow. The kit features the Simple Stories, Simple Vintage Traveler collection which is full of amazing travel themed goodness. From geo tags to luggage tags, airplanes to hot air balloons - this kit is fabulous. Check it out!
I received a few of the Kit Add On items in my kit this month. All are available on Scrap Shotz online store if you want to add a few of these to your kit too.
I have been waiting for the perfect kit, collection, inspiration to document my 196 mile (299 kilometer) solo hike from end to end of the Pembrokeshire Coastal Path in Wales in 2008. As soon as I unpacked the March kit I knew I found it. Travelers Notebook (TN) project here I come!
I literally grabbed some of my favourite adhesives, my little scrapbooking stapler and my self-inking date stamp and sat down and just started making. With a kit that inspires me so much and where everything coordinates so fabulously I was able to knock out 6 pages and the cover of my TN in just over an hour. Don't you love when you are in your creative groove?
Have you ever created a Travelers Notebook before? I discovered this project size just last summer and I love it. It feels like a perfect companion to my traditional 12x12 scrapbooks. I use the larger size for the more artsy side of scrapbooking and the TN size for journalling.
Here are few tips I have picked up in just this short time - happy to share them with you here and would love to hear any tips you have!
- You do not need special TN supplies. I use all the same supplies I use for scrapbooking - like my March kit - it just goes so much farther using it on the smaller format. Love that!
- Work from a kit. Everything matches. You can literally grab any item and it will work.
- In the smaller "book" style format it looks great when there is a continuity of design from first to last page and working from a kit makes this super easy.
- Add a few similar embellishments to each page to help the design style continue from start to finish. I like to add a few random tiny staples, and a few stamps from my date stamp. I think these embellies also gives it that "traveler" look.
- Journal! Worried about how your writing looks - get over it (I say that with love!). A Travelers Notebook is meant to look a little messy and traveled. If your writing is also a little messy, like mine, all the better - that is what this format is about!
- Add some journal pen stitching around the edges of each page to help give it that travel, messy look and you might be surprised at how this will also make it easier to journal.
- If, like me, you plan on filling your pages with all kinds of dimensional embellishments (chipboard, foam dots, flair) consider taking a few of the center pages out to make more room in the book AND then use those pages you took out to back your photos!
I am off to keep on creating! More pages to come in my next post and I will definitely post a flip through video of the completed project too.
Thanks for stopping by.


No comments:
Post a Comment