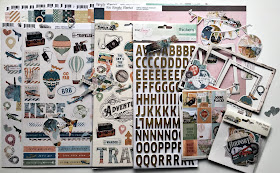
Hello friends! I'm here today to show a few layouts created with the March kit featuring the Simple Stories Vintage Traveler line. This kit has so much to offer!
With this first layout, I sprayed
dylusions "melted chocolate" ink spray just where I decided that I wanted to put my photo. This ink is wonderfully vibrant and I love the way it covers and drips. Once it dried, I wanted to put a bit of contrasting glam on top, so I dripped some gold Irresisible spray sparingly, then set it aside to dry thoroughly. I cut a panel of patterned paper from the kit, inked the edges with
Walnut Stain Distress Ink and adhered it to the top of the page. After I put my photo on the page, I inked the edges of the chipboard photo frame, then used glue dots to stick it on top. I added some sticker embellishments, always inking the edges, and used foam pop dots under some, giving the page more dimension. The title was cut out of a (probably vintage, lol) Quickutz die set called "Stardust." I used
Gina K Connect glue, and I can tell you that you don't want to change your mind after you've given that glue a moment. It's really super stuck! I did my journaling with a Pentel Liquid Gel Ink.
While we're traveling, I often pick up postcards from the souvenir shops or where ever they can be found. I love that I can use them immediately, they often have some fun information on the back and this one actually has an aerial photo of the resort that we stay in. I mounted the patterned paper on Bazzill cardstock. I cut the side banner off of the patterned paper, and backed it with Bazzill in the same brown as the base. I used some heart and you are here word and icon stickers to embellish the page. A bit of glossy accents on the stickers customizes and highlights them nicely. I did a line of journaling on the border strip and added a chipboard arrow. This one was really fast!

I love to do double pages! My first step is to tape together the base pages. This way I can always see the flow between them. For this spread I found posters online of the Broadway shows that we've seen and printed them on photo paper. I used 6" panels of patterned paper then used 3" strips of another pattern as borders. I mounted the photo and journaling spots on gold mat paper that matches the Thicker alphas in the kit. I also cut the stars out of the same gold. and spread them around. To give my title a little bit of movement, I used the curvy ruler in the
American Crafts Alphabet Alignment Guide available from Scrapshotz
here. I keep these guides handy and use them for almost every layout. They're perfect for titles.
My title uses a lot of A's. I actually ran out, but
used an upside down V on the last word, and most people won't notice. I
used pop dots all over the page, under some of the posters, stars and
journaling blocks.
While I think it's important that the 2 page spread is balanced, I like
to make sure that each of the single pages is also balanced and pleasing
to look at. Here you will notice that my star grouping goes over both
pages. I left the tape on the back for display purposes in my family room. To put it away, I will use an exacto
knife to cut the pages apart.
This month the Design Team was tasked to use the Creative Scrapbooker Magazine's monthly sketch to create a layout. Here is the sketch.
Here is my take on it.
I used a patterned paper from the Vintage Traveller line that already had some of the elements that would compliment my photos, and used the large block on the bottom to showcase a panoramic photo. The two smaller photos are just slightly overlapping, giving the page a pretty good balance. The title is from the sticker sheet, but it got sort of lost on the paper, so I outlined it with my journaling pen and that gave it just enough pop.

This "Haven't Been Everywhere" layout was fun to create! I layered some Snap cards from the kit with a quote page from the 6x8 add on pad, and adhered them in the center, so that they could curl up on the edges, looking like they were tossed in the pile. I matted the photo on black, then gave it something to sit on with a border sticker. I put a few pop dots under the bottom of the sticker to help it stay raised up, as well as the photo. The sticker dots and compass got a layer of glossy accents to liven them up. Journaling was done on the Post Card with a gel pen.

This last layout I'm sharing with you today is very simple. My friends seemingly coordinated their outfits for it - thanks, girls!! The yellow block journaling pattern was perfect and to give it interest, I used a collage patterned paper behind the photos. I printed the photos with the white border (one layer done!) and matted all the elements except the title on black Bazzill cardstock. The title was quickly done with the Thickers in the kit. (Thankfully, I didn't need any A's!) Simple, but I was really happy with the result.
I will be back next week to show you what else I've done with this kit. Until then, enjoy our spring weather, where ever you are!


