Hey Scrap Shotz Fans!
Today, I'm back and sharing with you three more projects that I created using the October Kit which features the fabulous Simple Stories line "Beautiful" which is filled with beautiful pastel colours and accented with black and white.
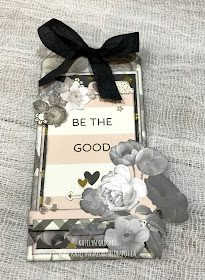
To kick off my projects, I decided to create a fun tag using one of the 3"x4" cards as the focal point on my tag.
To embellish the bottom portion of the tag, I mixed stickers, fussy cut images, silver sequins and washi tape. By adding the gold stickers, it picked up on the bit of gold patterned paper that I used on the tag.
At the top of the tag, I embellished it with a variety of stickers and used foam squares to create depth on my tag. At the top right hand corner of the tag, I added a tab sticker as well as a couple of silver stars. To finish the tag, I added some black seam binding ribbon to the top.
For my second project, I created a layered card using a variety of elements from the kit.
To add some interest in the top right portion of the card, I tore a bit of the patterned paper down and hid part of a heart in the now open area. In the top portion of the 3"x4" card, I trimmed a few banner stickers down and added them to the top of the card. I fussy cut the feathers from one of the 3"x4"cards.
In the top left hand corner I cut around a sticker to get rid of a lot of the white space. Just make sure to ink your edges.
To finish off the inside of your card, add three heart stickers in the bottom right hand corner.
For my final project using this kit, I created a wall hanging that's perfect to add to anywhere in your home. You'll want to read below as I've created a tutorial for you.
To start, cut a piece of chipboard that measures 4" x 6".
From the polka dot paper, cut a piece that measures 4" x 6". Distress the edges of the paper with an edge distressor. Ink the edges of the paper using Black Soot Distress Ink and a blending tool with foam.
Cut the 4" x 6" card down to 3 3/4" x 5 3/4". Distress the edges of the paper with an edge distressor. Ink the edges of the paper using Black Soot Distress Ink and a blending tool with foam.
From the mint floral patterned paper, cut a piece that measures 3 1/2" x 5 1/2". Distress the edges of the paper with an edge distressor. Ink the edges of the paper using Black Soot Distress Ink and a blending tool with foam.
Cut the 4" x 6" amazing card down to 3 3/8" x 5 3/8". Distress the edges of the paper with an edge distressor. Ink the edges of the paper using Black Soot Distress Ink and a blending tool with foam.
The last piece of paper you'll need to cut is the 4" x 6" card that has Follow Your Heart on it. Cut the card down to 3 1/4" x 5 1/4", Distress the edges of the paper with an edge distressor. Ink the edges of the paper using Black Soot Distress Ink and a blending tool with foam.
From the 4" x 6" card that has the pink floral at the bottom of it, fussy cut the floral images out. Ink the edges of the image using Black Soot Distress Ink and a blending tool with foam.
From the 4" x 6" card that has the mint floral at the top of it, fussy cut the floral images out. Ink the edges of the image using Black Soot Distress Ink and a blending tool with foam.
From some of the 3" x 4" cards left and any scrap pieces that have floral images on them, cut a couple of the single flowers out. Ink the edges of each floral image using Black Soot Distress Ink and a blending tool with foam.
Adhere the mint floral paper to the black map paper. Adhere the black map paper to the polka dot paper. Adhere the polka dot paper to the chipboard base.
In the top portion of the mint floral patterned paper, adhere the mint floral fussy cut images. in the bottom portion of the mint floral paper, adhere the pink floral fussy cut images.
Before adhering the Follow your Heart card, add some Cracked Pistachio Distress Crayon to the leaves of the flowers. Blend the distress crayon in with your finger. Adhere the Follow your Heart card to the black "amazing" card. Foam square the black card to the middle of the mint floral patterned paper.
If one of your floral elements has leaves, add some Cracked Pistachio Distress Crayon to the leaves of the flower. Blend the distress crayon in with your finger. Adhere both flowers in the bottom right hand corner of the wall hanging. At the end of the "t" on the heart word, add a gold heart. In the top right hand corner of the Follow your Heart card, add three sticker banners.
To finish the top of your wall hanging, add a piece of black ribbon.
Here's your wall hanging finished and ready to be hung.
Here's a closeup of how pretty the Cracked Pistachio Distress Crayon looks on the leaves.
The October Kit as well as the Add On's for the kit are available in the Scrap Shotz's store. Make sure to stop by the blog later this week, as Cathy is sharing more inspiration using the October Kit.
Thanks for joining me today!


Love all the projects! You always create the best layers!
ReplyDelete