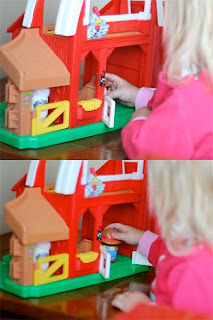
For this example, I am going to create a 4"x6" collage using 2 horizontal photos like this:
1. Open a new document (File -> New). A window will open that will give you a chance to create the size of photo collage that you want. For this example, I'm going to start with a 4"x6" canvas. So beside the width column, there will be a drop down box where you can choose inches. It may come up as inches or pixels or cm, etc. For this sample, we will use inches. Type 4 under the width and 6 under the height.
Make sure the resolution is set to 300 pixels/inch and the colour mode is RGB 8 bit. It doesn't matter what the background colour is as we will be covering it up but mine is usually white.
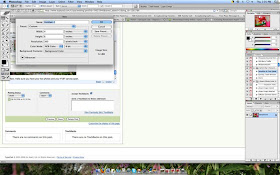
(click for larger view)
2. Click OK and you will see your canvas show up.
3. Open the photos you want to use. I opened 2 horizontal photos.
4. Do any colour adjustments to your photos that you want right now (turn them to black & white, sepia, boost the colour, etc.)
5. On the left hand side of your screen, there is a toolbar with a whole bunch of tools on it. Select the crop tool (it looks like a tilted diamond with a line through it). At the top of the screen, you will see some boxes appear.
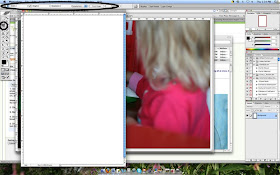
One says "width", one says "height" and one says "resolution". Since we are using 2 horizontal photos, we will be cropping them to 4"x3" so enter 4 as your width, 3 as your height and 300 pixels/inch as your resolution. This sets your crop tool to only crop photos to that size and resolution.
You could easily create a 4"x6' photo collage with four photos and have them all as different sizes, you just have to do the math to figure out what sizes you want them to be and what will fit on the canvas size you select.
So now that you've got your crop tool selected and set to the size you want, select one of your photos.
Click, hold and drag your mouse across the photo. You will see a box appear as you drag that is set to the proportion size you set earlier. Drag your mouse across the photo until you have the portion of the photo you want selected.
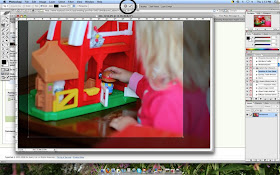
(click for larger view)
Once you let go of your mouse, the box will stay and you can set your mouse inside of the box to move it to whatever portion of the photo you want. Once you know what part of the photo you want to crop, on the top bar of your screen you will see a checkmark (and a circle with a line through it). If you are happy with the crop, select the checkmark (or double click your mouse or hit enter). If you are unhappy with the crop, select the circle with the line through it and re-crop your photo.
Repeat the above step for your second photo.
Now you want to move these two photos to your 4"x6" canvas.
Once again on the side toolbar, select the move tool. It looks like four arrows pointing in different directions.
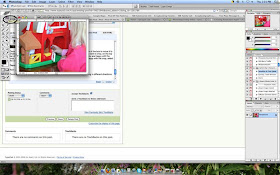
Now, make sure you have your two photos and your 4"x6" canvas open.
Move your canvas over to the side a bit so that you can see part of the photo and your canvas at the same time.
Click on one of the cropped photos and hold. Drag it over to the canvas. Do the same for the other photo as well.
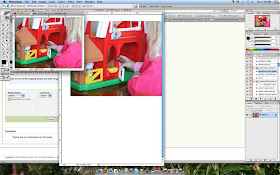
Now, here's a little trick I learned that has helped me immensely with creating perfectly lined up collages.
Under the View menu on the toolbar, go to "show" and select "grid". This creates a grid over your photos.
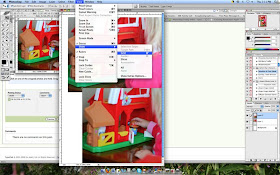
Again, go to the View menu but this time select "snap to" and "guides". This makes it so that when you select your photos to drag them, they will automatically 'snap' to the grid lines, which make it easy to perfectly line up your photos. Sometimes it looks like your photos are perfectly lined up but when you get them printed, there is a tiny white space between the photos and it's not a perfectly lined-up collage. The "snap to grid" tool eliminates this happening.
Continue to drag your photos (by selecting the different layers in your layers palette on the bottom right hand side) until they are lined up exactly where you want them.
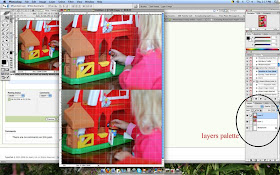
Now you can turn the grid off by going back to the View menu, "show" and clicking on "grid" again.
If you think you might want to make changes to this canvas in the future, you will want to save your canvas now. It will be saved as a .psd file with each layer open so that you can edit it again if you want.
However, before printed, you will need to flatten your image, so under the Layer menu, click on "flatten image". Now you can go ahead and save this as a .jpeg image for printing.
When you go to close your photos, make sure you DO NOT save them as you have adjusted the dimensions of your photos and you still want to save the photo as it was originally.
You can easily create collages of other sizes by following the same steps but using different dimensions. I frequently do this with 8"x10" photos as well as it saves a lot of money when printing photos.
I hope this tutorial was helpful. Please let me know if you have any questions or need help figuring things out.
There are so many great tutorials online that you can easily find by googling. I highly recommend checking out Jessica Sprague's Photoshop Friday Tutorials. They are full of fabulous, easy-to-understand information.

Wow Heather great tutorial! I love the look of a photo collage!
ReplyDeleteThanks for sharing this Heather!
ReplyDelete