Tuesday, October 17, 2023

49 and Market Christmas Spectacular 2023!

Hello Scrap Shotz Friends!

Sharing a couple of projects using the awesome 49 and Market Christmas Spectacular 2023


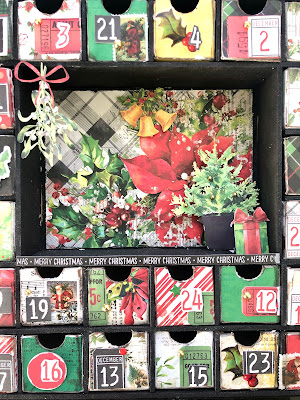
First up is this Kaisercraft Advent Calendar, this is a DIY advent calendar which provides all the pieces for you to assemble and then decorate with your choice of products. 

Kaisercraft no longer produces these calendars so if you want one grab it quickly!  

You can save yourself a bunch and take advantage of the PICK UP ONLY pricing if you're in Calgary!

I painted all the pieces, excluding the boxes, with black acrylic paint and then assembled. 

The individual boxes are assembled and covered with Christmas Spectacular 2023 6x8 papers, Scor-Tape and liquid adhesive.


After covering the boxes with patterned paper, I sanded the edges and inked them with Vintage Photo Distress Ink, you can use any dark brown ink for this. 

The date numbers are a combination of fussy cut and trimmed numbers from the Christmas Spectacular 2023 Ephemera Ticketed


Boxes are also embellished with the Washi Tape Postage Roll, Chipboard Set and Acetate Foliage.


The centre portion is covered with paper trimmed from the 12x12 collection pack (background and word strip). Hanging holly and potted tree are from Laser Cut Outs Greenery. The present is fussy cut from the Laser Cut Outs Greenery packaging. 

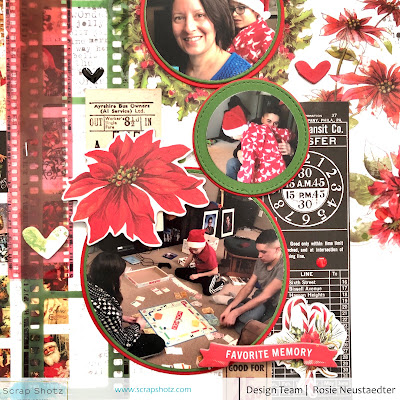
Next up is this layout which is based on this card sketch from Scrapbook and Cards Today.


I love how many fun, coordinating products 49 and Market offers for each of their lines!

The background is from the 12x12 collection pack which I trimmed and matted on a black cardstock base. The photos are cut into circles with a circle cutter and matted on cardstock cut with nesting circle dies.


The photo mats are layered over cards from the Ticketed Ephemera, the left side of the layout holds borders of Washi Tape Roll-Postage along with Film Strip Frames.


I've also added Acetate Foliage, pieces from the Chipboard Set and a heart and dot from the Wishing Bubbles & Baubles.

Thanks for stopping in!

Saturday, October 14, 2023

Cocoa Vanilla Studio - More Happy Days

Here to share some more Cocoa Vanilla Studio, Happy Days goodies from the Scrap Shotz shop and how they are shaping up into summer loving layouts from my scrappy space! 

For a peek at my first few pages with this amazing collection, pop over to Cocoa Vanilla Studio - Happy Days. Now let’s get to my newest layouts … 

Embrace The Alphas


For this layout, I reached for the Cocoa Vanilla Studio - Happy Days, Chipboard Title Stickers. I love the doodled look of the alphas and wanted to use as many as I could on a layout - so decided to use them as my background! 

I prepped this pattern paper from the collection with some black splatters. I also added a few random texture stamps and phrase stamps from my stash around the edges using Paper Rose Studio, Premium Dye Ink - Intense Black. This creates a sort of frame for the layout and love how it draws the eye to the middle of the page. I then used Ranger Ink, Distress Ink in Black Soot and one of my way-too-many stencils from Vicki Boutin and shaded in some colour in the middle of the page to anchor the alphas and my photos. I added a few small touches of the stencil to the edges of the page too. 


From there, I picked my favorite titles and spelt those out across the middle of the page - using a ruler to make sure they stayed straight. I wasn’t worried about covering up some the titles with my photos, that’s part of the fun. I did put the titles a little off set though and added the heart chipboards in between for a touch of colour. 

I then added two small photos, with a few collection patterns layers behind, and then just tucked and layered the florals from the Cocoa Vanilla, Happy Days - Floral Ephemera in and around the photos. My final touch was a couple little tucked tags with black/white twine and the collection die cut butterflies. 

All The Pattern Paper 


For my next magic trick (ha ha), I reached for every single pattern in the collection - they are all so pretty! 

First, I had to create my background. I cut down a 12x12 piece of cardstock to 11.75x11.75 and backed it with the cut apart pattern paper. I like how the cut apart has so many different colours and patterns making the edge of a layout a lot of fun. I used Ranger Ink, Distress Ink in Black Soot and a paw print from Peartree Cutfiles to add some paws to the background, and matched some Distress Inks to the Happy Days collection to add some small splatters around the paws. 

Now let’s get to the pattern paper! First I cut 3 pattern pieces in about 6.5 wide and 9.5 high; used a white journal pen to quickly and messily outline the edge then layered and titled them so just edges of each were peeking out and dropped those in the middle of the page. I reached for my 4 photos and added a layer or two of pattern behind each - also tilted and outlined in a white journal pen. I dropped those down on the larger pattern a little messy too but generally in a grid pattern. No straight lines on my layouts. 


For the final touch, I cut a few thin circles from the pattern paper and tucked them behind the top right and left bottom corner photos. I used the circle to anchor my title from the chipboard alphas and tucked in a few of the florals too. I used the same white journal pen to add some white lines to the leaves of the floral bunches. 

I had such fun with this Cocoa Vanilla collection - definitely one to add to your shopping cart for those summer, hot vacation or everyday playful photos! 


Wednesday, October 4, 2023

Simple Stories Here and There Layouts

Hello! Today I have two scrapbook layouts featuring the Simple Stories "Here and There" Collection.

If you did any traveling recently, this will be the collection for you! The main colours are dark blue, dark orange and pink. They really make light and bright pictures jump off the page. The shop has the kit and many embellishments available.


The first layout was inspired by the September challenge sketch in the Scrap Shotz Facebook group. I tend to have a hard time leaving white space on a page so this sketch was good for forcing me to use only one corner of the paper. 

To start, I double matted my photo. Then I cut some strips of paper and used a cardstock sticker for the strips at the bottom. The diagonal paper came in the kit but I added a piece of ribbon for dimension. The flowers are fussy cut from one of the papers. The rest of the embellishments are chipboard stickers or cardstock stickers. The final touch was to use a white pen to journal and then splatter some gesso.


My next layout was built around the title. I used my Silhouette Cameo to weld together the letters from the font. I backed each letter with a different colour from the striped paper in the kit. It always takes me so long to do but it was worth it. This page has more cardstock stickers for embellishments. I kind of cheated with the photo matting and just put strips of paper down the sides of the photos. Overall, I'm glad I got three more large pictures from our Wisconsin Dells trip on a layout!

That's all for today. Have fun scrapping!