Tuesday, September 26, 2017

New Great Outdoors Page Kit!

Well, you've all been waiting, and it's finally here!! We've listened and we've created a fun and fabulous page kit just for you! This kit is going to be great to get your summer and outdoors pics into your albums 💓

Here's a look at the Great Outdoors double page layout that the kit is based on:

And here a few closeups of just some of the awesome goodness you'll get in your kit!

Precut title, wooden buttons and sequins

Diecut Clouds and stamped index tabs

Wooden embellishments, stitched diecut circle for journaling and hemp string

These supplies are included in your kit:
-8 ½ x 11” Black Cardstock
-Six 12x12 pieces of patterned paper
-Two 12x12 pieces of white cardstock
-Diecuts including: Precut Title, Stitched Circle, 2 Clouds, 3 Stamped Index Tabs, 2 Flower Circles
-Embellishment bag also including: Wood Veneer pieces, 2 Luggage Tags, Hemp String, Wooden Buttons, Sequins, Enamel dots
-Completed Layout photo, Sketch to follow, Paper Cutting Directions and Complete Detailed Instructions

You only need your adhesives, ink to sponge on paper edges if desired and I find it helpful to use a grid ruler for positioning.

Thanks so much for stopping by! Be sure to check out the Scrap Shotz Store to find this exclusive, limited edition kit and keep your eyes open for more to come!


Wednesday, September 20, 2017

Flowers and Butterflies

I am still all about flowers and butterflies! I have done some Christmas stuff, but I'm not quite ready yet! First up are two cards featuring the great stamp set from Waffle Flower called Pretty Wings and the matching die set

I love this set. So many possibilities and no fussy cutting. The wings can be layered and there is a little body shape for each set of wings, and the flowers can be layered too. 

On my first card I used some watercolour paper, stamped some butterfly wing images and embossed them in Emerald Creek clear embossing powder  and then for the colour I used Color Bursts from ken Oliver.


And I kept the under sheet I had after spraying and making a mess, and used it to die cut my flowers. No sense wasting pretty paper!

I then used my Kelly Creates Studio Love stamp, inked in Distress Oxide Wilted Violet and then embossed with Emerald Creek Fractured Ice.


I love the rich colour from the Color Burst but it still looks watercoloured. I also used some Lawn Fawn Watercolur Paper to layer behind my Color Burst piece.

I used the Pretty Wings die cuts for the flowers on this one and added a few 49th and Market Pink Flamingo flowers for the centers. 

 And the finished card in shades of purple.


The second card is in shades of blue.

I stamped my images in Distress Oxide using the colours Faded Jean and Salty Ocean. For the little antenna and the center of my flowers I used Nuvo Crystal Drops in Caribbean Ocean

I put my layers together and used some pop dots to add some dimension. All the butterflies are popped up and I just kind of rolled the wings around my finger to make them pop a bit more.
And for just a bit more texture I embossed the green Lawn Fawn Watercolor Paper with the Darice Fern Background Embossing Folder.


And for my last project I did a reverse canvas.

I used some of the wonderful chipboard from SRTC and used Distress Oxide Peeled Paint then embossed in EC Fractured Ice and did the branch part in EC Burnt Copper Leaves

For the background I used some TH cork and ran it through the Fern Background folder and just highlighted the leaves with Distress Ink in Peeled Paint.

For the center I used Kelly Creates "Create" stamp and embossed ii in EC Hammered Metal.

A little sign post from American Crafts Thickers and the beautiful flowers from 49th and Market in Blue Hawaiian


The finished canvas! I also added a couple of the TH Quote Chips on the side and did a small strip of metallic blue on the canvas.
 
Thank so much for stopping to have a look and click on the links for all the great products that are available from Scrap Shotz!!
 
Have a great day!
Cathy

Tuesday, September 19, 2017

Using American Crafts Thickers


Hey Scrap Shotz fans!! I'm Cathy and I am very excited to share my first post here as a member of the Scrap Shotz Design Team. I received a package of supplies, all available from Scrap Shotz, and could not wait to get started. My first post is two projects, but I made them so they could go together! 

Part one of this project is a gift box decorated with Thickers Fresh Start set, Lawn Fawn Watercolor Paper and one of my loves, Distress Oxides and regular old Distress Ink.

I found this little box in my stash and thought it would make a great gift box, for a small gift or even a gift card, or my second project :)


I nice layer of Distress Oxide in Salty Ocean, then a very small splatter of water.

I added the Wilted Violet by smooshing the pad on my craft mat, spritzing it with water then dabbing the box into the color.

I cut out paper to fit the sides and top of the box and then edged it in Wild Honey Distress Ink.

After the pieces were attached I splattered the whole box with Wilted Violet.

And here is the completed gift box with all the panels done and my Thickers added, all the stamp sayings are from a Tim Holtz set. 

I didn't love all the yellow, so I used the blue watercolor paper and layered it so there was just a touch of the yellow showing.

All four sides are done with a stamped saying and one of the pretty Fresh Start Thickers.


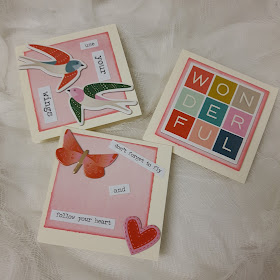
For my second project I wanted to keep using the Fresh Start Thickers and thought a set of little cards would go great in the gift box. All the cards are 3X3 and all the layers are done with the Lawn Fawn Watercolor Paper. The word stickers are from the Tim Holtz Big Chat line and also from the Small Talk book.

I did one set of 3 using a blue base and edged the watercolor paper in Faded Jeans

The second set of 3 I used pink and cream together and edged the watercolor pieces in Worn Lipstick.

The whole set of 6 little cards (envelopes too) fit right in the box.

And here are both projects together! I think this would make a great little gift for a teacher or co-worker.

I hope you liked these two projects and I will be back tomorrow showing you some other amazing products you can find in the Scrap Shotz Online Store!

Have a great day everyone.
Cathy

Monday, September 18, 2017

Christmas Crafting Part 2

Hey Scrap Shotz Fans!

I'm back with part 2 of my Christmas Crafting projects which feature a home decor project and ATCs using Kaisercraft's "Christmas Edition" paper collection.

For my home decor project, I decided to transform an already vintage looking picture frame into a fabulous altered home decor piece. 


To add some extra interest to the vintage picture frame, I used a Black Soot Distress Crayon  and highlights of White Gold Art Alchemy Metallique Wax along the edges of the frame.


In the top half portion of the frame, I applied some Silver Gem Nuvo Paste through the Fancy Stars Template from Kaisercraft. Lift the stencil off and your left with pretty silver stars. Once the stars have dried, adhere a snowflake and a sentiment in the top left hand corner. 


In the bottom right hand corner, use foam squares and adhesive to adhere the deer beside the tree fussy cut image. After the deer and tree have been adhered, use a palette knife and add highlights of Silver Gem paste to the tree. To finish off the bottom portion of the frame, add a couple more snowflakes. 


For my last project, I created a set of two ATCs. 


For my first ATC, to add some extra interest on the piece of patterned paper, I laid the Fancy Stars stencil over the entire surface of the patterned paper piece and placed the Silver Gem Paste through the stencil. Once the stencil is lifted off, allow the fancy stars to dry. After the fancy stars have dried, use foam squares and adhesive to adhere fussy cut images and images from the Collectables package. The Merry Christmas Sentiment came from one of the tear off strips from the bottom of the patterned paper. Make sure to ink all the edges of the fussy cut images to make them pop against the stenciled background.


With the Fancy Star stencil still out, place the stencil on the right hand side of the patterned paper and apply Silver Gem Glitter Paste through parts of it. Pull off stencil. After the Fancy Stars have dried, layer on the corners from the Collectables pack. Die cut three trees using the Tall Trees Die from Penny Black. Adhere trees as desired. The Christmas Wishes sentiment came from the sticker sheet in the Christmas Edition patterned paper pack. To finish off the ATC, I added a few sequins around the sentiment.


All of the products that I've used today on my projects are available in the Scrap Shotz's store. 

Thanks for joining me today! Make sure to tune in tomorrow as another design team member will be sharing their projects.

- Katelyn


Sunday, September 17, 2017

Christmas Crafting Part 1

Hey Scrap Shotz Fans!

I'm excited to kick off my first post as a design team member sharing with you some Christmas projects featuring Kaisercraft's "Christmas Edition" collection available at Scrap Shotz's

The design team members who designed fabulous projects with the September Kit, used this page sketch from Stuck?! Sketches and I thought I would also play along and use it for my first project. 


Here's my scrapbook layout using inspiration from the sketch.


In the bottom right hand corner of my layout I added my "Winter" tittle using Black Rainboots Thickers. To highlight around the word, I added a fun little snowflake charm from Emerald Creek Craft Supplies as well as a few sequins.


On the top portion of my layout, I layered together patterned paper, cut outs from the Collectables that match the Christmas Edition paper and fussy cut images from the patterned paper. To make the cut out images pop, I inked the edges of them with Black Soot Distress Ink. To tie in the bottom right hand corner of the layout, I added the snowflake charms and sequins to the top portion of the layout. To finish off some one of the tags, I added a twine thread bow.  


For my second project, I created this pretty Christmas Card.


On the music note paper, I took the Fancy Stars stencil from Kaisercraft and put Tonic Studios Nuvo Glimmer Paste - Silver Gem through it. Lift off the stencil and your left with fabulous sparkly stars on your music note paper. 


Once the paste was dry, I layered a die cut circle out of the Christmas Edition patterned paper, die cuts from the Collectables - Christmas Edition, fussy cut images and sequins. For the paper elements I made sure to ink the edges using Black Soot Distress Ink. For the sentiment on the front of the card, I used one of the sentiments found on the tear strip at the bottom portion of the patterned paper. 


For the inside of the card, I cut a piece of patterned paper that measures 4 1/8" x 5 3/8". For the sentiment on the inside of the card, I used another one of the sentiments found on the tear strip at the bottom portion of the patterned paper. 


All of the products that I've used today on my projects are available in the Scrap Shotz's store. 

Thanks for joining me today! Tune in tomorrow as I share a few more projects using this fabulous paper collection. 

- Katelyn


Friday, September 15, 2017

Darice: Thanks Embossing Folder


Embossing - it is my weakness, be it dry embossing or heat embossing, I'm completely smitten with its magic!

This month one of the products I am working with is the Darice Thanks Embossing Folder. I never have enough Thank You cards and embossing folders make stunning cards in literally seconds.

For this card, I inserted a chocolate colored piece of card stock into the embossing folder and ran it through my Vagabond. To jazz it up, I brushed Worn Lipstick Distress Oxide ink over the embossed areas and wrapped it with gold quilting thread that was sitting on my desk. Voila! 


Then I decided to apply Worn Lipstick Distress Oxide ink directly to the embossing folder. Here is the resulting card. Again, it was quick and easy to create this thank you card. (I added a few of the 49 Market flowers to spiff up the card.)


As you know, I am smitten with sparkle! So I added foil to my cardstock before using the embossing folder. In the gold foiled example, I used the Minc to adhere the foil before using the embossing folder. With the teal foil, I used the pressure of my Vagabond (or any die cutting machine) to adhere the pieces together. Then I peeled off the top layer leaving the beautiful color on the cardstock.


With the foil in place, I inserted each into the embossing folder and ran it through my Vagabond.


When I removed the teal foil, I noticed a couple of spots where the foil had not adhered fully. I decided to use my fine grit sandpaper and lightly sand various spots on the foiled cardstock. Under the foil was tacky adhesive. To the tacky adhesive, I applied some Elizabeth Craft Glitter Ritz in a warm tone. It adhered easily and leaves a brilliant sparkle and shine.

Here is a close up of the card foiled in gold with my Minc.


And here is a close up of the card foiled in teal using the pressure of my Vagabond.


I hope you were inspired by my projects - if you have any questions, please post in the comments below.

-Virginia